Creating image overlays
An image overlay is an interactive editing surface that is placed on top of a selected image. They enable users to edit images and preview adjustments to images immediately and in context.
For example, imagine an app that applies effects to an image. Overlays allow the user to select an image in their design, choose an effect via the app, and see an in-place preview of what the effect looks like before applying it.
Our design guidelines help you create a high-quality app that easily passes app review.

Features
- Apps can create image overlays for raster images. (Vector images are not supported.)
- Overlays are compatible with most image content, including image elements and page backgrounds.
- Overlays can receive pointer events, which allows apps to support brush controls.
Cropping and flipping
In Canva, users can crop and flip images. When a user opens an overlay though:
- Apps can only access the uncropped and unflipped version of the image.
- Apps cannot detect if an image has been cropped or flipped.
This behavior is intentional, but it does have some possibly confusing side effects.
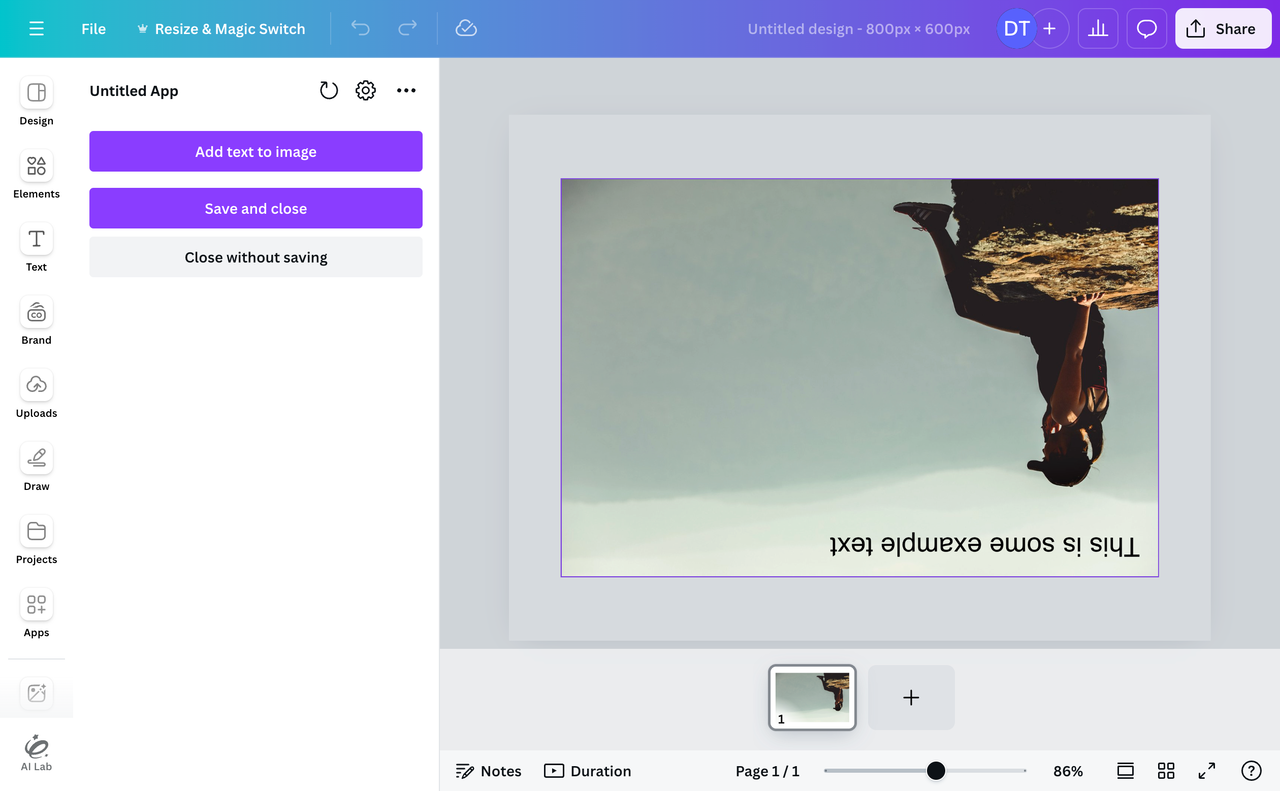
To understand these side effects, imagine an app that adds text to the top-left corner of an image. If the image is not cropped or flipped, the app works as expected.

If the image is cropped before the overlay is opened though, the text may only be partially visible. This is because the text is being added to the entire image, not only the cropped (visible) portion of the image.
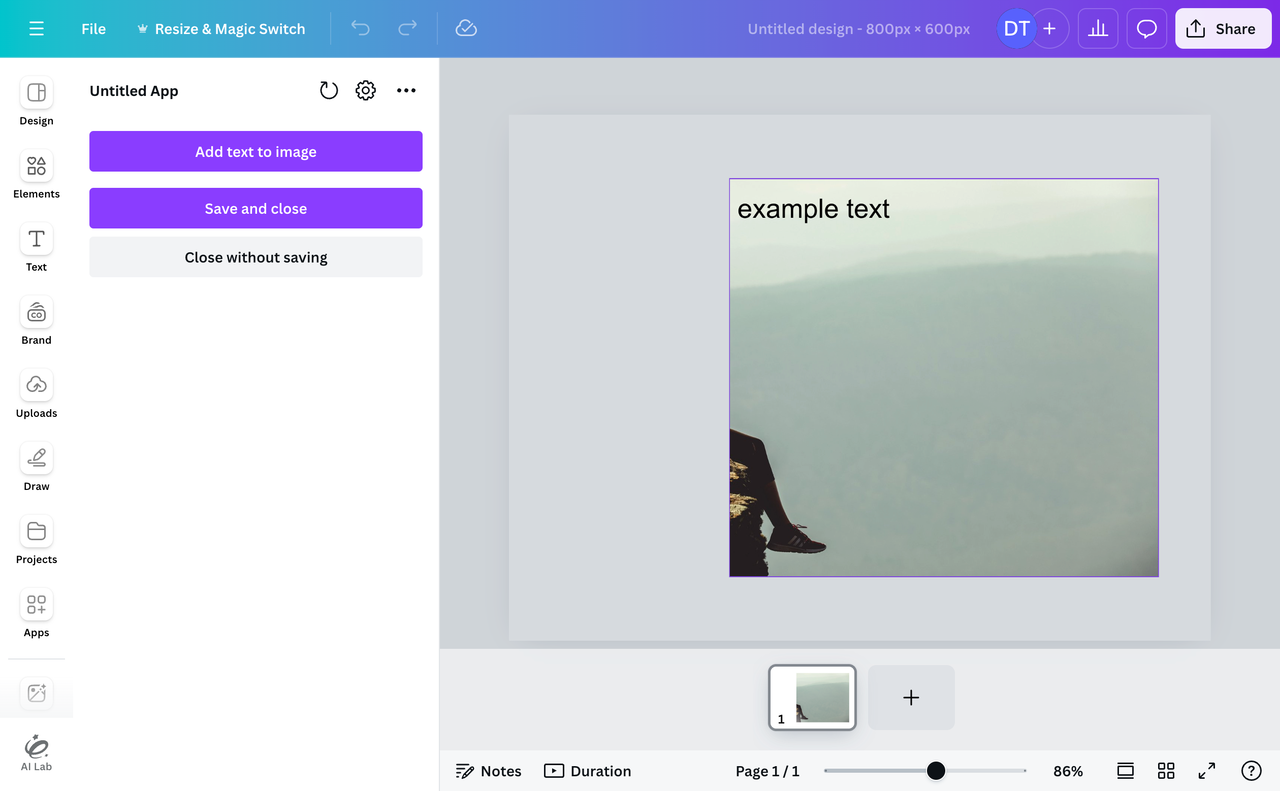
If the image is flipped before the overlay is opened, the text will appear upside down, in the bottom-right corner. This is because the text is being added to the original image in its unflipped state.
To account for this behavior, we recommend:
- Testing your apps with images that have been cropped and/or flipped.
- Rendering UI elements in the object panel, not the overlay iframe. (See the design guidelines.)
How to create image overlays
Step 1: Enable the required scopes
In the Developer Portal, enable the following scopes:
canva:design:content:readcanva:design:content:writecanva:asset:private:readcanva:asset:private:write
In the future, the Apps SDK will throw an error if the required scopes aren't enabled.
To learn more, see Configuring scopes.
Step 2: Open an overlay
-
Import the
useOverlayhook from the@canva/app-hookspackage:import { useOverlay } from "@canva/app-hooks";TSX -
Call the hook with an argument of
"image_selection":const overlay = useOverlay("image_selection");TSX -
Create a function that calls the overlay's
openmethod:function handleOpen() {overlay.open();}TSX -
Render a button that, when clicked, calls the
handleOpenfunction:return (<div className={styles.scrollContainer}><Rows spacing="2u"><Buttonvariant="primary"disabled={!overlay.canOpen}onClick={handleOpen}>Edit image</Button></Rows></div>);TSX -
Use the
canOpenproperty to disable the button if the overlay can't be opened:<Button variant="primary" disabled={!overlay.canOpen} onClick={handleOpen}>Edit image</Button>TSXThese are some examples of when an overlay can't be opened:
- an image isn't selected
- more than one image is selected
- an overlay is already open
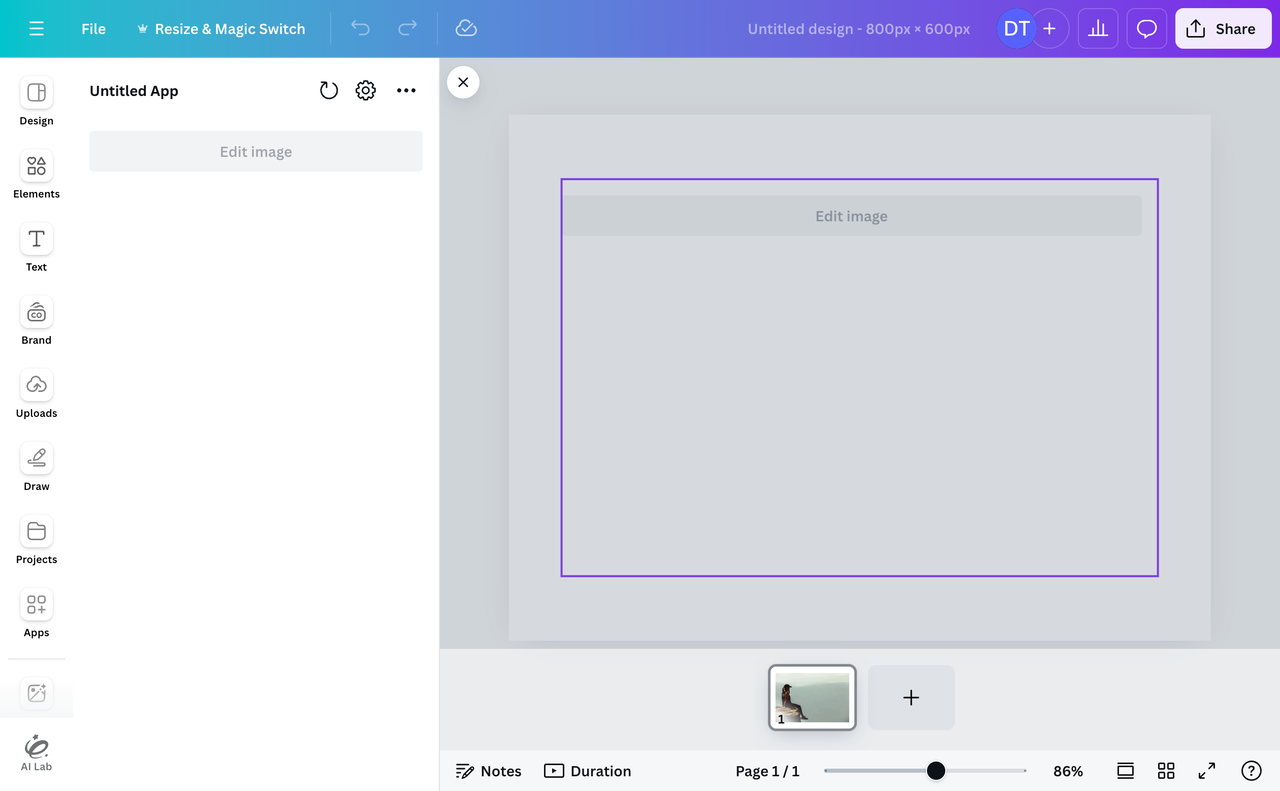
This is what the app looks like when the overlay can't be opened:
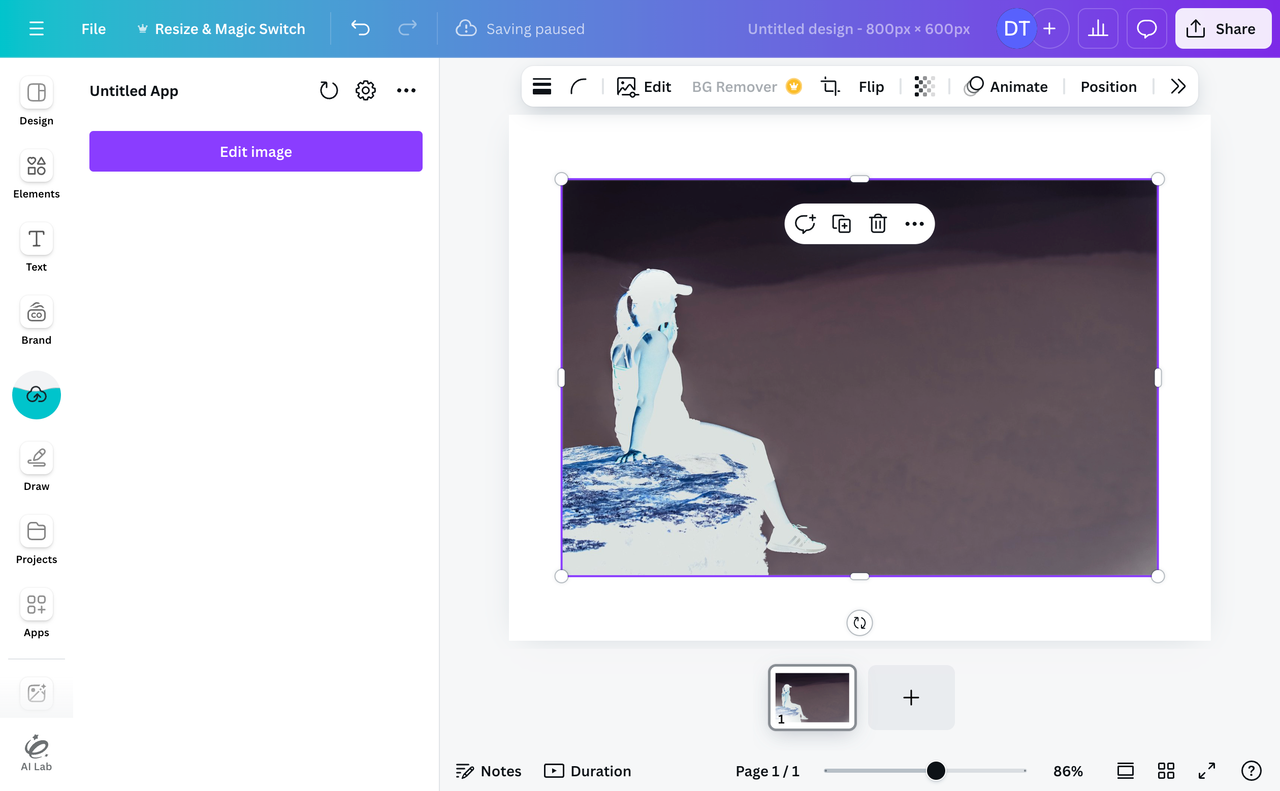
This is what the app looks like when the overlay can be opened:
At this stage, the code should look like this:
import { Button, Rows } from "@canva/app-ui-kit";import * as React from "react";import * as styles from "styles/components.css";import { useOverlay } from "@canva/app-hooks";export function App() {const overlay = useOverlay("image_selection");function handleOpen() {overlay.open();}return (<div className={styles.scrollContainer}><Rows spacing="2u"><Buttonvariant="primary"disabled={!overlay.canOpen}onClick={handleOpen}>Edit image</Button></Rows></div>);}
To verify that the code works:
- Open the app in the Canva editor.
- Add an image to the design.
- Select the image.
- In the app, click Open.
An iframe should appear on top of the selected image. This iframe will load the same JavaScript bundle that's loaded in the object panel, which means the same user interface will be rendered in both iframes.
This isn't what we ultimately want, but it's a step in the right direction.
Step 3: Check the current surface
At the moment, we're always running the same code, regardless of where that code is running. What we actually want is to run one code path in the object panel and a separate code path for the image overlay.
To run different code based on where the code is running:
-
Import the
appProcessobject from the@canva/platformpackage:import { appProcess } from "@canva/platform";TSXThis object has a
currentproperty that contains methods for interacting with the current process. It's beyond the scope of this topic to explain processes, but the key point is that each iframe has its own process. -
Call the
getInfomethod to retrieve the information about the current process:const context = appProcess.current.getInfo();TSX -
Use the
surfaceproperty to identify the iframe in which the code is running:if (context.surface === "object_panel") {return (<div className={styles.scrollContainer}><Rows spacing="2u"><Buttonvariant="primary"disabled={!overlay.canOpen}onClick={handleOpen}>Edit image</Button></Rows></div>);}if (context.surface === "selected_image_overlay") {return <div>This is the selected image overlay.</div>;}TSXThe
scrollContainerstyle should only be applied to the object panel content.
For the sake of readability, extract the code for each surface into separate components:
import { Button, Rows } from "@canva/app-ui-kit";import { appProcess } from "@canva/platform";import * as React from "react";import * as styles from "styles/components.css";import { useOverlay } from "@canva/app-hooks";export function App() {const context = appProcess.current.getInfo();if (context.surface === "object_panel") {return <ObjectPanel />;}if (context.surface === "selected_image_overlay") {return <SelectedImageOverlay />;}throw new Error(`Invalid surface: ${context.surface}`);}function ObjectPanel() {const overlay = useOverlay("image_selection");function handleOpen() {overlay.open();}return (<div className={styles.scrollContainer}><Rows spacing="2u"><Buttonvariant="primary"disabled={!overlay.canOpen}onClick={handleOpen}>Edit image</Button></Rows></div>);}function SelectedImageOverlay() {return <div>This is the selected image overlay.</div>;}
Based on these changes, the object panel and overlay iframes will contain different content.

Step 4: Check if an overlay is open
It's often useful for an app to keep track of whether or not an overlay is open. For example, an app usually needs to render different controls in the object panel while an overlay is open.
To do this, use the isOpen property that's returned by the useOverlay hook:
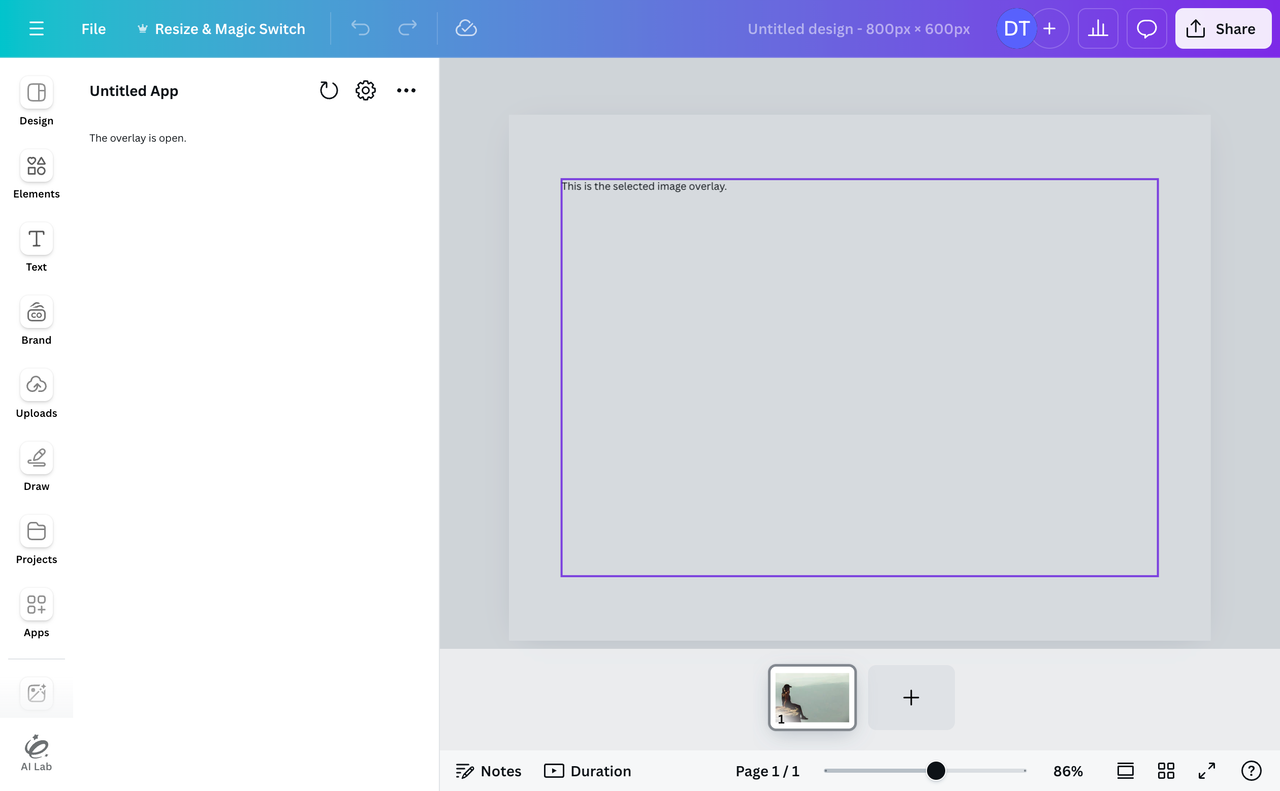
if (overlay.isOpen) {return <div className={styles.scrollContainer}>The overlay is open.</div>;}return (<div className={styles.scrollContainer}><Rows spacing="2u"><Buttonvariant="primary"disabled={!overlay.canOpen}onClick={handleOpen}>Edit image</Button></Rows></div>);
Based on this change, this is what the app looks like when the overlay is open:
Step 5: Close the overlay
An app can close an overlay at any point in its lifecycle, such as when a button is clicked, but when an overlay is closed, it's also important to consider the users intent:
- Sometimes, the user wants to persist the changes they've made to the image.
- In other cases, the user wants to reset the image to its original state.
Your app should account for both use-cases.
Here's what we recommend:
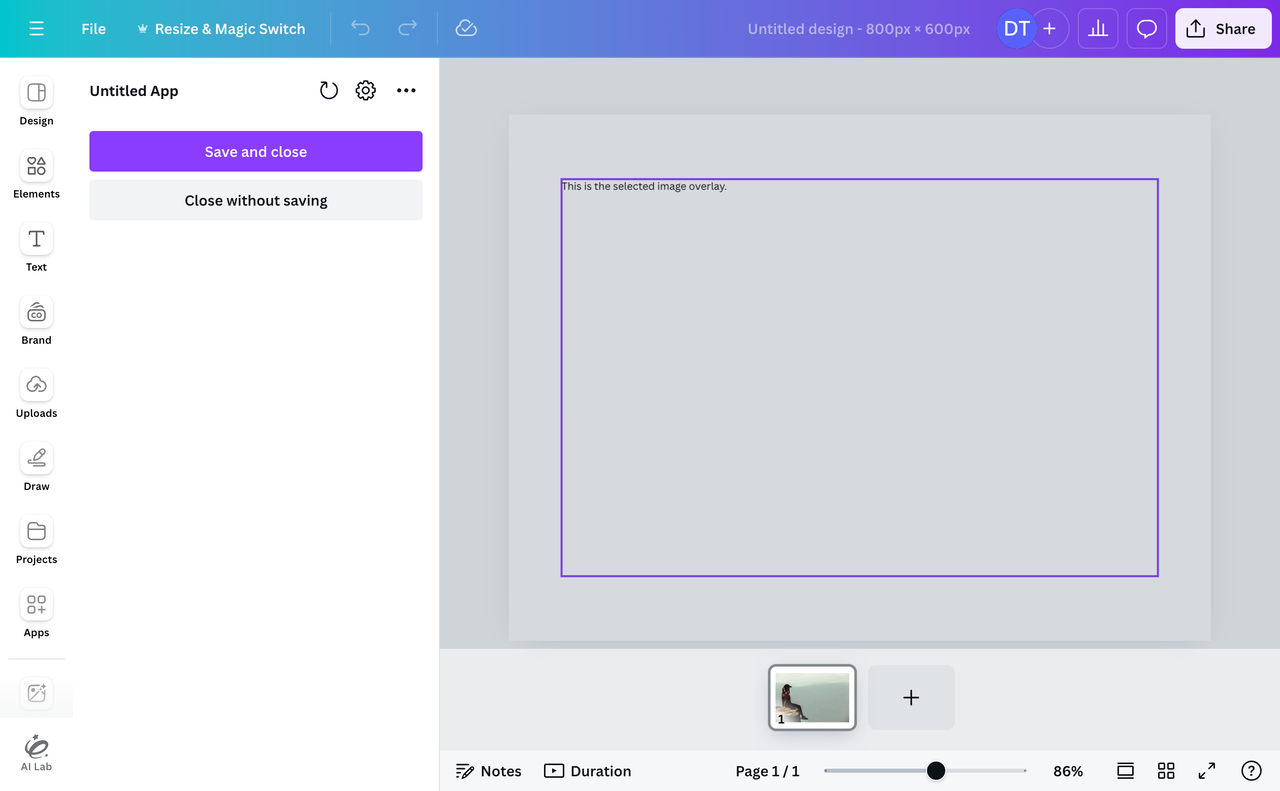
-
When the overlay is open, render buttons that each call a function:
function handleSave() {// TODO: Close the overlay and save changes}function handleClose() {// TODO: Close the overlay without saving changes}if (overlay.isOpen) {return (<div className={styles.scrollContainer}><Rows spacing="2u"><Button variant="primary" onClick={handleSave}>Save and close</Button><Button variant="secondary" onClick={handleClose}>Close without saving</Button></Rows></div>);}TSX(These buttons should be rendered in the object panel.)
-
In each function, call the
closemethod that's returned by theuseOverlayhook:function handleSave() {overlay.close({ reason: "completed" });}function handleClose() {overlay.close({ reason: "aborted" });}TSXThe
reasonproperty indicates why the overlay is being closed.For the time being, there is no difference between either option. In a later step though, we'll use the
reasonproperty to determine whether or not the app should persist changes to the image.
Based on these changes, the overlay can be opened and closed.
Step 6: Render the selected image
When an app opens an overlay, it needs to download and render the selected image within the overlay. The app can then manipulate this copy of the image however it wants and, if the user is satisfied with their changes, replace the original image.
Let's explore how to do this.
Download the image
-
Import the
useSelectionhook from the@canva/app-hookspackage:import { useSelection } from "@canva/app-hooks";TSX -
Import the
getTemporaryUrlmethod from the@canva/assetpackage:import { getTemporaryUrl } from "@canva/asset";TSX -
Call the
useSelectionhook from theSelectedImageOverlaycomponent:const selection = useSelection("image");TSX -
In a
useEffecthook, get the URL of the selected image:React.useEffect(() => {const initializeCanvas = async () => {const draft = await selection.read();const [image] = draft.contents;if (!image) {return;}const { url } = await getTemporaryUrl({ type: "image", ref: image.ref });};initializeCanvas();}, [selection]);TSXThe Edit image button will only be active if a single image is selected, so we can assume the
draft.contentsarray only contains a single element. -
Use the following function to download and get the dimensions of the image:
async function downloadImage(url: string) {const response = await fetch(url, { mode: "cors" });const blob = await response.blob();const objectUrl = URL.createObjectURL(blob);const img = new Image();img.crossOrigin = "anonymous";await new Promise((resolve, reject) => {img.onload = resolve;img.onerror = () => reject(new Error("Image could not be loaded"));img.src = objectUrl;});URL.revokeObjectURL(objectUrl);return img;}TSXFor example:
React.useEffect(() => {const initializeCanvas = async () => {const draft = await selection.read();const [image] = draft.contents;if (!image) {return;}const { url } = await getTemporaryUrl({ type: "image", ref: image.ref });const img = await downloadImage(url);const { width, height } = img;};initializeCanvas();}, [selection]);TSX
Do not get the selected image outside of the overlay. Getting the selected image and opening an overlay are asynchronous operations, so if the selection changes, an image passed into the overlay may be stale.
Render the image
In the SelectedImageOverlay component:
-
Use the
useRefhook to create a ref for anHTMLCanvasElement:const canvasRef = React.useRef<HTMLCanvasElement>(null);TSX -
Return an
HTMLCanvasElementthat's connected to the ref:return <canvas ref={canvasRef} style={{ width: "100%", height: "100%" }} />;TSXThe
styleproperties are important. They ensure that theHTMLCanvasElementexpands to fill the dimensions of the iframe, which means the element will grow or shrink based on the browser's zoom level. -
In the
useEffecthook, draw the image into theHTMLCanvasElement:React.useEffect(() => {const initializeCanvas = async () => {// Get the selected imageconst draft = await selection.read();const [image] = draft.contents;if (!image) {return;}// Download the selected imageconst { url } = await getTemporaryUrl({ type: "image", ref: image.ref });const img = await downloadImage(url);const { width, height } = img;// Render the selected imageconst { canvas, context } = getCanvas(canvasRef.current);canvas.width = width;canvas.height = height;context.drawImage(img, 0, 0, width, height);};initializeCanvas();}, [selection]);TSXThis code uses the following
getCanvasfunction to get a canvas and its context in a type-safe way:function getCanvas(canvas: HTMLCanvasElement | null) {if (!canvas) {throw new Error("HTMLCanvasElement does not exist");}const context = canvas.getContext("2d");if (!context) {throw new Error("CanvasRenderingContext2D does not exist");}return { canvas, context };}TSX
The code for the SelectedImageOverlay component should look like this:
function SelectedImageOverlay(props: { launchParams: LaunchParams }) {const canvasRef = React.useRef<HTMLCanvasElement>(null);React.useEffect(() => {const initializeCanvas = async () => {// Get the selected imageconst draft = await selection.read();const [image] = draft.contents;if (!image) {return;}// Download the selected imageconst { url } = await getTemporaryUrl({ type: "image", ref: image.ref });const img = await downloadImage(url);const { width, height } = img;// Render the selected imageconst { canvas, context } = getCanvas(canvasRef.current);canvas.width = width;canvas.height = height;context.drawImage(img, 0, 0, width, height);// Set the `isImageReady` stateappProcess.broadcastMessage({ isImageReady: true });};initializeCanvas();}, [selection]);return <canvas ref={canvasRef} style={{ width: "100%", height: "100%" }} />;}
Based on these changes, the selected image will be rendered within the overlay when it opens.

Step 7: Transform the selected image
Apps have a lot of freedom in terms of how they transform the selected image, but these are some common options:
- Transform the image as soon as it's rendered in the overlay iframe.
- Transform the image when a user interacts with a control in the object panel.
- Transform the image in response to pointer events, such as touches.
The second option allows us to talk about an important feature of the Apps SDK — the ability for iframes to broadcast messages that other iframes can listen for — so that's what we'll explore.
Here's the plan:
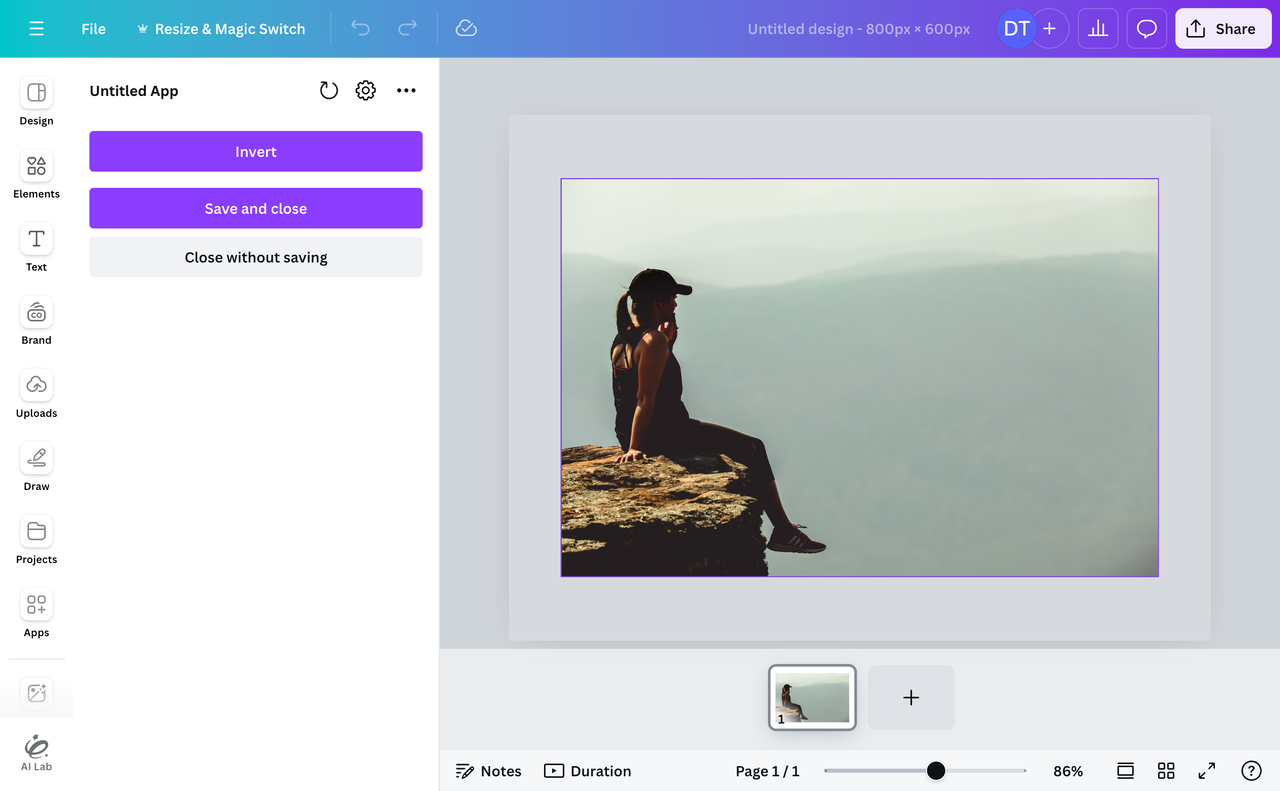
When an overlay is open, we'll render an Invert button. When this button is clicked, it will invert the colors of the image in the overlay, thereby providing an instant preview of the effect.
This is a simple concept, but the same pattern can be used for more complex use-cases, such as creating sliders or dropdowns that transform the image in different ways based on their values.
Broadcasting messages
In the ObjectPanel component:
-
Create an Invert button that calls a
handleInvertfunction:function handleInvert() {// TODO: Broadcast a message}return (<div className={styles.scrollContainer}><Rows spacing="2u"><Rows spacing="1u"><Button variant="primary" onClick={handleInvert}>Invert</Button></Rows><Rows spacing="1u"><Button variant="primary" onClick={handleSave}>Save and close</Button><Button variant="secondary" onClick={handleClose}>Close without saving</Button></Rows></Rows></div>);TSX -
Call the
broadcastMessagemethod from theinvertfunction:function handleInvert() {appProcess.broadcastMessage("invert");}TSXThis method accepts a single argument. The value of this argument is sent to all of the app's active processes, such as the process for the overlay's iframe. The app's processes can listen for and access that value.
In this case, the argument is a string, but more complex data types are supported, such as objects.
This is what the app looks like with the Invert button:
Receiving messages
In the SelectedImageOverlay component:
-
Register a callback with the
registerOnMessagemethod:React.useEffect(() => {appProcess.registerOnMessage(async (sender, message) => {console.log(message);});}, []);TSXThis callback receives information about the process that sent the message and the message itself. Be sure to register the callback in a
useEffecthook. -
If
messageis a string of"invert", invert the colors of the image:if (message === "invert") {const { canvas, context } = getCanvas(canvasRef.current);const { width, height } = canvas;context.filter = "invert(100%)";context.drawImage(canvas, 0, 0, width, height);}TSX
Based on these changes, clicking the Invert button inverts the colors of the image.

Step 8: Save the user's changes
The last feature our app needs is the ability to save changes to the selected image.
All of these steps should be done in the SelectedImageOverlay component.
Detect when the overlay closes
An overlay may close for various reasons. For example, a user may click outside of the overlay or tap the Escape key on their keyboard. To handle all of these possibilites, register a callback with the setOnDispose method:
React.useEffect(() => {return void appProcess.current.setOnDispose(async (context) => {console.log(context.reason);});}, []);
This callback runs when the current process closes — in this case, the process for the overlay's iframe. It receives a reason property the indicates why the overlay is closing. This property can be either of the following values:
"completed""aborted"
We can use this callback to always take the most appropriate action, whatever the user's intent.
Upload the transformed image
-
Check if
context.reasonis"completed":if (context.reason === "completed") {// code goes here}TSX -
Convert the
HTMLCanvasElementinto a data URL(opens in a new tab or window):const { canvas } = getCanvas(canvasRef.current);const dataUrl = canvas.toDataURL();TSX -
Import the
uploadmethod from the@canva/assetpackage:import { getTemporaryUrl, upload } from "@canva/asset";TSX -
Upload the result to the user's media library:
const asset = await upload({type: "image",mimeType: "image/png",url: dataUrl,thumbnailUrl: dataUrl,});TSX
The app should always save the transformed image at its original resolution — not a downscaled version.
Replace the existing image
-
Call the
useSelectionhook:const selection = useSelection("image");TSX -
Set the current selection as a dependency of the
useEffecthook:React.useEffect(() => {// ...}, [selection]);TSXBe sure to set
selectionas a dependency for the hook. -
Get the original image:
const draft = await selection.read();TSX -
Replace the
refproperty of the original image with therefproperty of the new image:draft.contents[0].ref = asset.ref;TSX -
Save the change to the original image:
await draft.save();TSX
This is the complete code for the useEffect hook:
React.useEffect(() => {return void appProcess.current.setOnDispose(async (context) => {if (context.reason === "completed") {const { canvas } = getCanvas(canvasRef.current);const dataUrl = canvas.toDataURL();const asset = await upload({type: "image",mimeType: "image/png",url: dataUrl,thumbnailUrl: dataUrl,});const draft = await selection.read();draft.contents[0].ref = asset.ref;await draft.save();}});}, [selection]);
Based on this change, the app can persist changes to the image.
Step 9: Fix a (subtle) bug
If a user opens an overlay and clicks the Invert button before the image in the overlay has rendered, the effect won't be applied. This happens because, at the moment, the app is only aware of whether the overlay is open or not. It's not aware of whether or not the image within the overlay has finished rendering.
This is something we should fix to ensure a consistent user experience.
In the SelectedImageOverlay component:
-
Broadcast a message after the image has rendered:
React.useEffect(() => {const { canvas, context } = getCanvas(canvasRef.current);const { dataUrl, width, height } = props.launchParams.img;const img = new Image();img.onload = function () {canvas.width = width;canvas.height = height;context.drawImage(img, 0, 0, width, height);+ appProcess.broadcastMessage({ isImageReady: true });};img.src = dataUrl;}, []);DIFF -
Broadcast a message after overlay has closed:
React.useEffect(() => {return void appProcess.current.setOnDispose(async (context) => {if (context.reason === "completed") {const { canvas } = getCanvas(canvasRef.current);const dataUrl = canvas.toDataURL();const asset = await upload({type: "image",mimeType: "image/png",url: dataUrl,thumbnailUrl: dataUrl,});const draft = await selection.read();draft.contents[0].ref = asset.ref;await draft.save();}+ appProcess.broadcastMessage({ isImageReady: false });});}, [selection]);DIFF
In the ObjectPanel component:
-
Create a state variable to track if the image is ready:
const [isImageReady, setIsImageReady] = React.useState(false);TSX -
Register a callback with the
registerOnMessagemethod that updates the state variable:React.useEffect(() => {appProcess.registerOnMessage(async (sender, message) => {const isImageReady = Boolean(message.isImageReady);setIsImageReady(isImageReady);});}, []);TSX -
Disable the buttons if the image is not ready:
<Rows spacing="2u"><Rows spacing="1u"><Buttonvariant="primary"disabled={!isImageReady}onClick={handleInvert}>Invert</Button></Rows><Rows spacing="1u"><Button variant="primary" disabled={!isImageReady} onClick={handleSave}>Save and close</Button><Buttonvariant="secondary"disabled={!isImageReady}onClick={handleClose}>Close without saving</Button></Rows></Rows>TSX
Based on these changes, the app waits until the image is ready before the controls become active.
Disabled APIs
Some APIs are disabled within the "selected_image_overlay" surface. If you call a disabled API, a CanvaError will be thrown with an "unsupported_surface" error code.
The disabled APIs include:
@canva/assetrequestFontSelection
@canva/designoverlay.registerOnCanOpenrequestExportui.startDragui.startDragToPointui.startDragToCursor
@canva/userauth.requestAuthentication
To learn more, see Handling errors and Feature support.
Gotchas
- An overlay's iframe must adhere to the same Content Security Policy as the rest of the app.
- Overlays are only compatible with image content, such as image elements or page backgrounds.
- Overlays are not compatible with vector images. If a vector image is selected,
canOpenwill befalse. - Overlays are not compatible with app elements, even if that element contains image content.
Code sample
import { Button, Rows } from "@canva/app-ui-kit";import { getTemporaryUrl, upload } from "@canva/asset";import { appProcess } from "@canva/platform";import * as React from "react";import * as styles from "styles/components.css";import { useOverlay, useSelection } from "@canva/app-hooks";export function App() {const context = appProcess.current.getInfo();if (context.surface === "object_panel") {return <ObjectPanel />;}if (context.surface === "selected_image_overlay") {return <SelectedImageOverlay />;}throw new Error(`Invalid surface: ${context.surface}`);}function ObjectPanel() {const overlay = useOverlay("image_selection");const [isImageReady, setIsImageReady] = React.useState(false);React.useEffect(() => {// Listen for when the image has been renderedappProcess.registerOnMessage(async (sender, message) => {const isImageReady = Boolean(message.isImageReady);setIsImageReady(isImageReady);});}, []);function handleOpen() {overlay.open();}function handleInvert() {appProcess.broadcastMessage("invert");}function handleSave() {overlay.close({ reason: "completed" });}function handleClose() {overlay.close({ reason: "aborted" });}const isSupported = useFeatureSupport();if (overlay.isOpen && isSupported(overlay.open)) {return (<div className={styles.scrollContainer}><Rows spacing="2u"><Rows spacing="1u"><Buttonvariant="primary"disabled={!isImageReady}onClick={handleInvert}>Invert</Button></Rows><Rows spacing="1u"><Buttonvariant="primary"disabled={!isImageReady}onClick={handleSave}>Save and close</Button><Buttonvariant="secondary"disabled={!isImageReady}onClick={handleClose}>Close without saving</Button></Rows></Rows></div>);}return (<div className={styles.scrollContainer}><Rows spacing="2u"><Buttonvariant="primary"disabled={!overlay.canOpen}onClick={handleOpen}>Edit image</Button></Rows></div>);}function SelectedImageOverlay() {const selection = useSelection("image");const canvasRef = React.useRef<HTMLCanvasElement>(null);React.useEffect(() => {const initializeCanvas = async () => {// Get the selected imageconst draft = await selection.read();const [image] = draft.contents;if (!image) {return;}// Download the selected imageconst { url } = await getTemporaryUrl({ type: "image", ref: image.ref });const img = await downloadImage(url);const { width, height } = img;// Render the selected imageconst { canvas, context } = getCanvas(canvasRef.current);canvas.width = width;canvas.height = height;context.drawImage(img, 0, 0, width, height);// Set the `isImageReady` stateappProcess.broadcastMessage({ isImageReady: true });};initializeCanvas();}, [selection]);React.useEffect(() => {appProcess.registerOnMessage(async (sender, message) => {// Invert the colors of the imageif (message === "invert") {const { canvas, context } = getCanvas(canvasRef.current);const { width, height } = canvas;context.filter = "invert(100%)";context.drawImage(canvas, 0, 0, width, height);}});}, []);React.useEffect(() => {return void appProcess.current.setOnDispose(async (context) => {// Save changes to the user's imageif (context.reason === "completed") {// Get the data URL of the imageconst { canvas } = getCanvas(canvasRef.current);const dataUrl = canvas.toDataURL();// Upload the new imageconst asset = await upload({type: "image",mimeType: "image/png",url: dataUrl,thumbnailUrl: dataUrl,parentRef: content.ref,aiDisclosure: "none",});// Replace the original image with the new imageconst draft = await selection.read();draft.contents[0].ref = asset.ref;await draft.save();}// Reset the `isImageReady` stateappProcess.broadcastMessage({ isImageReady: false });});}, [selection]);return <canvas ref={canvasRef} style={{ width: "100%", height: "100%" }} />;}async function downloadImage(url: string) {const response = await fetch(url, { mode: "cors" });const blob = await response.blob();const objectUrl = URL.createObjectURL(blob);const img = new Image();img.crossOrigin = "anonymous";await new Promise((resolve, reject) => {img.onload = resolve;img.onerror = () => reject(new Error("Image could not be loaded"));img.src = objectUrl;});URL.revokeObjectURL(objectUrl);return img;}function getCanvas(canvas: HTMLCanvasElement | null) {if (!canvas) {throw new Error("HTMLCanvasElement does not exist");}const context = canvas.getContext("2d");if (!context) {throw new Error("CanvasRenderingContext2D does not exist");}return { canvas, context };}