Test harness
The Canva Apps SDK test harness lets you run and test your Canva app outside of the Canva environment.
This can be especially useful as a visual assist tool for AI agents, providing them with a clean browser environment to observe and debug your app's UI without the Canva interface as a distraction. This isolation helps AI agents better understand and suggest improvements to your app's interface.
The Canva Apps SDK harness is provided as an experimental resource to support development.
Step 1: Create required directories
First, create the necessary directories in your project root, if they don't already exist:
mkdir -p harness public
Step 2: Create the harness HTML file
Create a file at public/harness.html with the following content:
<!doctype html><html dir="ltr" lang="en" class="cc24 theme dark"><head><title>Canva Apps SDK Test Harness</title><script src="/init.js" defer></script><script src="/harness.js" defer></script></head><bodystyle="width: 360px;height: 770px;padding: 10px;border: 1px solid red;overflow-y: auto;overflow-x: hidden;"><div id="root" style="width: 100%; height: 100%"></div></body></html>
Step 3: Create the harness initialization file
Create a file at harness/init.ts with the following content:
import * as design from "@canva/design/test";import * as asset from "@canva/asset/test";import * as user from "@canva/user/test";import * as error from "@canva/error/test";import * as intents from "@canva/intents/test";import * as platform from "@canva/platform/test";design.initTestEnvironment();asset.initTestEnvironment();error.initTestEnvironment();user.initTestEnvironment();intents.initTestEnvironment();platform.initTestEnvironment();
Step 4: Create the harness app file
Create a file at harness/harness.tsx with the following content (replace src/app.tsx with the path to your app's main component):
import React from "react";import { TestAppUiProvider } from "@canva/app-ui-kit";import { createRoot } from "react-dom/client";import { App } from "../src/app"; // Change this path to your app's main componentimport "@canva/app-ui-kit/styles.css";import { TestAppI18nProvider } from "@canva/app-i18n-kit";const root = createRoot(document.getElementById("root") as Element);function render() {root.render(<TestAppI18nProvider><TestAppUiProvider><App /></TestAppUiProvider></TestAppI18nProvider>,);}render();if (module.hot) {module.hot.accept("../src/app.tsx", render); // Change this path to your app's main component}
Step 5: Update your webpack configuration
If you have created your app from the Canva CLI (using canva apps create, since version 0.0.1-beta.28), you might already have IN_HARNESS configured.
Modify your webpack.config.ts to support the harness environment. The following diff shows the required changes for your webpack configuration.
export function buildConfig({devConfig,appEntry = path.join(process.cwd(), "src", "index.tsx"),backendHost = process.env.CANVA_BACKEND_HOST,+ inHarness = process.env.IN_HARNESS?.toLowerCase() === "true",}: {devConfig?: DevConfig;appEntry?: string;backendHost?: string;+ inHarness?: boolean;} = {}): Configuration & DevServerConfiguration {// ...return {mode,context: path.resolve(process.cwd(), "./"),- entry: {- app: appEntry,- },+ entry: inHarness+ ? {+ harness: path.join(process.cwd(), "harness", "harness.tsx"),+ init: path.join(process.cwd(), "harness", "init.ts"),+ }+ : {+ app: appEntry,+ },target: "web",resolve: {alias: {styles: path.resolve(process.cwd(), "styles"),src: path.resolve(process.cwd(), "src"),},extensions: [".ts", ".tsx", ".js", ".css", ".svg", ".woff", ".woff2"],},infrastructureLogging: {- level: "none",+ level: inHarness ? "info" : "none",},module: {rules: [// ...],},...buildDevConfig(devConfig),};}
Step 6: Run the test harness
Start the webpack dev server with the test harness environment variable:
IN_HARNESS=true npx webpack serve --config webpack.config.ts --mode development
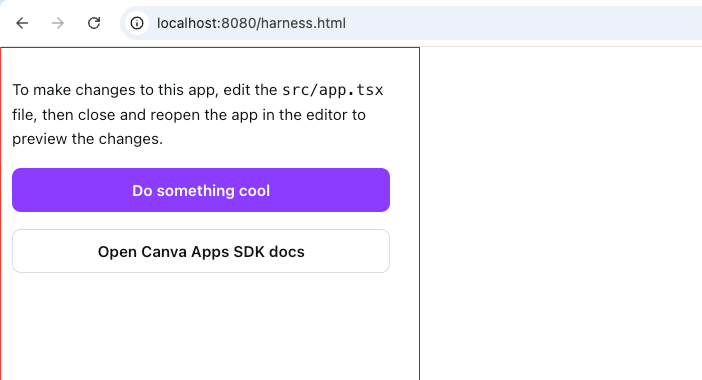
Step 7: View your app in the test harness
Open your browser and navigate to http://localhost:8080/harness.html(opens in a new tab or window)
You should now see your app running in the test harness environment.
Troubleshooting
-
Webpack configuration issues
- Check that your webpack configuration correctly handles the
IN_HARNESSenvironment variable. - Check that the entry points for harness files are correctly configured.
- Check that your webpack configuration correctly handles the
-
Path issues
- Check that the import path in
harness/harness.tsxcorrectly points to your app's main component. - Check that the hot module replacement path matches your app's main component path.
- Check that the import path in
-
Dependencies
- Check that you have all required Canva SDK packages installed:
@canva/app-ui-kit@canva/app-i18n-kit@canva/design@canva/asset@canva/user@canva/platform
- Check that you have all required Canva SDK packages installed:
Cleanup
When you're done testing, you can stop the webpack dev server and remove the harness artifacts. Alternatively, you can add the harness artifacts to your .gitignore file.
# Stop the webpack dev server (Ctrl+C)# Then remove the harness directoriesrm -rf harness public/harness.html