Implement premium apps features
This article is for apps that have been accepted into the Premium Apps Program(opens in a new tab or window). If your app hasn't been accepted into the program, this article does not apply to you.
This guide shows you how to implement the premium apps API in your app.
Our design guidelines help you create a high-quality app that easily passes app review.

Step 1: Decide what Premium apps features to implement
-
Before you start implementing premium app features, confirm the following with us:
- A list of the distinct features you'd like to make premium and/or billable.
- The access model of the app (Gated, Freemium, or Credit-based).
- The App ID(s) you're using. If you're using separate apps for different stages of your development workflow (for example: development, staging, production), provide all relevant App IDs.
-
For each premium feature you provide, we'll add a specific billable action to your app.
Billable actions are what your app performs to receive compensation from Canva. Billable actions correspond to either generate, modify, or import actions performed on different asset types or text.
To receive compensation from Canva, each of your app's features must be associated with one of the following billable actions:
generate_image: Create a new image asset (for example, using AI generation or a remote service) that didn't previously exist in the user’s design or library.generate_video: Create a new video asset (for example, an AI or service-generated clip or sequence) that didn't previously exist in the user’s design or library.generate_audio: Create a new audio asset (for example, AI-generated music or voice) that didn't previously exist in the user’s design or library.generate_text: Create new text content (for example, AI-written copy) that didn't previously exist in the user’s design or library.modify_image: Modify or improve an existing image asset (for example, upscale, denoise, recolor, background removal) rather than creating a new one.modify_video: Modify or improve an existing video asset (for example, color correction, stabilization, re-timing, upscaling) rather than creating a new one.modify_audio: Modify or improve an existing audio asset (for example, noise reduction, mastering, voice enhancement) rather than creating a new one.modify_text: Modify or improve existing text content (for example, rewrite, summarize, translate, tone-shift) rather than creating new text.import_image: Add a premium/licensed image from the app into the user’s design.import_video: Add a premium/licensed video from the app into the user’s design.import_audio: Add a premium/licensed audio asset from the app into the user’s design.import_text: Add premium/licensed text content from the app into the user’s design.
App operations that don't fit one of the billable actions aren't eligible for compensation.
-
After you receive the assigned billable action for each of your premium features, you can start implementing them in your app.
Step 2: Install the User SDK
-
In your starter kit’s
package.jsonfile, add or update@canva/userto version 2.2.0 or later:{..."dependencies": {..."@canva/user": "^2.2.0"...},...}JSON -
Run the following command to install the dependency:
npm installSHELL -
If you're upgrading from the previous apps bundling experiment, make sure to remove any references to the previous experiment API. For example, remove references to
UserCapabilitiesToken,UserInfo, and so on.
Step 3: Check whether a user can perform a billable action
Before rendering a premium feature, you first need to check whether a user can perform the billable action.
This is done using the monetization API, which has an isEnabled method that you can use to check whether a user is enabled for a billable action.
import { monetization } from "@canva/user";const checkBillableAction = async (action: BillableAction) => {const canPerformAction = await monetization.isEnabled(action);if (canPerformAction) {// The user is enabled for the billable action} else {// The user is not enabled for the billable action}};
Step 4: Display your UI
When displaying your app UI, you must customize what is shown depending on whether the user is enabled for a billable action.
In general, you should use the included components in @canva/user/components with isEnabled. This especially includes displaying the pro badge and the premium crown icon.
For details on the components and what UI to display, make sure to follow the design guidelines that have been provided to you.
For example:
const [isActionEnabled, setIsActionEnabled] = useState<boolean>(false);useEffect(() => {const checkIsActionEnabled = async () => {setIsActionEnabled(await monetization.isEnabled("generate_image"))};checkIsActionEnabled().catch(e => {// handle error});}, [])// In JSX// Premium badge usage<PremiumBadge enabled={isActionEnabled} />// Premium icon usage{isActionEnabled ? <PremiumFilledIcon /> : <PremiumFilledGoldIcon />}
Step 5: Handle not-enabled users executing premium features
If a user isn't enabled for a billable action and they attempt to use a premium feature, you should prompt them to upgrade to a paid Canva plan. You can do this using the monetization.requestEnableBillableAction API. For example:
const performBillableAction = async (action: BillableAction) => {const canPerformAction = await monetization.isEnabled(action);if (canPerformAction) {// Do the billable action} else {const res = await monetization.requestEnableBillableAction(action);if (res.status !== "granted") {// Deny access to the billable actionreturn;}// Do the billable action}};
Step 6: Execute premium features
If a user is enabled for a billable action, you can execute the premium feature.
Run your code in a tracking session
Opening and closing tracking sessions is critical for accurate payout of Premium apps. Each billable action must have its own unique tracking session.
An important part of executing a premium feature for a billable action is using a tracking session. This allows Canva to correctly attribute your app's usage.
When using tracking sessions, it's very important to do the following:
- Use the correct billable action when opening a tracking session.
- Only open a tracking session immediately before you start work on a billable action. Valid work includes things like relevant SDK calls or calling
fetchfor tasks directly related to executing the premium feature. - Defer any calls that don't contribute to the billable action until after you close the tracking session. Examples of what to defer include:
- Analytics calls.
- Calls to your backend that aren't directly related to the billable action.
- Non-billable calls which don't require the user to be enabled for a billable action. For example, uploading non-premium assets.
- Close a tracking session immediately after you finish work on a billable action. A tracking session must be properly closed to correctly register a billable action.
- Each billable action must have its own tracking session. To register a new billable action, you must open a new tracking session.
You can also continue a tracking session after closing it if you need to do non-billable work while a tracking session is open.
Basic tracking session example
For example, a simple app that imports premium assets should open a tracking session using monetization.openTrackingSession with the import_image billable action before uploading that image and adding it to the design. It should close the tracking session immediately afterwards.
const importPremiumAsset = async () => {const session = await monetization.openTrackingSession({action: "import_image",});const image = await upload({type: "image",mimeType: "image/jpeg",url: "https://www.canva.dev/example-assets/image-import/image.jpg",thumbnailUrl:"https://www.canva.dev/example-assets/image-import/thumbnail.jpg",aiDisclosure: "none",});await addElementAtPoint({type: "image",ref: image.ref,});session.closeTrackingSession();};
HTTP requests with tracking sessions
In this example, a more complex app (such as an AI image generation app) might need to make an HTTP request. After opening a tracking session, make sure you do the following:
- Add the
Canva-Premium-Usage-Idheader to thefetchcall, with the tracking session's ID as the value. Only pass this header with HTTP requests that directly contribute to the completion of a billable action. Don't attach this header to non-essential calls, such as analytics. - Add the
CanvaUserTokenin theAuthorizationheader, and make sure to verify the request and the billable action name in your backend.
async function generateImage(): Promise<TrackingId> {const token = await auth.getCanvaUserToken();// Start tracking the generation of an imageconst generationSession = monetization.openTrackingSession({action: "generate_image",});try {const response = await fetch("https://example.com/generate", {headers: {Authorization: `Bearer ${token}`,"Canva-Premium-Usage-Id": generationSession.id,},});// Do things with the response// Close the session after image generation completesawait generationSession.closeTrackingSession();return generationSession.id;} catch (error) {// Log the error}}
Continue a closed tracking session
There may be situations when you need to do tasks not related to a billable action while a tracking session is open. You can close a session and keep track of the ID, and then continue with the same session later.
// Start a tracking for generation of an imageconst generationSession = monetization.openTrackingSession({action: "generate_image",});// Do some billable work// Close the session and keep the IDawait generationSession.closeTrackingSession();// Do some non-billable work// Continue the previous sessionconst imageAdditionSession = monetization.openTrackingSession({id: generationSession.id,});// Do some more billable work// Close the session after the work is doneawait imageAdditionSession.closeTrackingSession();
Configure your backend
We recommend that apps have a backend for performing billable actions. If your app doesn't have a backend, checking that a user is enabled with monetization.isEnabled and opening/closing a tracking session is sufficient. For more information, see Security considerations.
To configure your backend, you must do the following:
- Set up separate endpoints for each billable action.
- For HTTP requests going to your backend, verify the requests with the
CanvaUserTokenJWT.
Set up endpoints for each billable action
To prevent abuse, you must avoid sending the billable action's name in HTTP requests. Instead, we recommend that you configure dedicated endpoints for each billable action, and then follow the next section to check that the billableActions claim has the matching action.
Verify HTTP requests
When making fetch calls to your app's backend, you must verify the HTTP request using the CanvaUserToken JWT.
For apps with billable actions, the CanvaUserToken includes an extra JWT claim: billableActions.
Follow the process described in HTTP request verification to verify the HTTP request in your backend, with one important difference: when checking the claims, you must also check the billableActions claim. For example, the following code example checks for the generate_image billable action:
if (!verified.aud ||!verified.brandId ||!verified.userId ||!verified.billableActions) {return response.sendStatus(401);}if (!verified.billableActions.includes("generate_image")) {return response.sendStatus(403);}
Security considerations
As with building any app on Canva, you must comply with the Security guidelines and Shared responsibility model for Canva Apps. For premium apps, there are some additional security considerations when using Monetization API.
Apps without a backend
Apps that do work for a billable action only in the frontend are inherently vulnerable to users tampering with the JavaScript bundle to access the feature for free.
Canva has measures to limit these attacks, such as obfuscating the JavaScript bundles, but because of the nature of JavaScript, these attacks are always possible.
If you suspect a user is fraudulently accessing your premium app features, contact us and provide as much evidence as possible. We will investigate and take appropriate action.
Where practical, consider implementing high-value parts of a billable action in a backend which is better protected.
Check CanvaUserToken when making fetch calls
As mentioned previously, when your app makes fetch calls to your backend, you must verify the HTTP request using the CanvaUserToken, and when checking claims, also check the billableActions claim.
If it done incorrectly, you might expose your app to fraudulent use.
Check for the correct billable actions
It's the responsibility of the app to check and use the correct billable action for a premium feature. If you use the incorrect billable action, you may allow ineligible users to access your app's premium features. Canva is also unable to accurately attribute your app's premium usage.
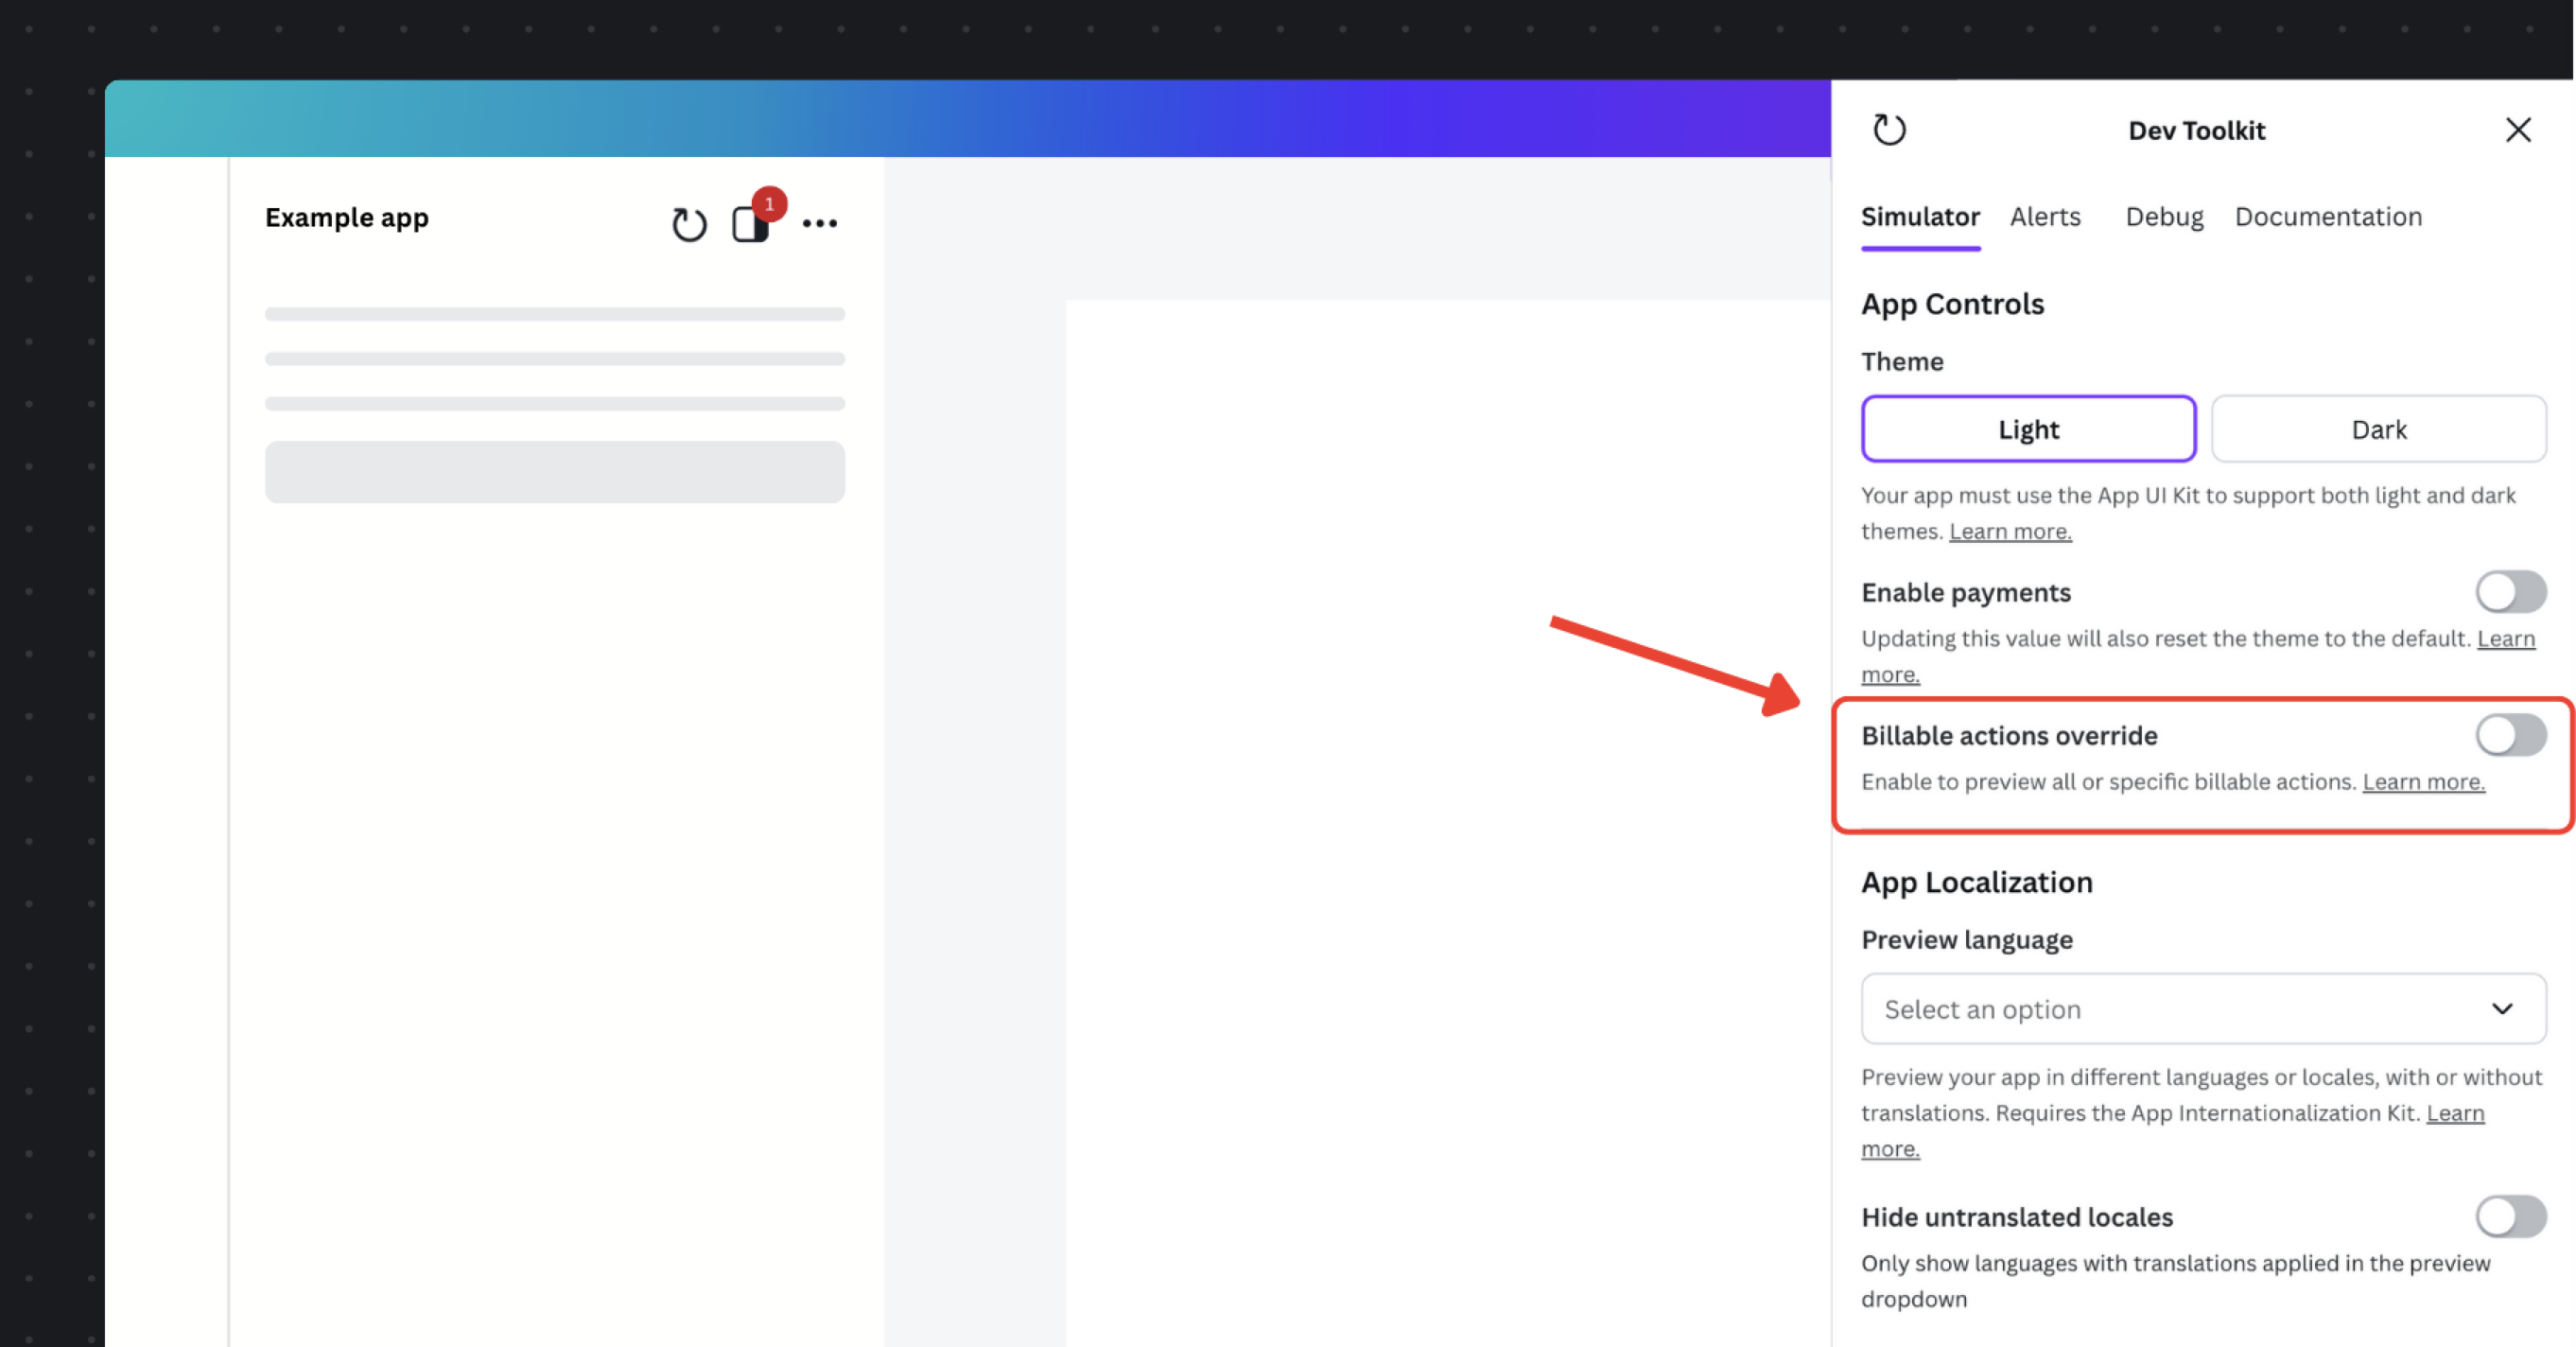
Test your app's billable actions
This test checks that UI behavior works correctly and confirms that paid users can access Premium features. Reach out to your Canva point of contact to confirm your tracking sessions and billable actions are set up correctly.
You can use the Dev Toolkit to override your own account's billable actions and test when certain billable actions are on or off. This saves you from having to switch between Canva Free and Pro accounts to see how your app behaves.
-
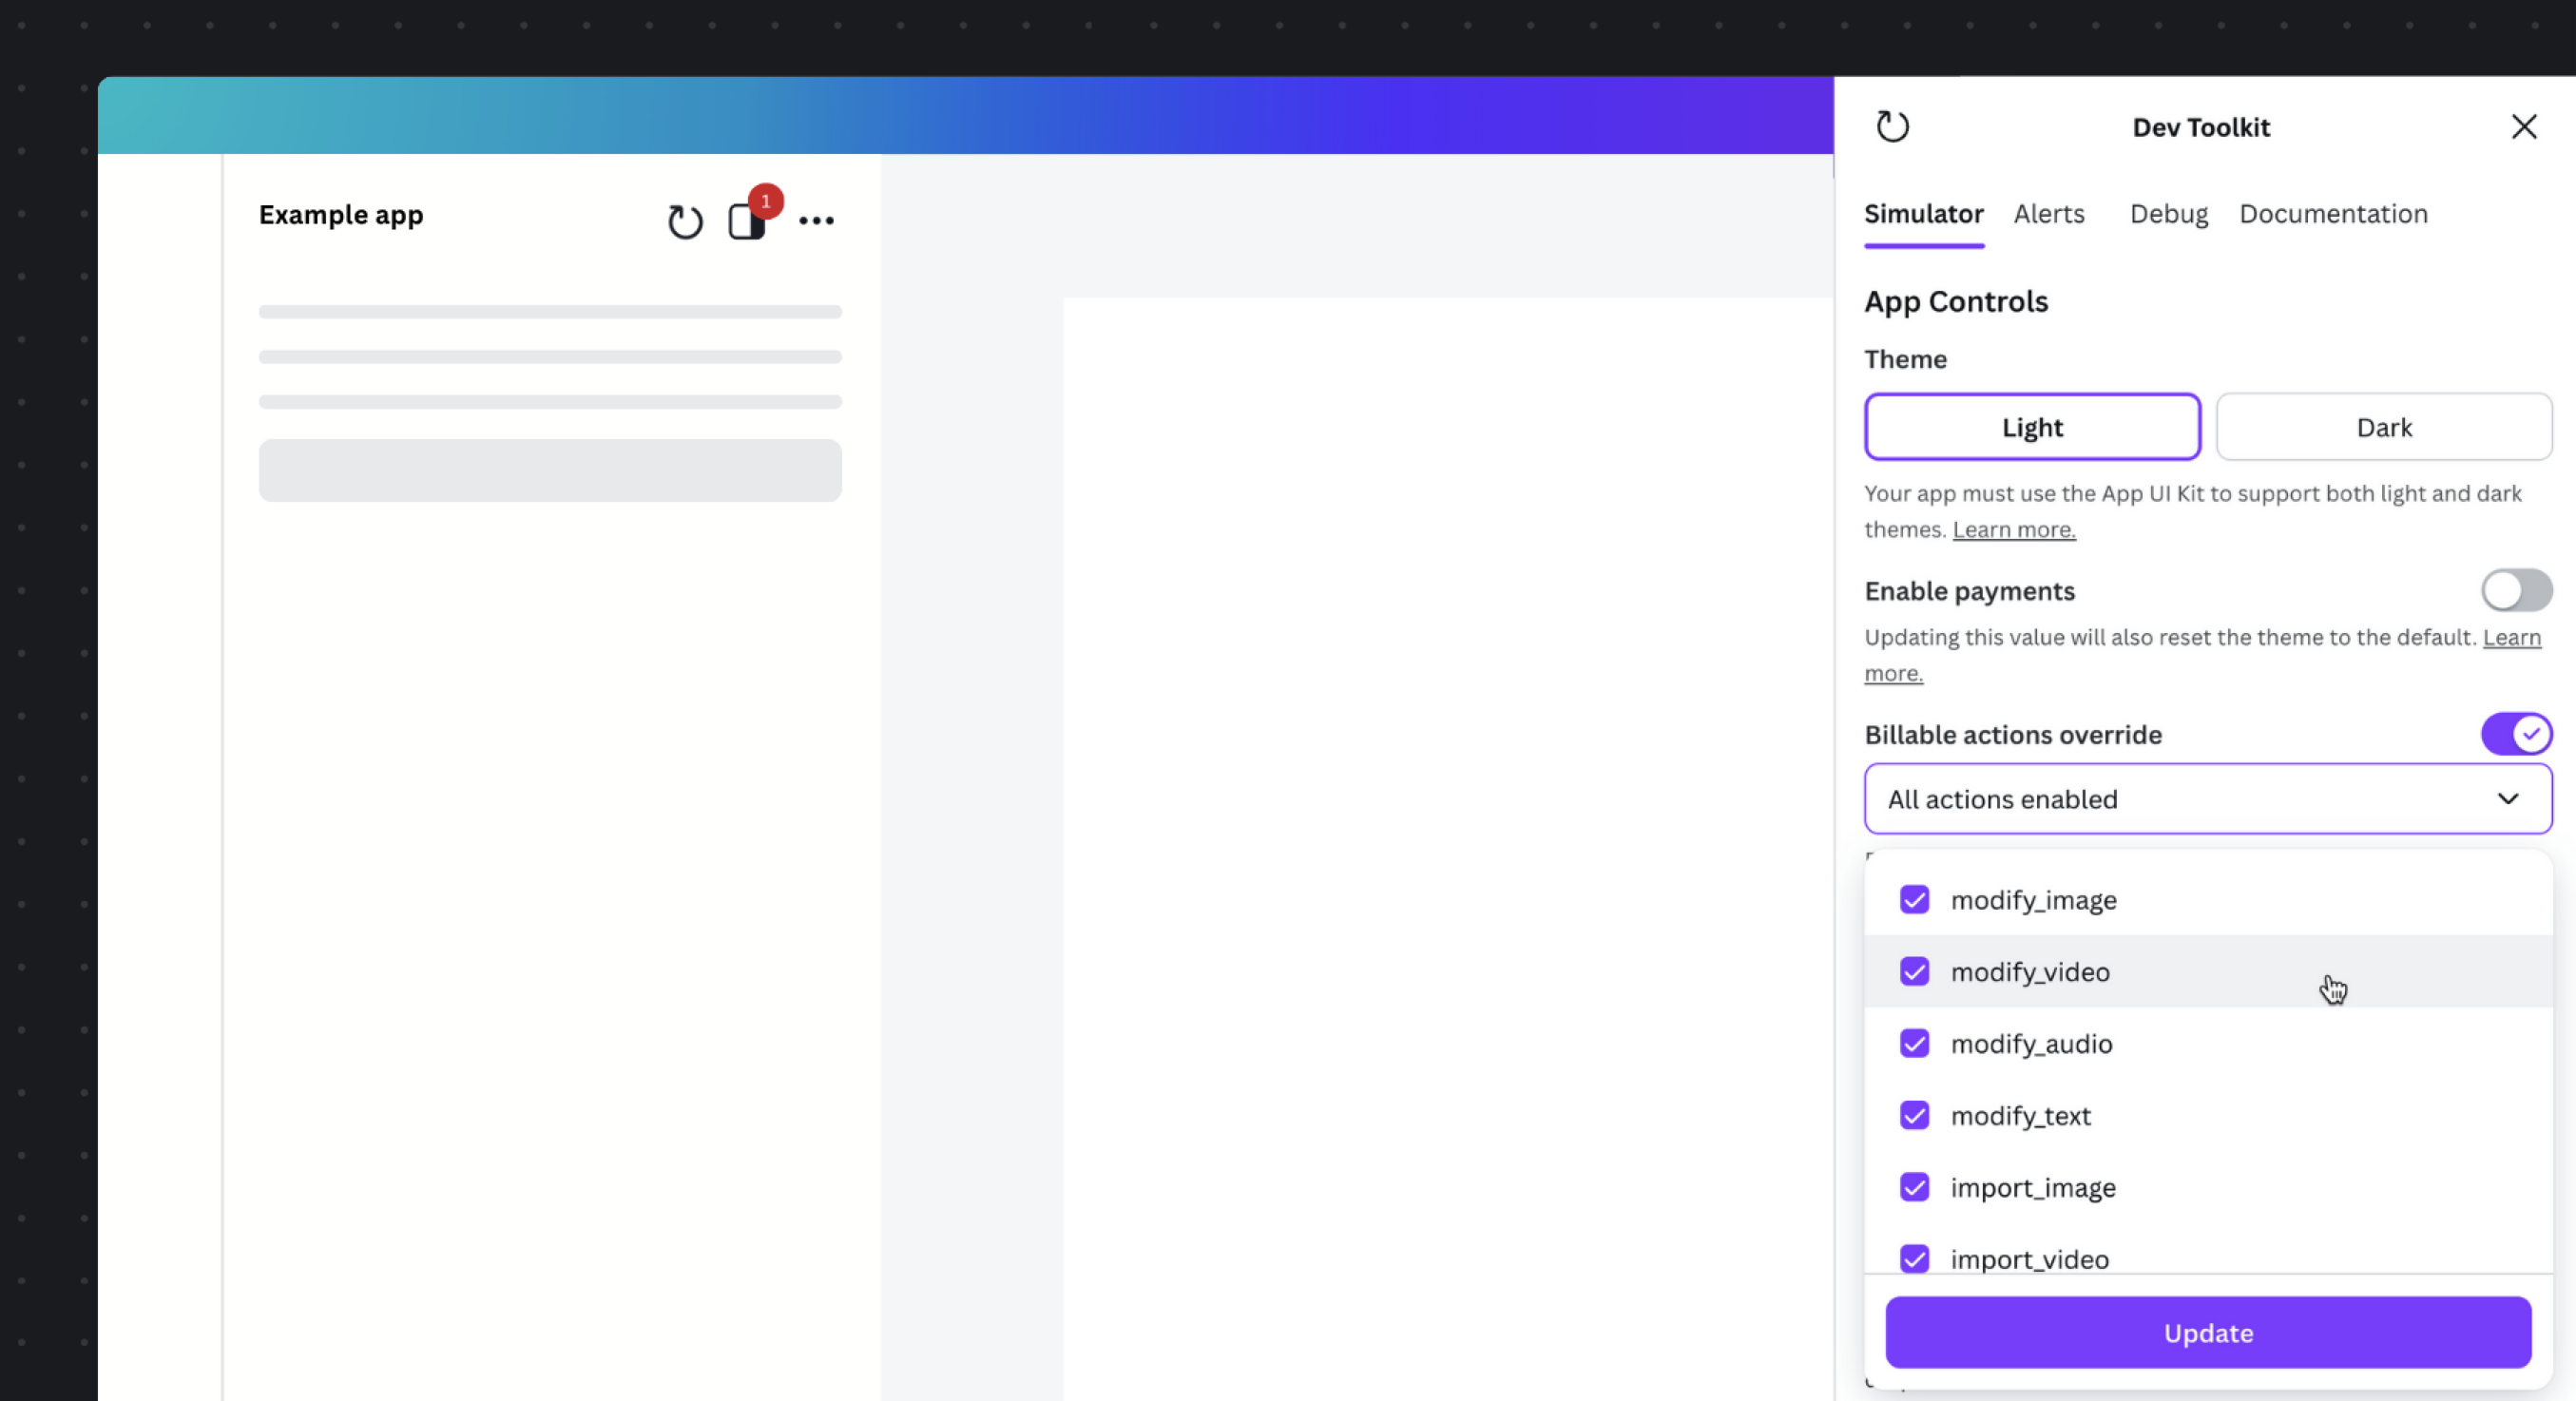
In the Dev Toolkit, enable Billable actions override.
-
Use the Dev Toolkit to select which billable actions are enabled or disabled. You can enable all billable actions, disable all billable actions, or enable specific billable actions.
Whatever you select will override the billable actions for your account only. This includes removing any billable actions that Canva has enabled for you.
-
When you are finished testing, disable Billable actions override to return to your account's normal billable actions.