Authentication
You can configure apps to remember user data, using either the auth.getCanvaUserToken API or connecting with a third-party platform. This approach can make certain features and content available only to authenticated users, or a limited subset of users.
This article contains some guidelines for creating an efficient authentication flow.
Authentication in your app's workflow
Canva's users want to quickly evaluate an app's value, and might be deterred from using your app if you require them to log in before they can see its functionality.
An efficient authentication workflow can produce a better experience for your users and subsequently lead to more app usage. For example, if your app requires the user to log in just so that you can see data about who is using your app, consider using frictionless authentication instead of requiring a separate login.
Authentication workflows
When implementing an authentication workflow in your app, we recommend referring to the following list, where appropriate. Workflows are listed in order of preference, so if your app uses workflows shown higher on the list, the better the user experience.
- All functions are available to the user. No authentication required.
- All functions are available to the user, regardless of whether the user authenticates.
- Some functions are available to the user, but they can still complete a basic workflow. The user must log in to use the other functions.
- Some functions are available to the user to evaluate the app, but they cannot complete a workflow. The user must log in to complete the workflow.
- No functions are available unless the user authenticates.
For each of the above options, you can use frictionless authentication. This is the preferred authentication approach when you want to track user data (such as time or usage), recognize returning users, or implement a freemium model.
Authentication and the Apps Marketplace
An app can quickly demonstrate its usefulness when it's promoted in the Apps Marketplace, such as being included in the Featured apps section.
However, an app is not eligible to be featured unless a user can test functionality before manual authentication occurs in the workflow. This means that only apps that have no authentication or those that include a timed or per-use trial can be featured apps.
General guidelines
Authentication flow guidelines
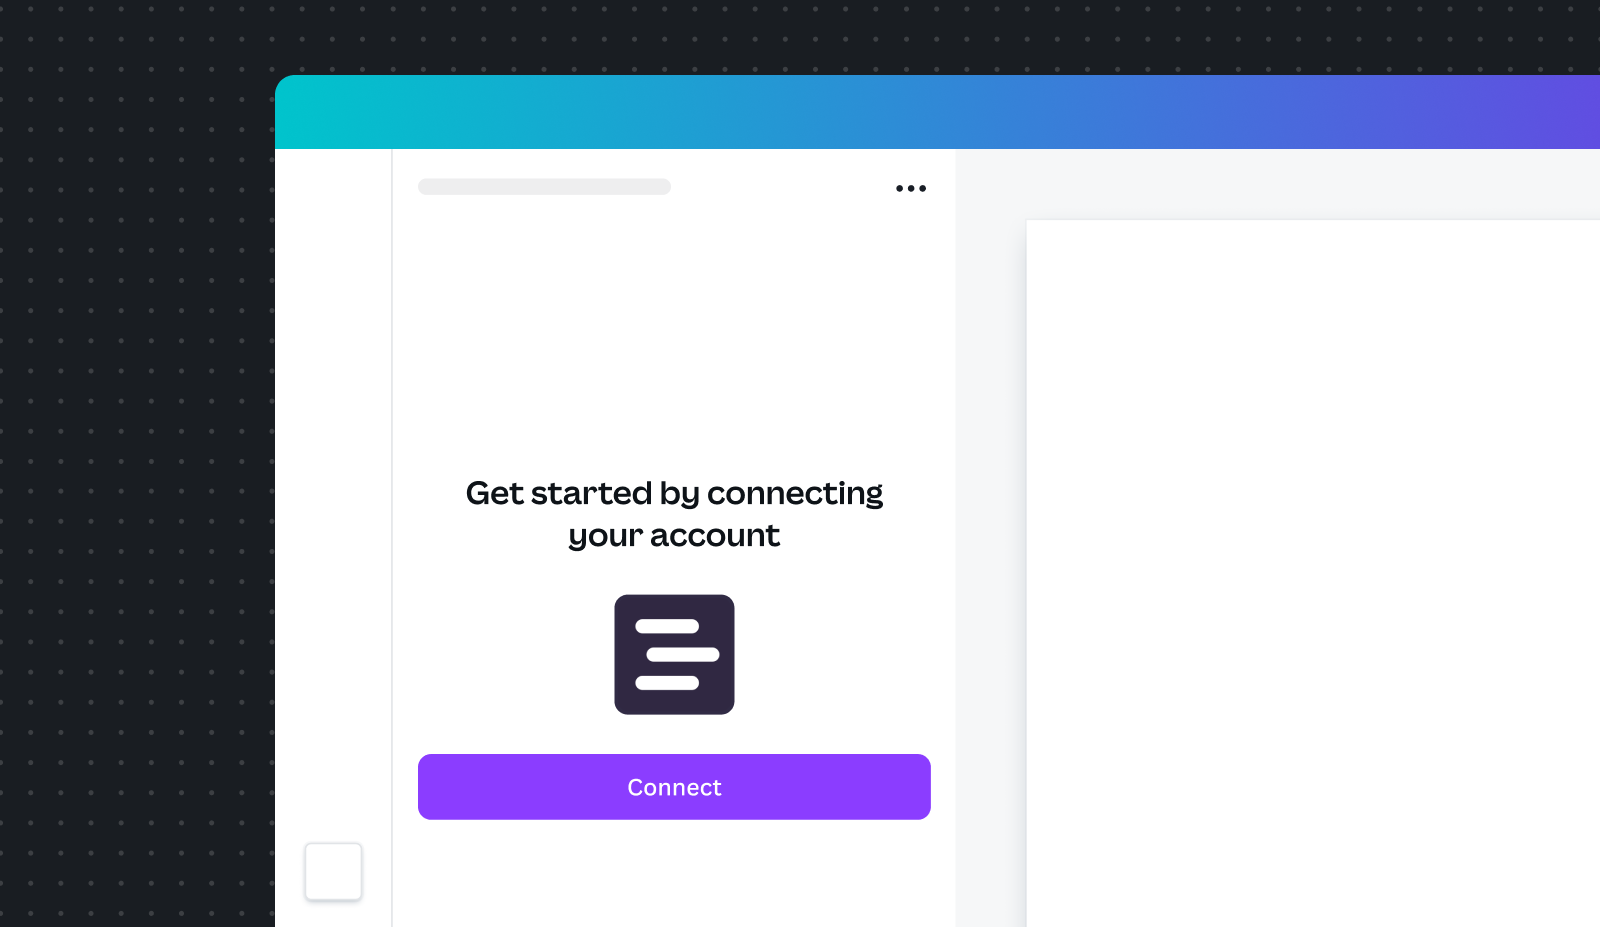
- Make it easy for the user to benefit from the app. Where possible, make the app useful before the user has to authenticate.
- Authentication flows must occur in the authentication pop-up window, not within the app's iframe. The sign-up and login forms must only appear in the pop-up window.
- Start an authentication flow by calling the
requestAuthenticationmethod. This will display a screen with a Connect button. Don't show redundant authentication screens before this screen or attempt to bypass the standard authentication flow. - Prevent users from arriving at dead-ends or becoming stuck in endless loops.
- Support non-desktop devices, such as mobile phones and tablets.
- Do not auto-subscribe users to marketing content — all marketing material must be opt-in.
- If the same user installs the same app under different teams(opens in a new tab or window), require them to authenticate separately for each team — do not automatically authenticate the user.
- Ensure that users are able to disconnect your app, and that the disconnection is handled appropriately. This is described in the next section.
Handle disconnections
Users can choose to remove your app from their account, and the app must respect the user's intention to no longer be associated with the app. Users are also free to change their minds and reconnect your app later.
- Do log users out of your app when they remove it.
- Do require users to reauthenticate if they reconnect your app.
For a consistent user experience, handle these events using the following flow.

When the user clicks Remove from your apps:
- Log the user out of your app.
- Delete the connection between your app and the third-party platform.
If the user later reconnects your app:
- Display the initial page that prompts them to open the app.
- Immediately redirect the user to the connection page.
- When the user clicks on Connect, the app must require them to re-enter their credentials and log in with the app.
- After successfully logging in, users must be able to use the app right away.
More information
- If you're using frictionless authentication, see Handle disconnections.
- If you're using OAuth, see Revoking access.
- If you're using manual authentication, see Handle disconnections.
Pop-up guidelines
- For the pop-up page, use the
titleHTML element(opens in a new tab or window) to set a meaningful title on the authentication's pop-up window. - Provide clear and actionable error messages.
- Ensure that the redirect URL appears familiar and friendly — that is, not like a phishing threat.
- Provide options for both signing up for and logging in to the platform.
Deferred authentication
If some of your app's features don't require authentication, users should be able to use the app without entering credentials right away. Allowing immediate access helps maintain design productivity, reduces friction, and defers authentication until it's genuinely required. For example:
- Freemium apps: Authentication is optional for apps using a freemium model. We encourage apps with paid features to use a freemium experience, which allows the user to try the features to understand the value, and authenticate later in the workflow to access full features.
- Content publisher apps: It's necessary for publish apps to implement deferred authentication. This allows the user to enter publish settings, preview, and then authenticate to decide which account to publish with.
Error handling
When building authentication flows in your app, you must implement error handling. Clear and concise error messages can help users understand what went wrong and what to do next.
At a minimum, your app should render a defensive catch-all fallback and a server error view. You can then sequentially add more error handling scenarios depending on your app's circumstances. The error message should also follow our error messaging best practices.
Use the patterns and messages provided in the following examples as a starting point, and make changes only if absolutely necessary.
The following UI guidelines explain recommended practices for required error messaging scenarios (the catch-all fallback and server errors) as well as other optional error scenarios.
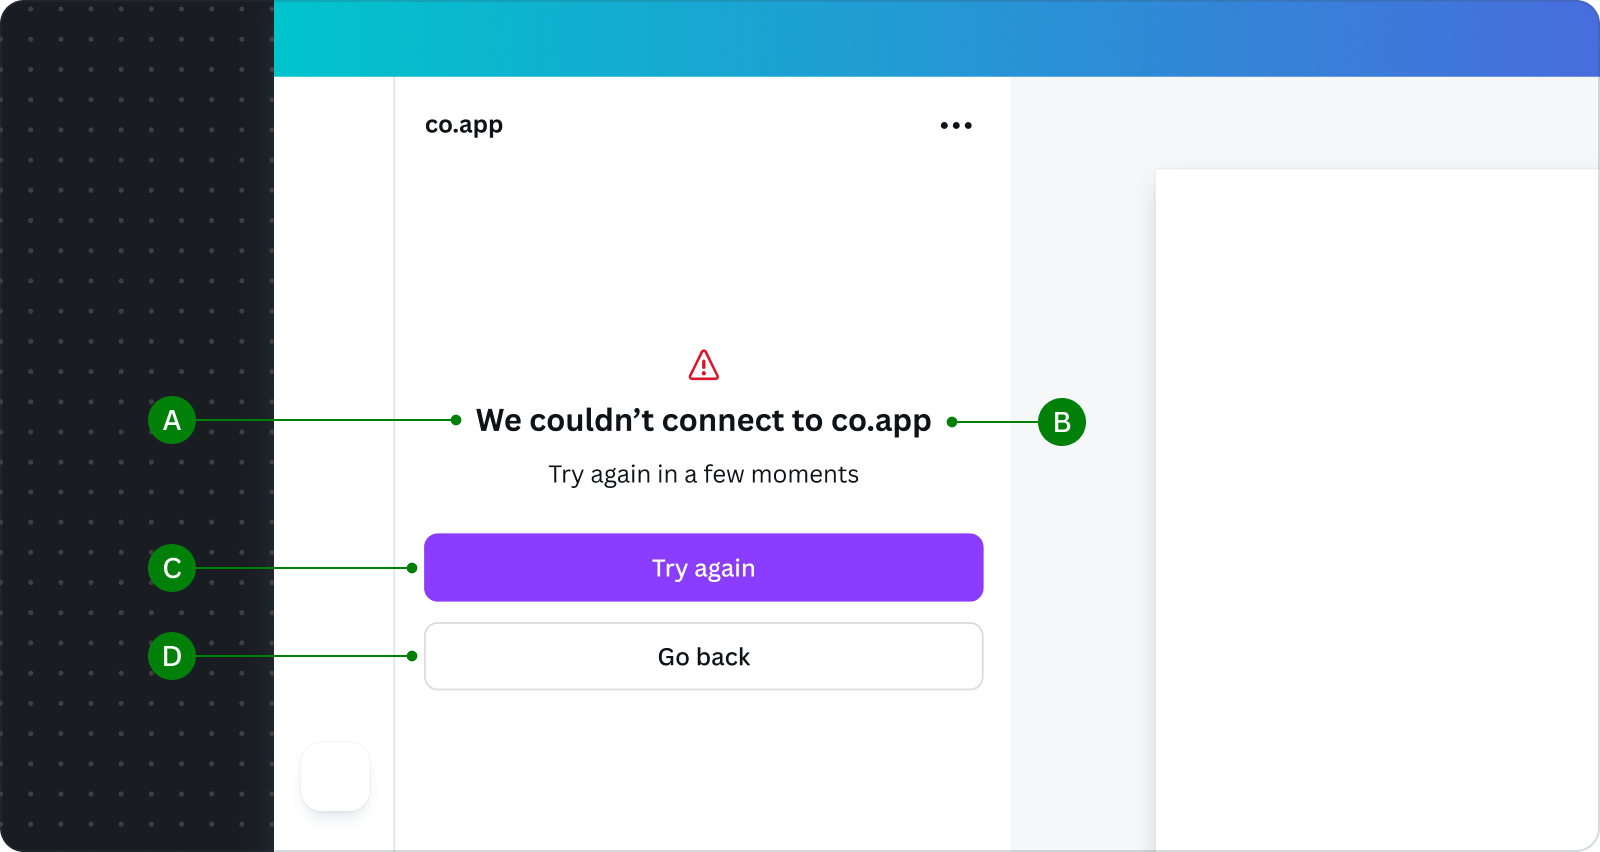
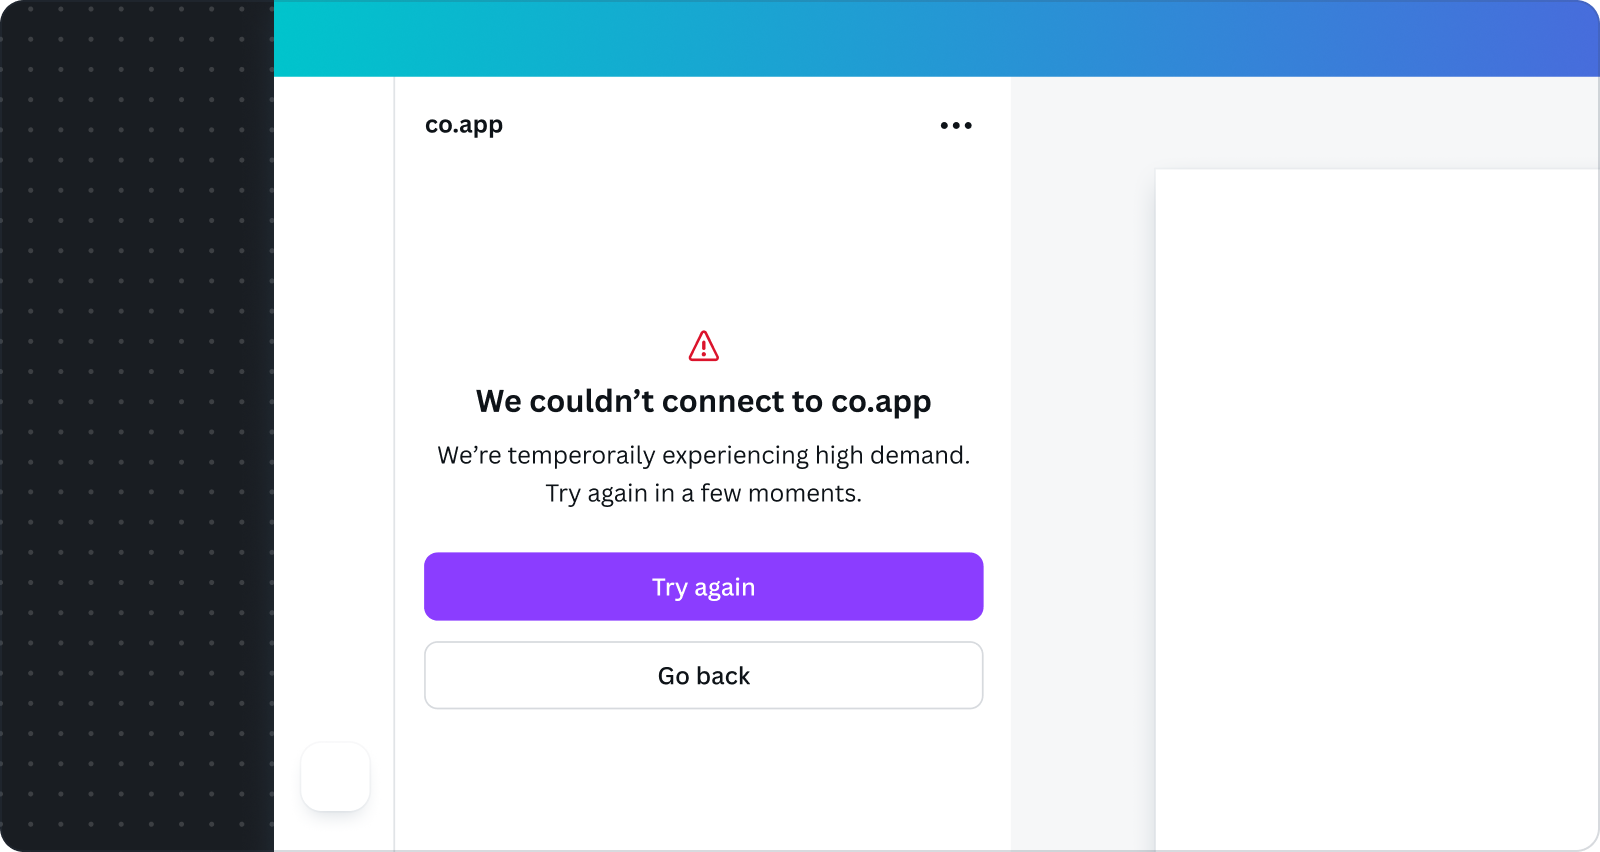
Catch-all fallback
Required — The fallback view for all errors. It informs users that authentication has failed. Its message is simple and generic. Users can fix the error by trying again. The fallback is also a safety net for any unforeseen errors.
Do
A Keep the message short, informing users that the connection has failed.
B State your app name because your app could appear in surfaces where the app header isn't immediately visible.
C Use the primary button to ask users to try reconnecting.
D Provide a way to go back to the app's starting step to use the app in its unauthenticated state.
Don't
- Use technical jargon.
- Blame the user, and use a written tone that implies the user is at fault.
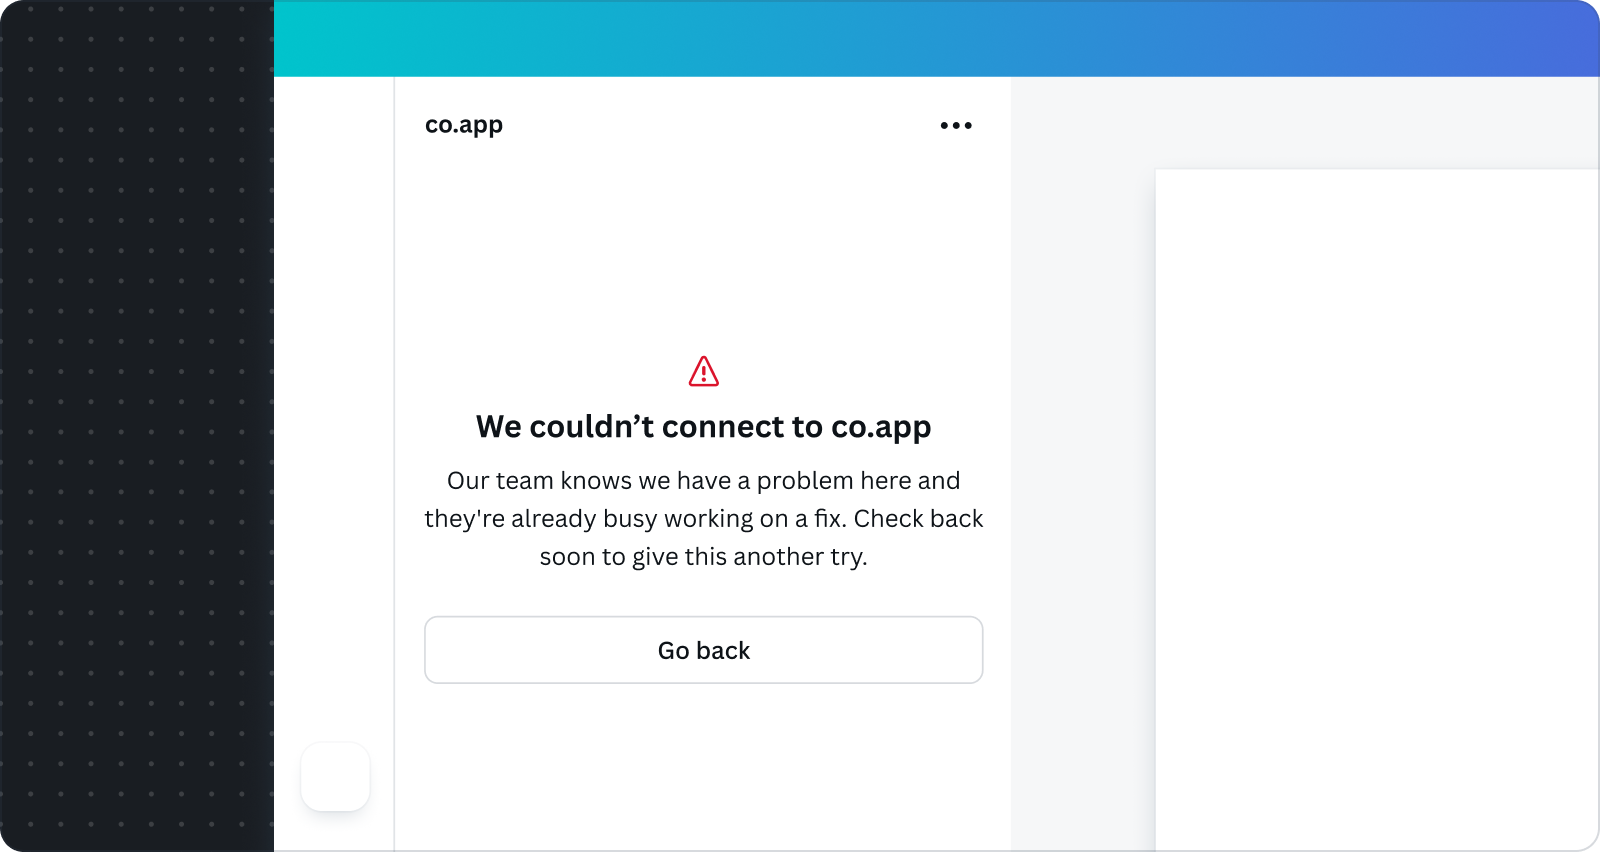
Server error
Required — This occurs when there's an unexpected server-side issue that the user can't resolve. We recommend letting the user know that authentication has failed and to try again later.
Do
- Acknowledge the issue, and clearly state that a server error has occurred.
- Reassure the user, and let them know the issue is being addressed.
- Tell the user to come back later.
Don't
- Share unnecessary technical details with the user.
- Blame the user, and use a written tone that implies the user is at fault.
Permission denied
Optional — This occurs when the user hasn't granted the permissions necessary for app features to work. Handling this error is only required if your app asks users for specific permissions. For example, your app's features might cause progressive permission requests.
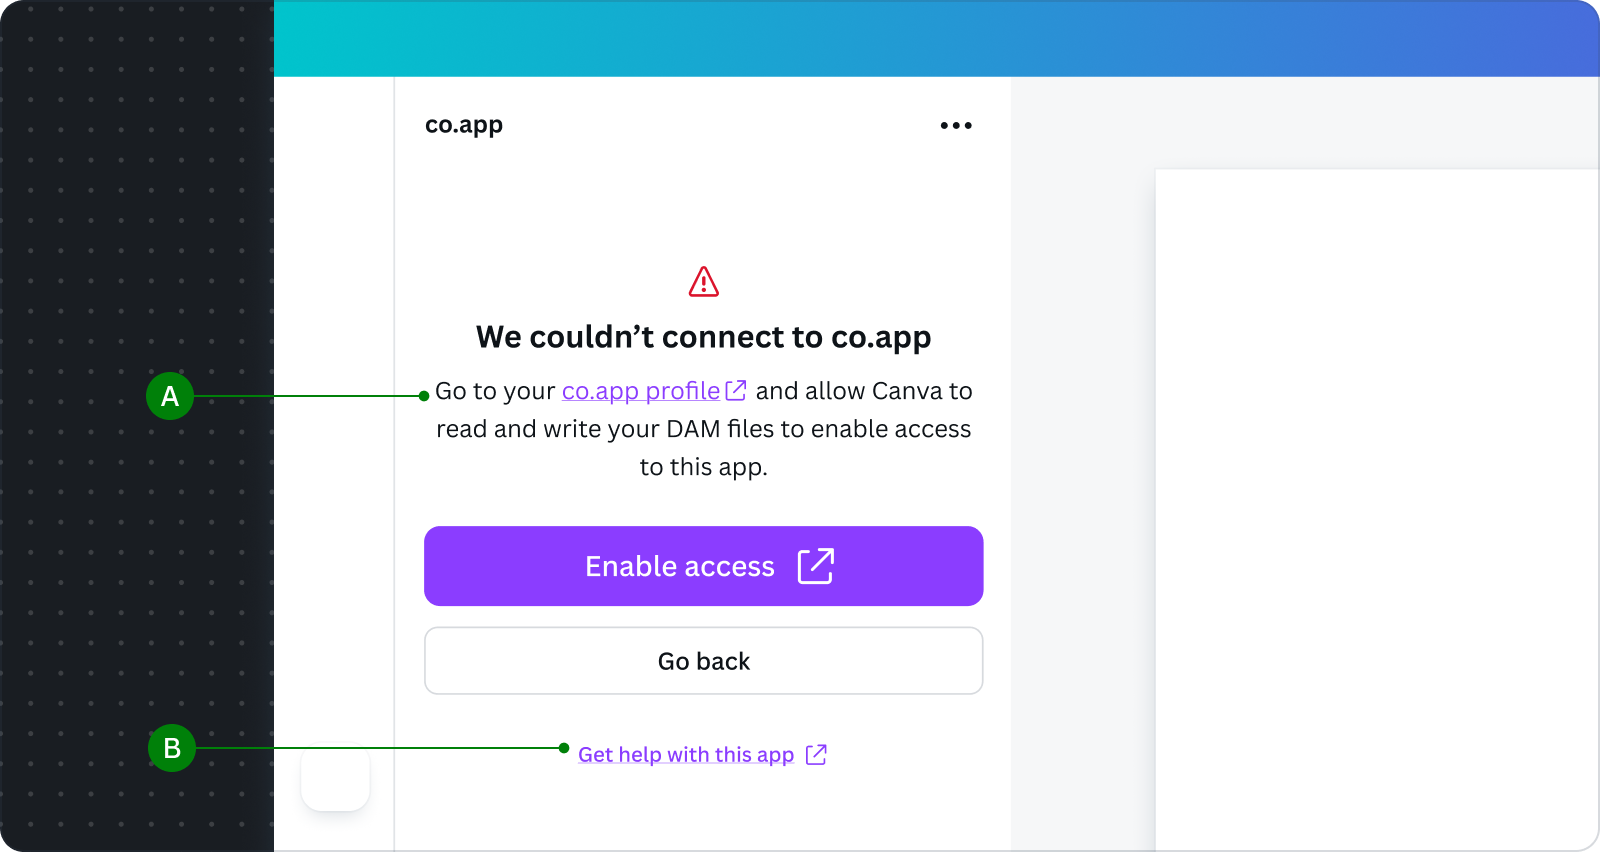
Do
A Provide instructions to retry and grant specific permissions.
B If your app's permissions are complex, offer assistance and a link to a guide.
Don't
- Avoid vague requests. Make sure you explain why you are asking for the required permissions.
- Overload the error message with too much information. Provide a link to external content.
Temporarily unavailable
Optional — This error occurs when there's a server overload. Use this error message if you expect your server to frequently experience excessive load. For example, a freemium Gen AI app that allocates fewer resources to their free users.
Do
- Focus on transparency, explaining that the server is busy.
- Provide a primary action to try again soon.
Don't
- Include technical details irrelevant to the design task.
Other errors
Optional — These are error types specific to your app, or unexpected and hard to predict error scenarios.
For example, a private app might limit an external contractor's access. When a time limit expires, the contractor sees an error message explaining why they can't continue accessing the app. The error message offers a way for them to extend their access, such as a support request.
Only build this error message view if there's no way to prevent these specific errors in your app. During the app review process, other error messages are reviewed on a case-by-case basis because we have limited knowledge of your specific error types.
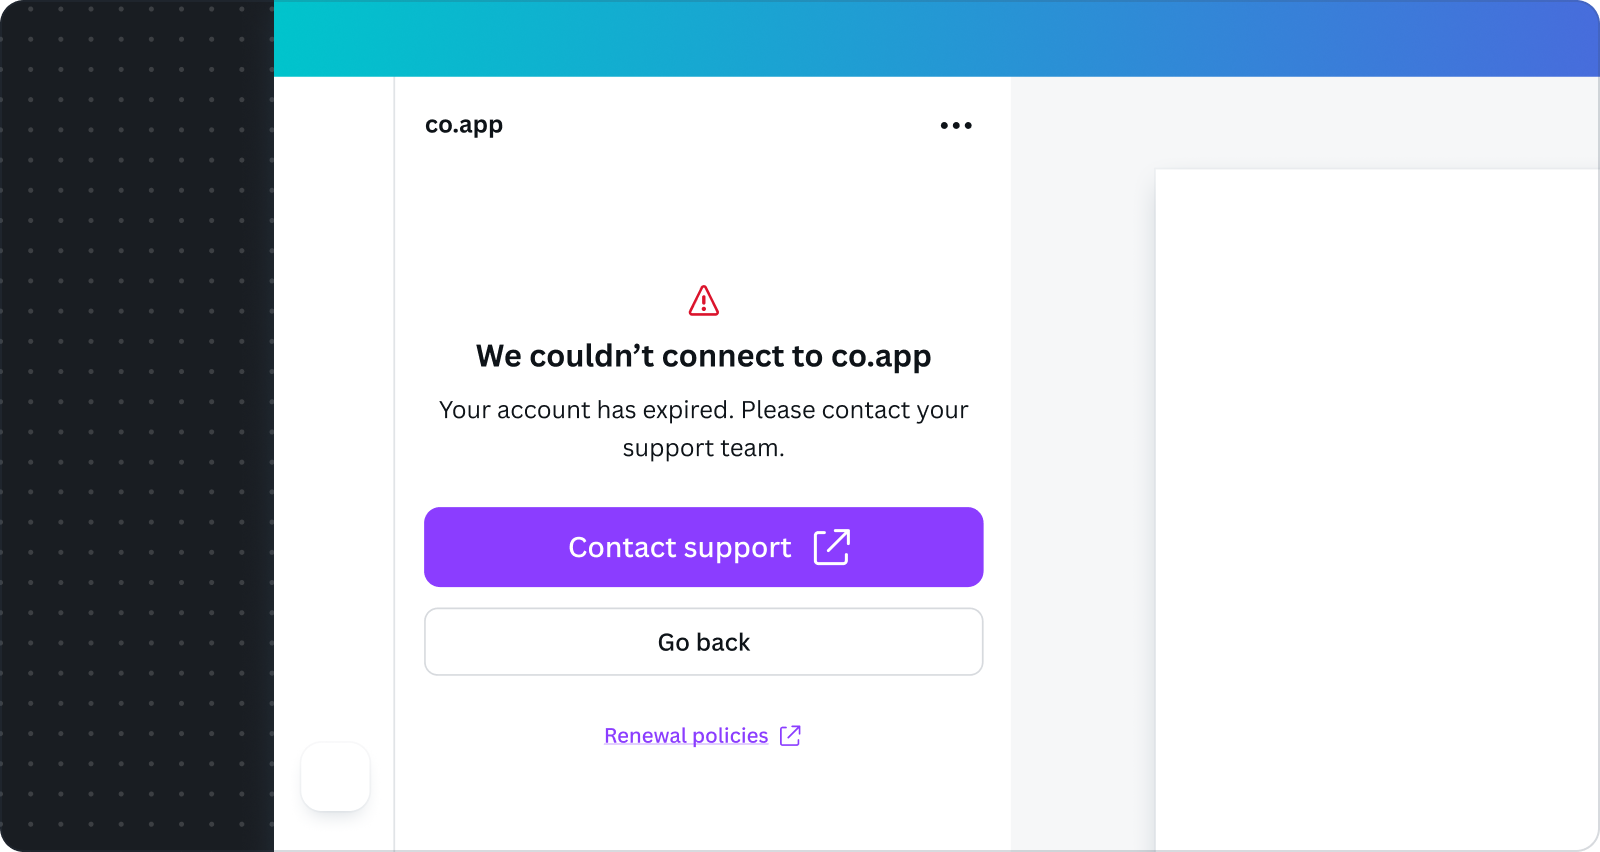
Do
- Add a help link to your support page if your support team can address the error.
- Follow the error and messaging design guidelines.
Help links must be hard coded because there currently isn't an API or other method to get this information from the Developer Portal.
Don't
- Build this error message if the catch-all feedback provides sufficient support for your app error scenarios.
Multi-account switcher
If your app lets the user switch between multiple accounts, we recommend you use the Account Switcher pattern(opens in a new tab or window) from the App UI Kit. This pattern allows the user to switch, add, and manage accounts, as well as handle edge cases such as reconnecting expired accounts.
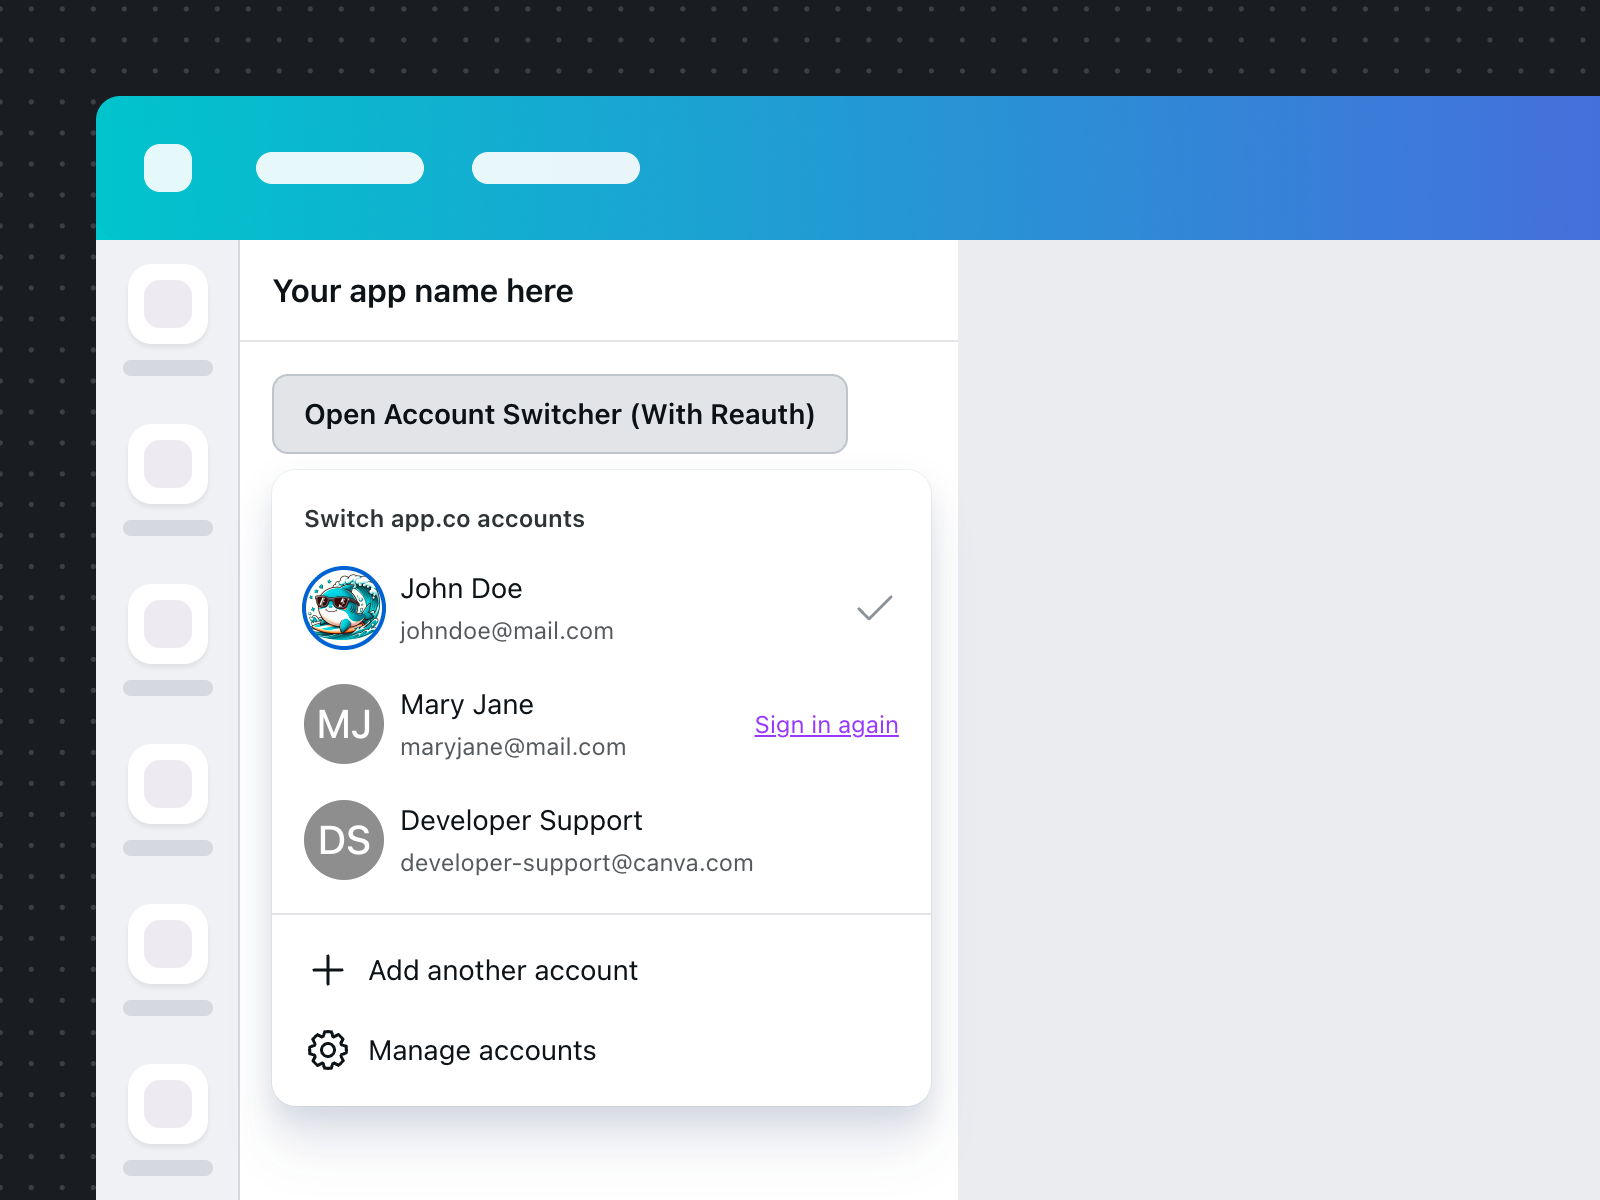
There are multiple ways to allow users to access the Account Switcher in your app. If you're using the recommended pattern, you can control this using the trigger prop in FlyoutMenu.
Although we don't have strict requirements for the entry point, we recommend using one of the following common patterns:
Drop-down button
Make it easy to identify the current account with an avatar and handle. The button styling with a chevron icon indicates more accounts are available. Publish apps are a good example of using this pattern to switch between social media accounts.
Avatar button
Use the user's avatar as the clickable entry point. This is a minimal version of the dropdown, which helps to condense the UI when used with a search header.
![]()
Multi-provider workflows
If your app is integrated with multiple providers, we recommend the following design patterns for different authentication requirements.
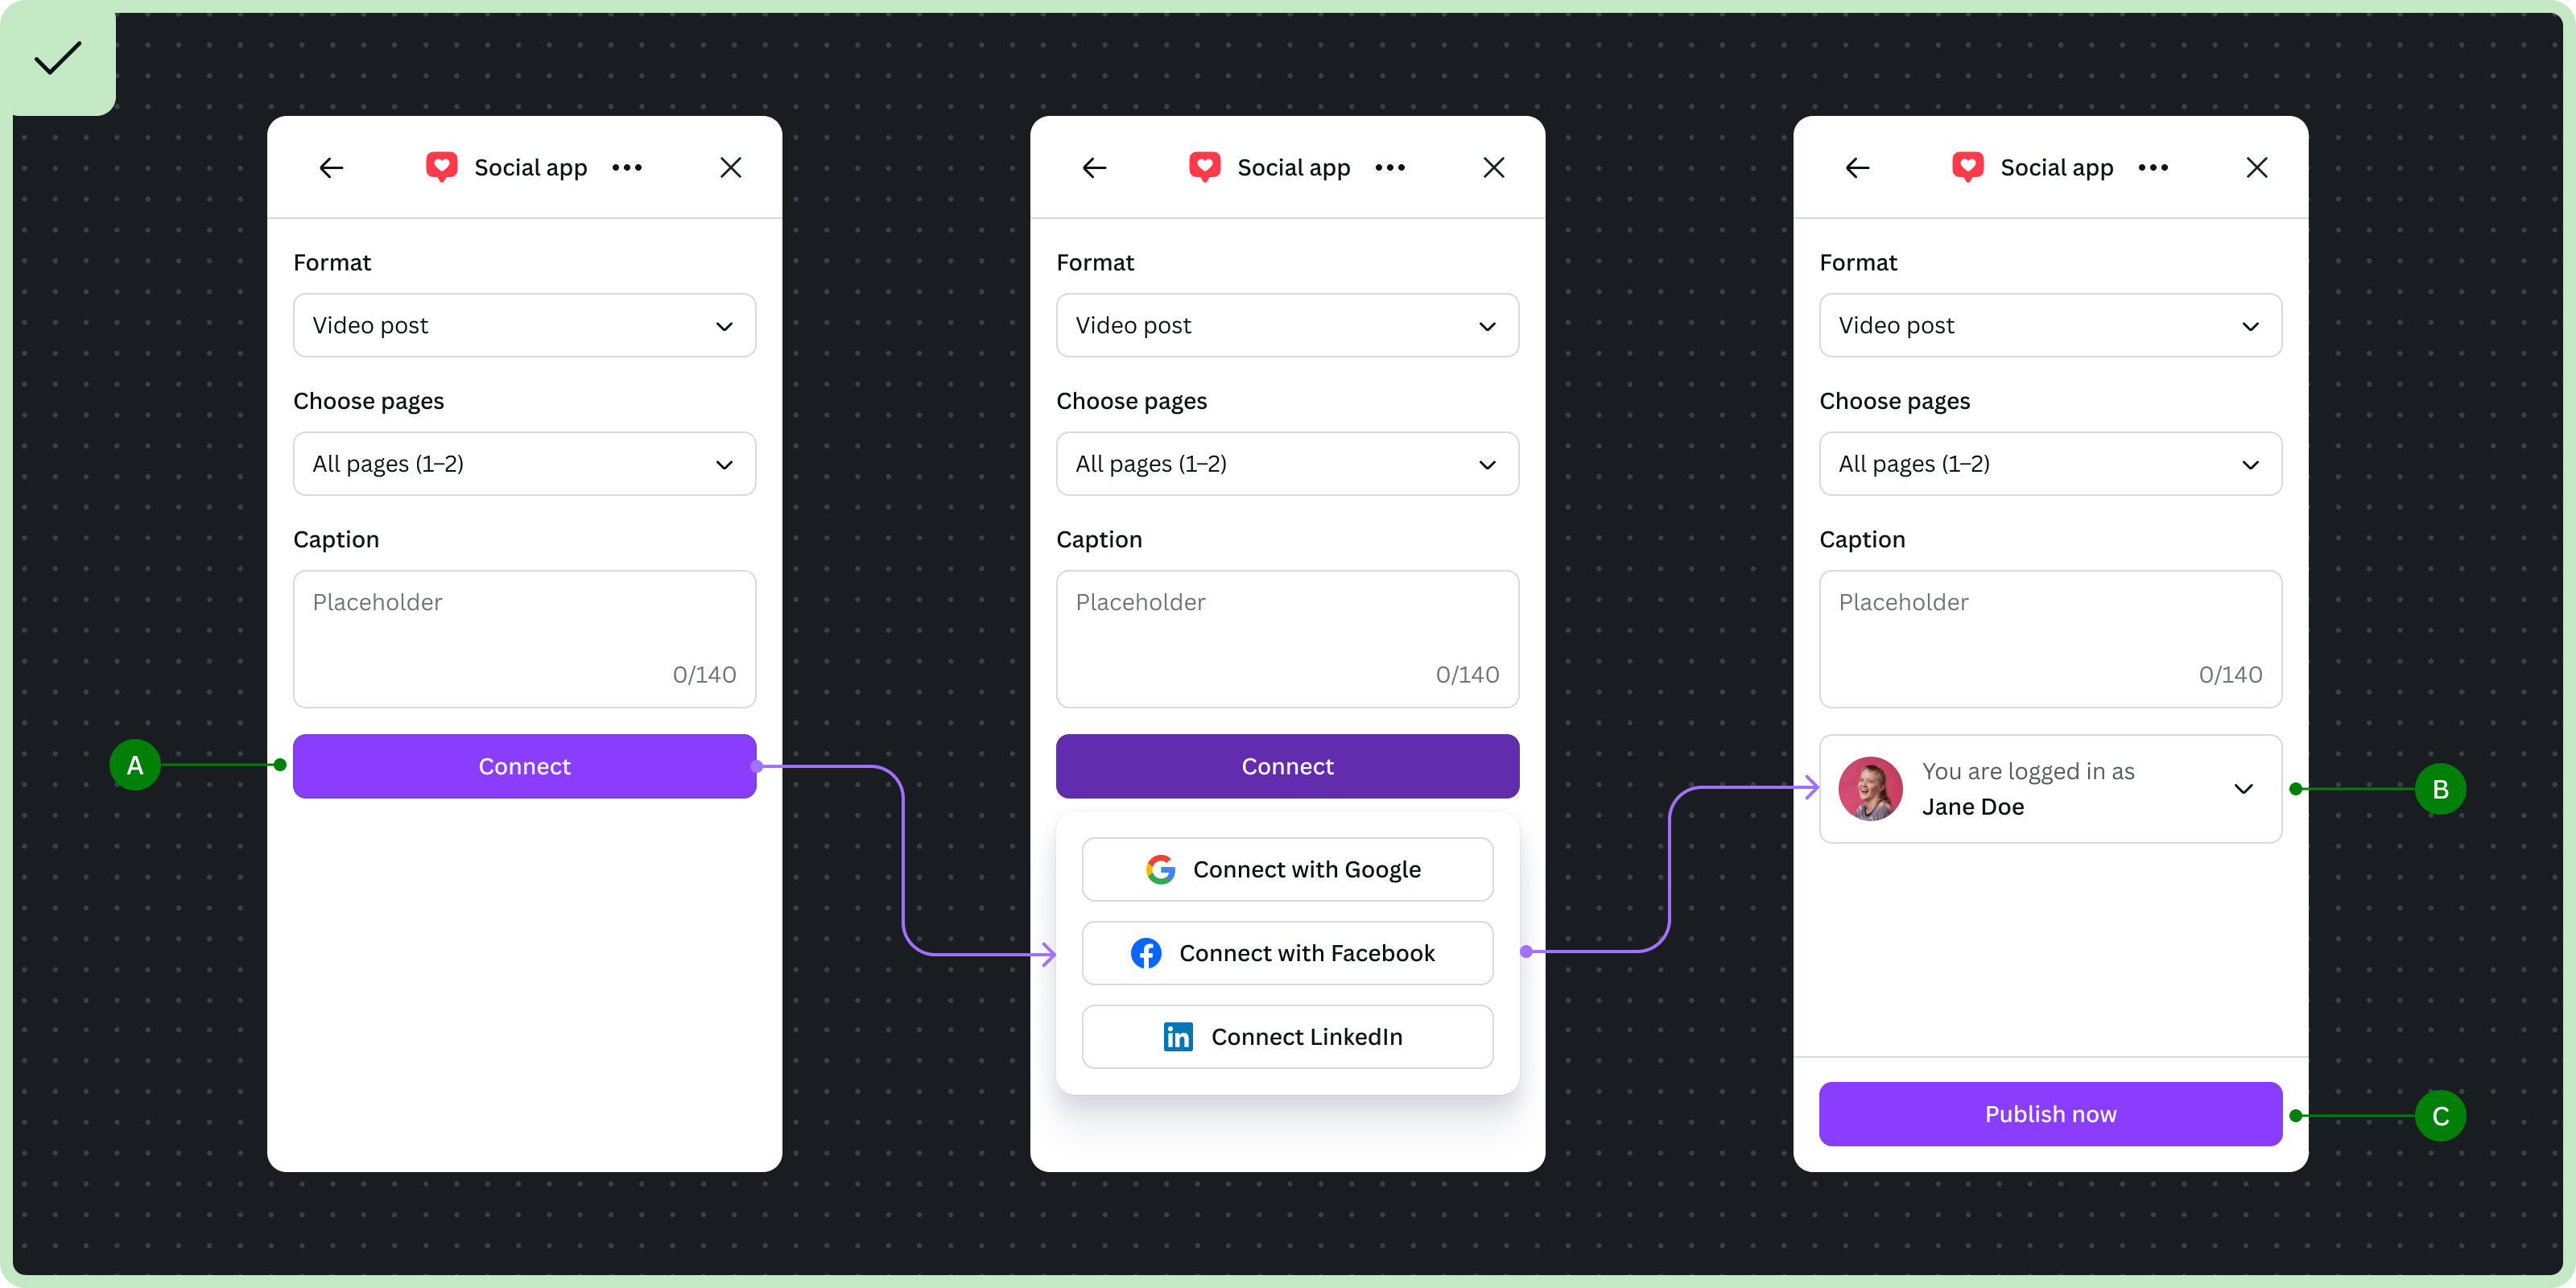
Authentication is optional
Your app may limit access to certain functions without authentication, but users can complete the workflow. For example, freemium apps with both free and paid features, or limited free AI credits, or a data app with both public and private datasets. The general guidance is to keep the users focused on the primary workflow, and only require authentication when they need to access protected content.
Do
A Use a secondary trigger to open a flyout(opens in a new tab or window) with the list of providers. It should be placed after the primary button so the user can use the app until they need to authenticate.
B After the user authenticates, you should provide a UI to disconnect or switch accounts in the same proximity as the trigger button.
Don't
- Show all the providers without progressive disclosure. This overloads the UI with too many options.
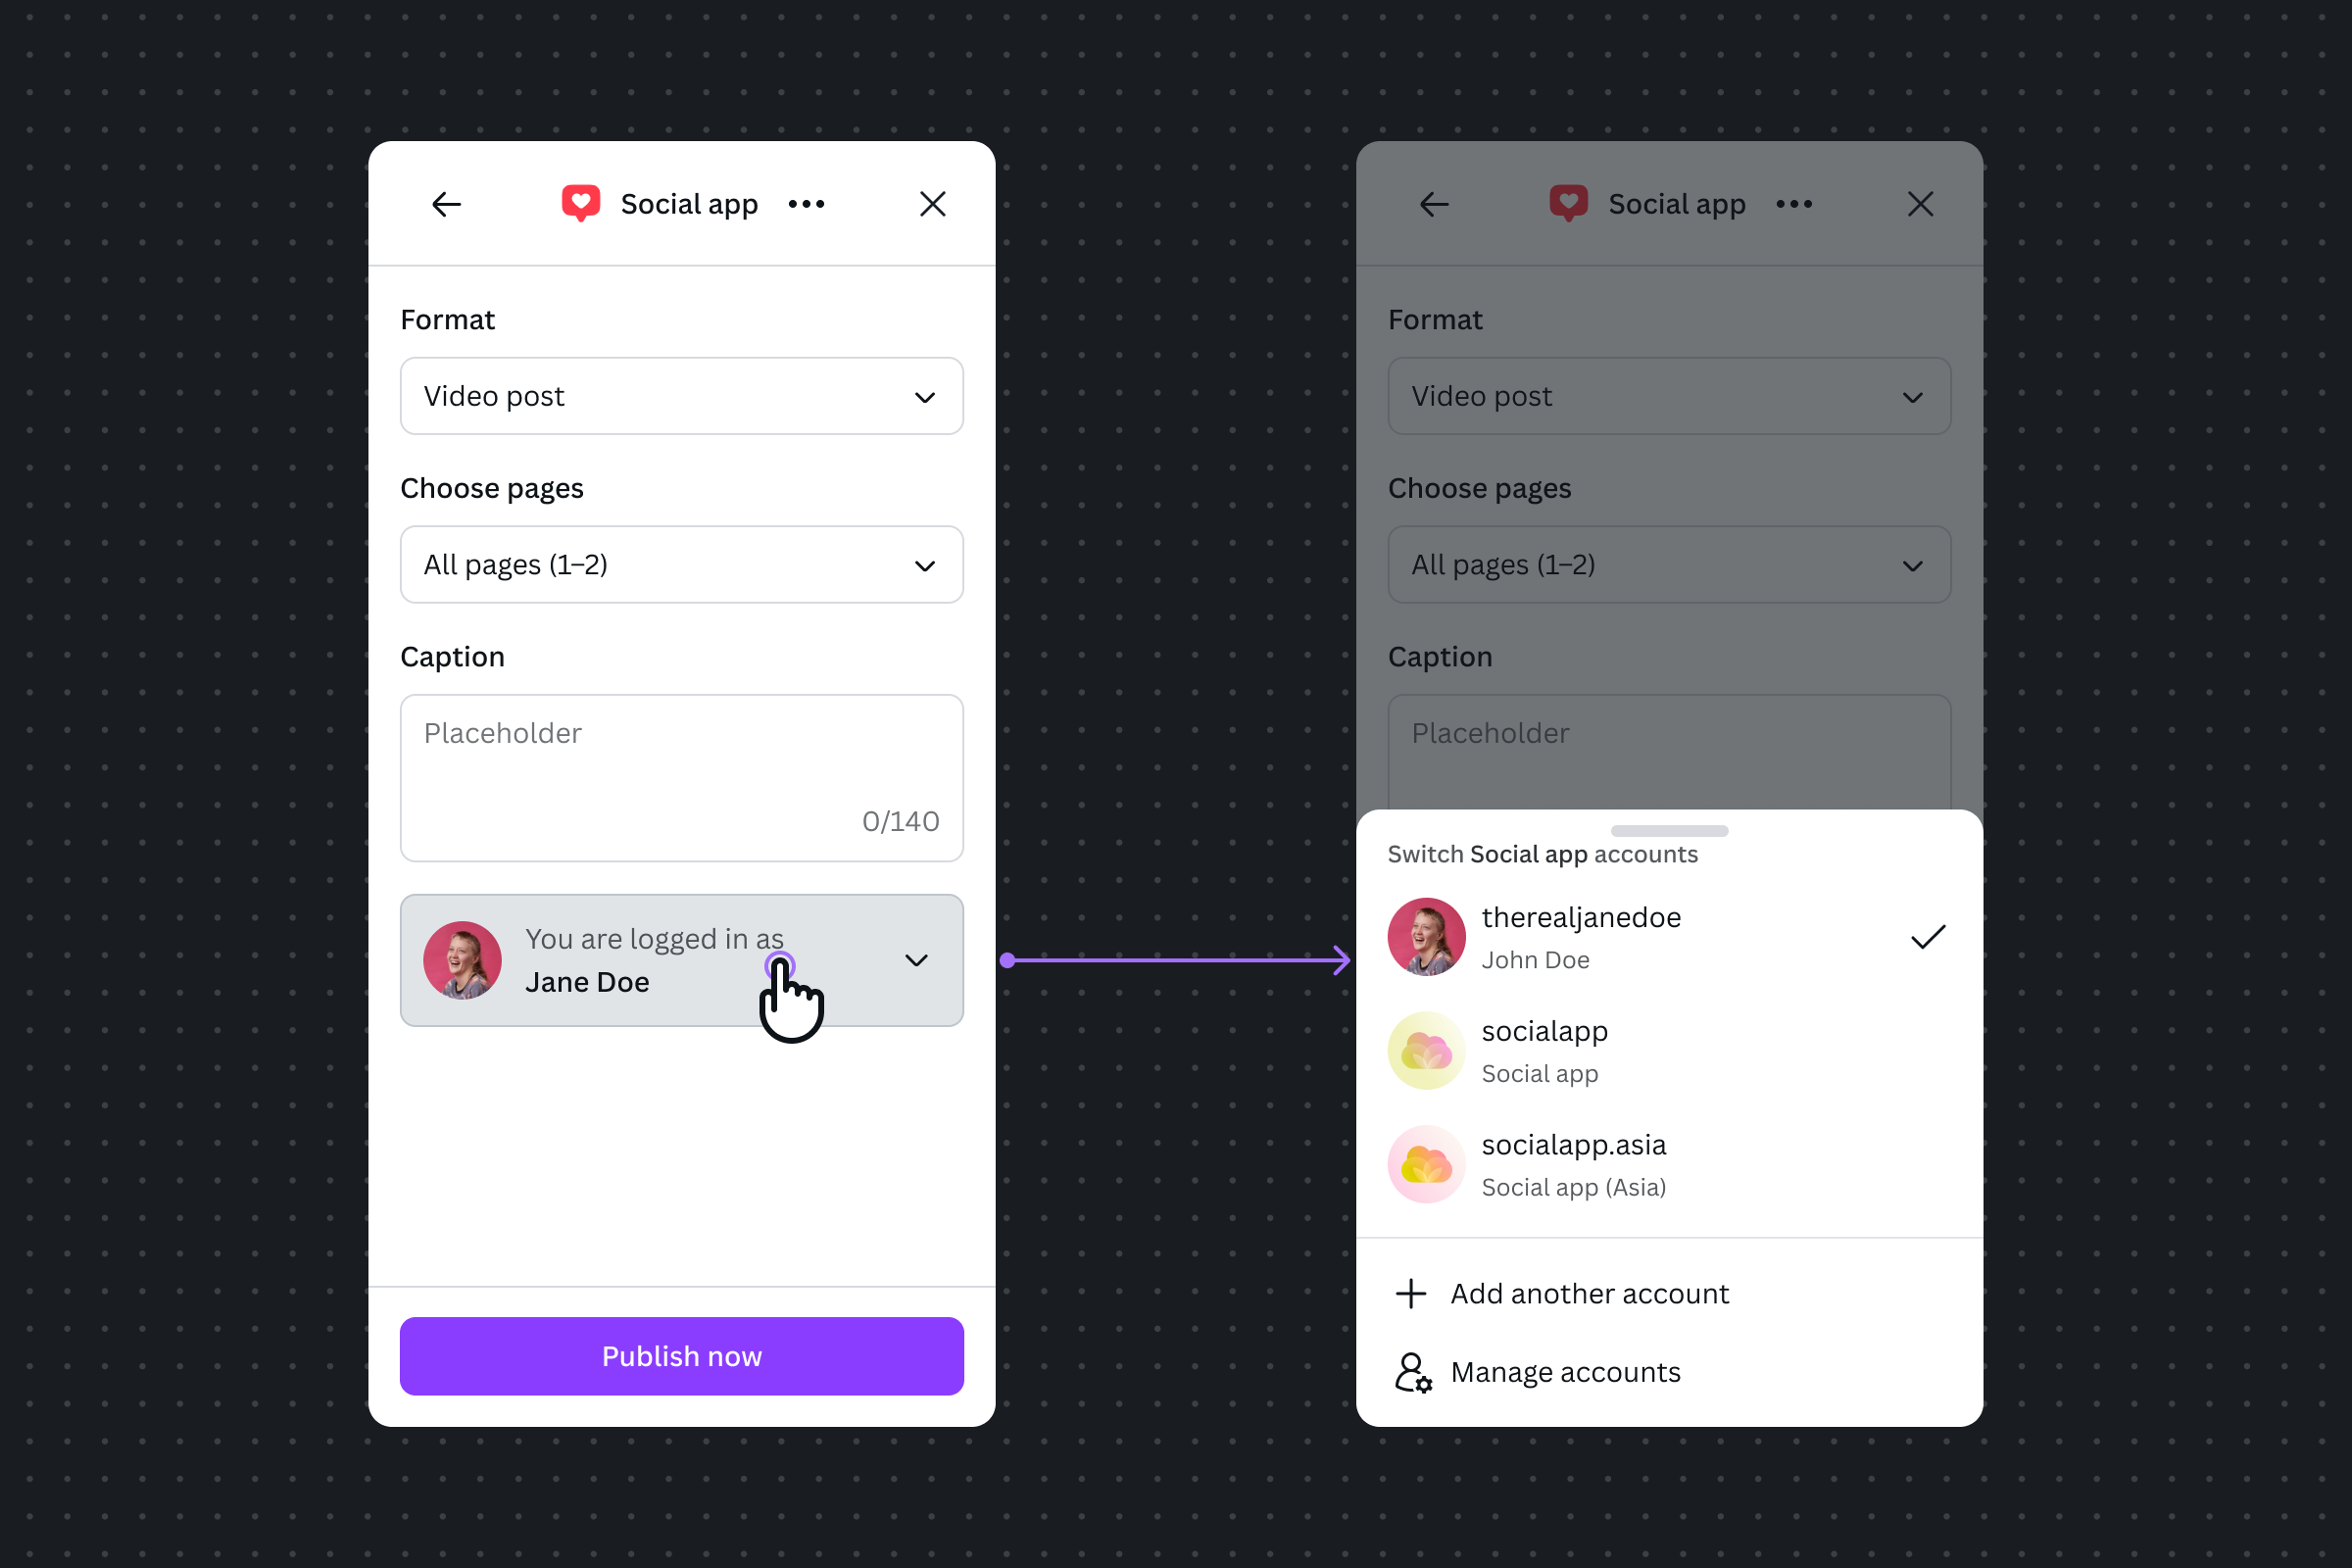
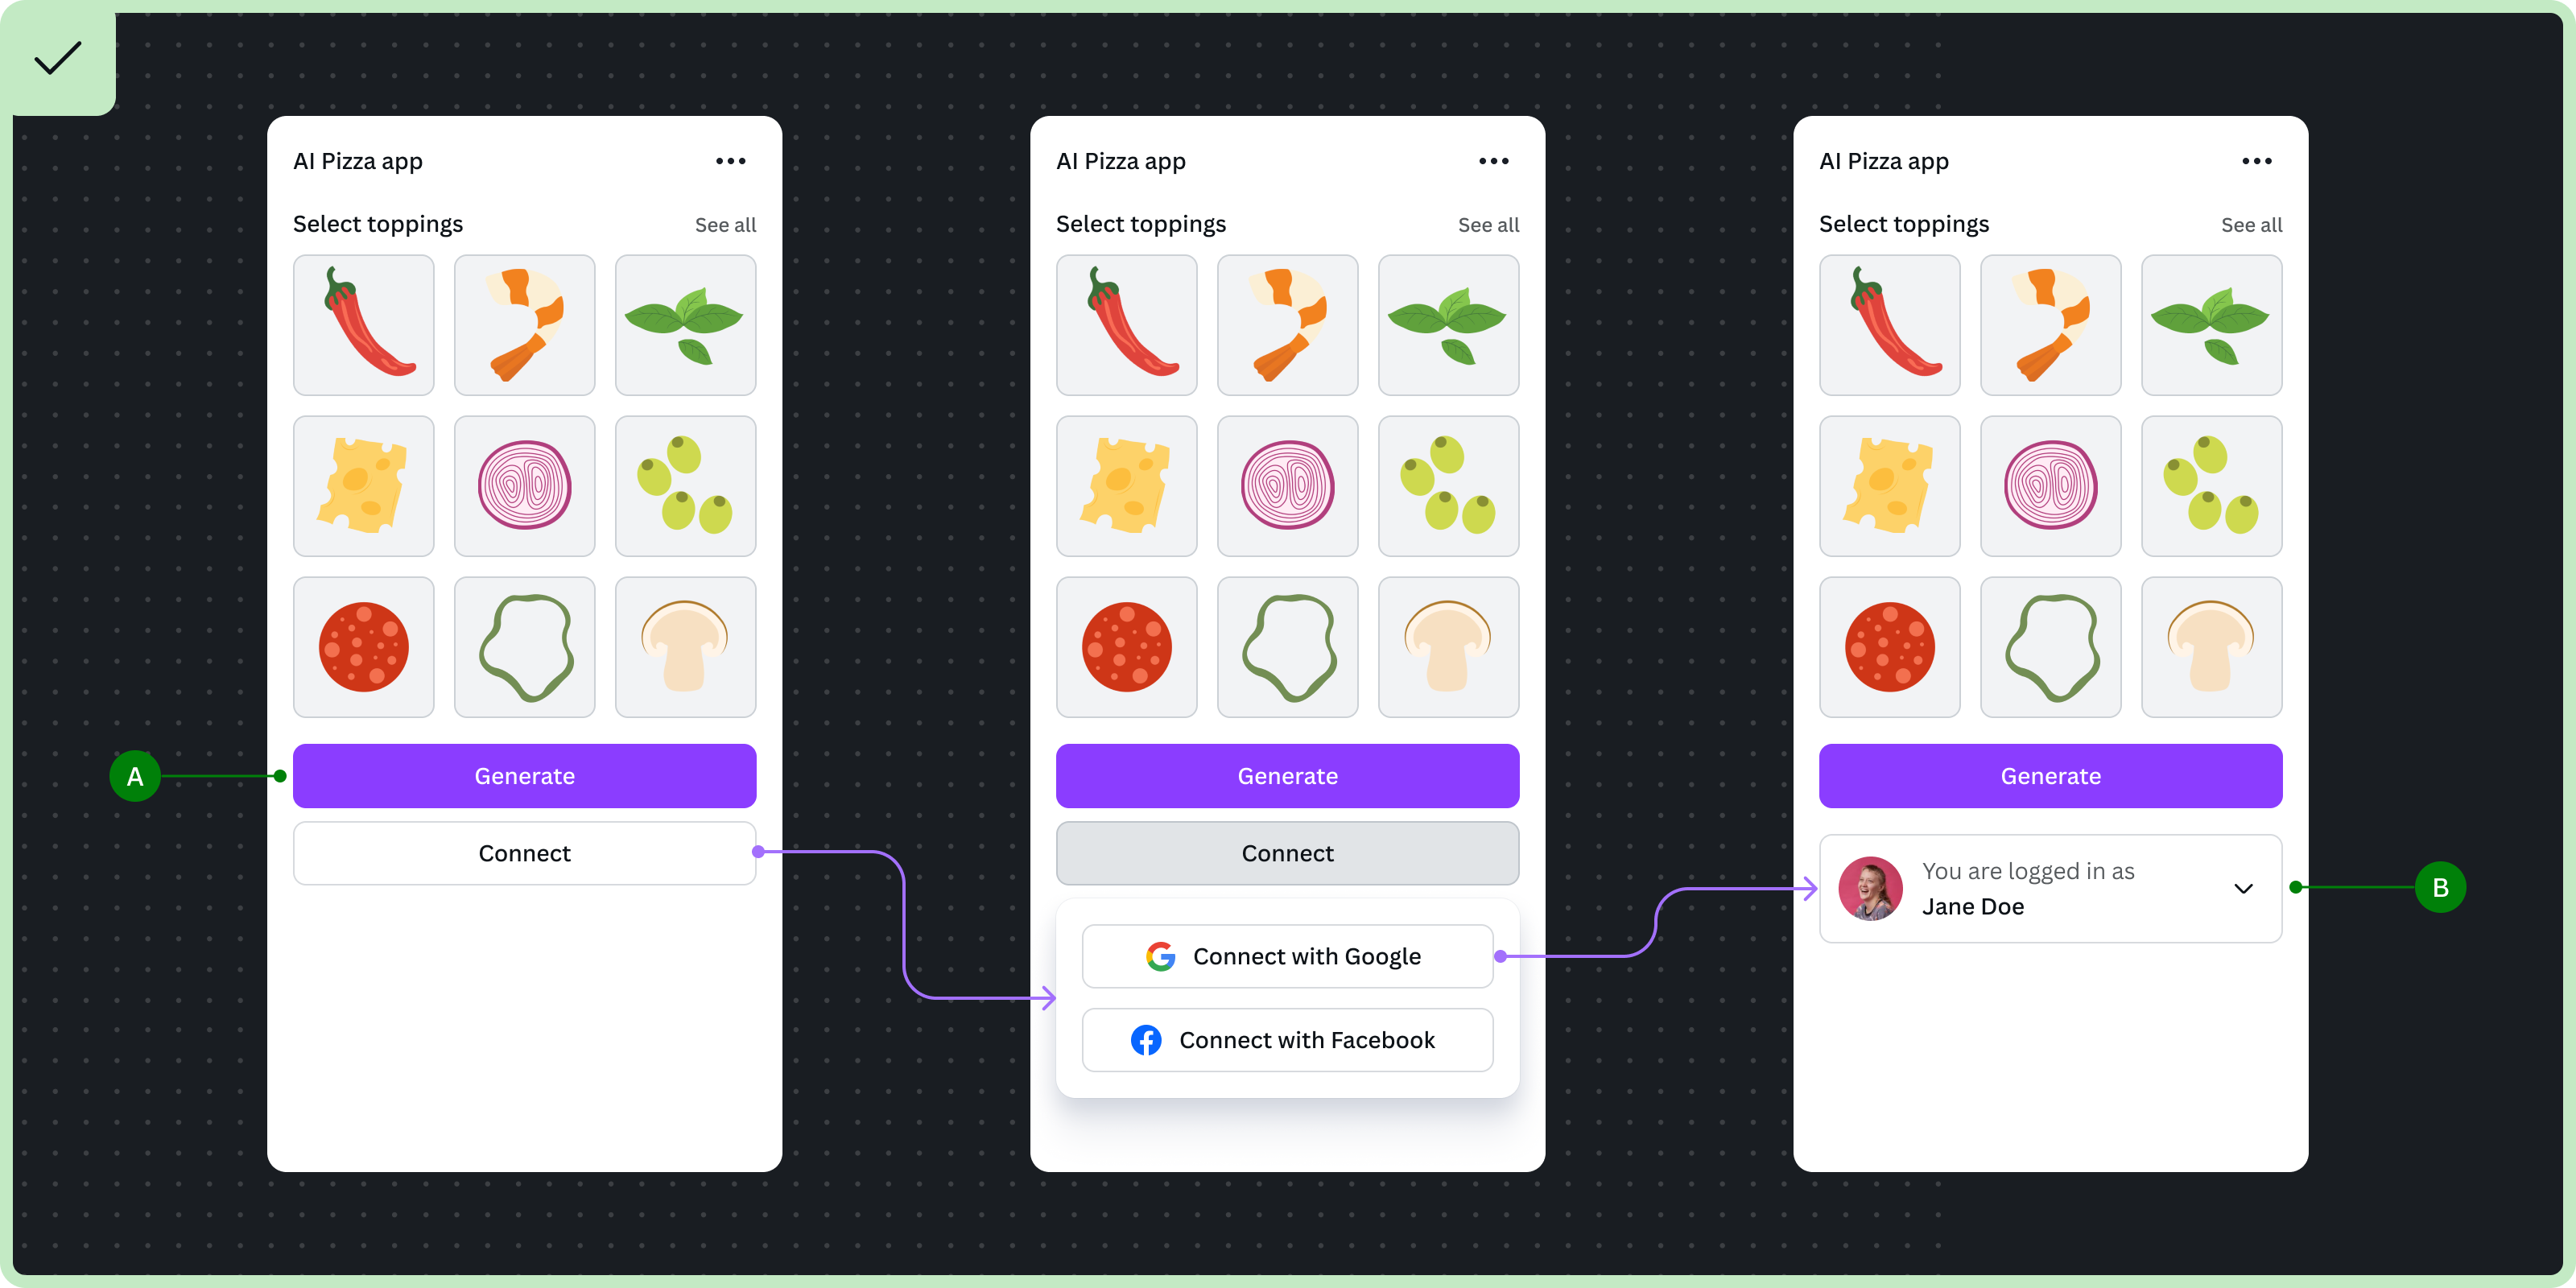
Authenticate to complete the workflow
Your app allows the user to use some of its functions, but they must authenticate to complete the workflow. For example, social media publish apps allow the user to add captions and preview their content, but they must authenticate to publish the design. The general guidance is to maintain the user's design productivity until they need to authenticate at the end.
Do
A Use a primary 'Connect' button to trigger a flyout with the list of providers.
After the user authenticates:
B Add a secondary UI, such as an Account Switcher, to show they are authenticated and can disconnect or switch accounts.
C Make sure there's one new primary button to complete the workflow.
Don't
- Show multiple primary buttons. This competes with the primary workflow.
Authenticate to access the app
When no functions are available unless the user authenticates, we recommend you to render a simple screen listing all the authentication providers. This focuses the user on authenticating, and defers the app's functionality to the next step.
Do
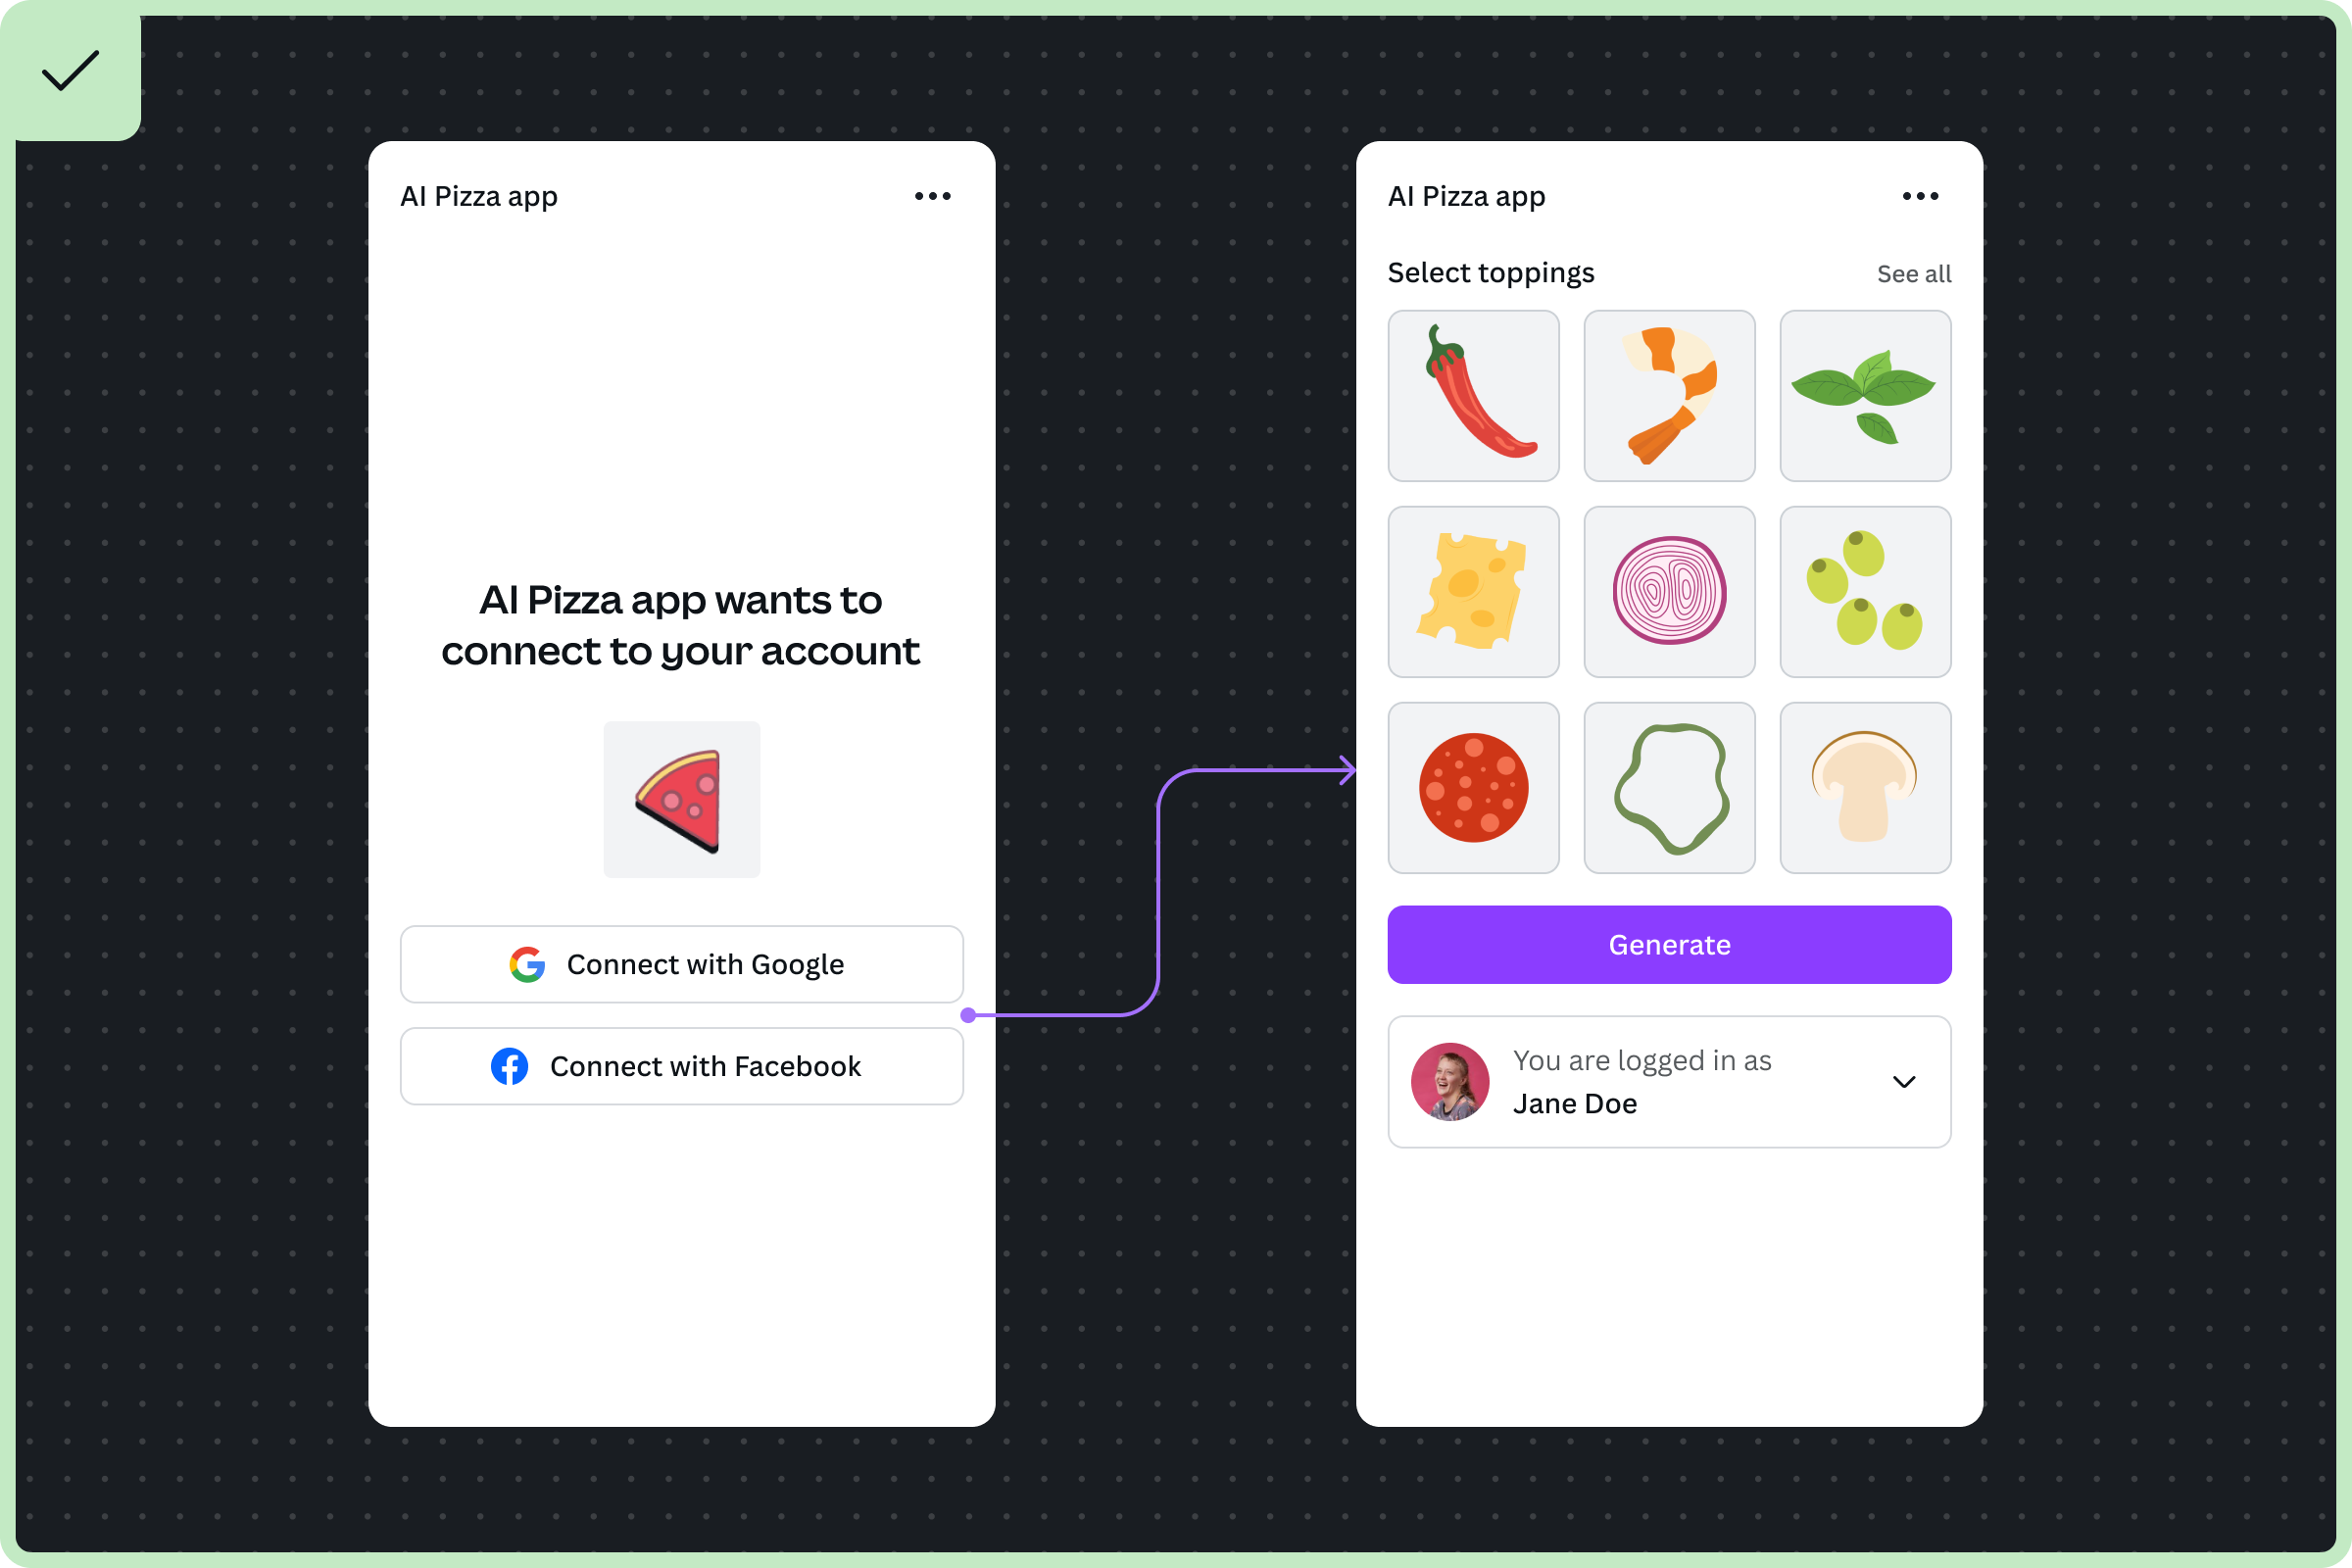
- Simplify the UI by showing a clear message to direct the user to choose a provider to authenticate.
Don't
- Clutter the UI with elements that are not relevant to the authentication flow.
Suggested written content for authentication flows
There can be many scenarios to consider when building an authentication flow. You are free to make your own written content to communicate authentication flows. Alternatively, to speed up your development, we've provided some suggested written content that you can use.
Scenario | Suggested written content |
|---|---|
Password is incorrect | Forgot password? |
No email found | We couldn’t find that account. Try a different email or sign up. |
One or all of the credentials are invalid | We couldn’t find that account. Try logging in a different way or sign up. |
User needs to reset password | For your security, we’ve emailed your a link to reset your password. |
Too many failed login attempts | Too many attempts. Please try again in X minute(s). |
Password reset link expired or used already | Looks like you need a new password reset link. |
User already has an account | Looks like you already have an account! Log in. |
Not all form fields complete | Not quite done yet... |
Incomplete fields | You missed this one. |
Passwords don’t match | Those passwords don’t match. |
Invalid password – doesn’t meet criteria | Use 8 or more characters with a mix of letters, numbers, and symbols. |