Quickstart
The Canva Developers SDK lets anyone build apps that extend Canva, across three surfaces: apps inside Canva, Canva for your platform, and Canva for AI assistants. This guide explains how to get an app up and running on each of them, in a matter of minutes.
The steps are different for each surface, so choose the surface you're building for in the tabs below and follow that path.
The starter kits for apps inside Canva (previously known as the Apps SDK) and the Canva REST APIs (previously known as the Connect APIs) are being combined in a future update. The steps here continue to work until that happens, and will be updated in the future.
Before you begin
To follow this guide, you'll need to:
- Sign up for a Canva(opens in a new tab or window) account.
- Install the tooling for the surface you're building on. See Prerequisites for the what is required for each surface.
Public and private apps
Before you create an app you must decide who your app is for. You can't change this after the app is created.
-
Public apps are created for release to the general public. After they're reviewed by Canva and released, they can be discovered in the Apps Marketplace. A public app must meet the requirements outlined in the submission checklist.
-
Private apps are created solely for a team using Canva, such as an app that works with a specific internal system. These apps aren't available to the general public. Your team administrators review and approve private apps.
Private apps are only available to teams(opens in a new tab or window) on an Enterprise plan(opens in a new tab or window).
Choose a surface
Choose one of the tabs below to get started with that Developers SDK surface.
An app inside Canva runs in the Canva editor. You can create one with the Canva CLI, or by hand in the Developer Portal.
Step 1: Create an app
-
Install the Canva CLI(opens in a new tab or window) globally:
npm install -g @canva/cli@latestSHELL -
Log in to the Canva CLI. This command opens an access request page in your browser:
canva loginSHELL -
Click Allow to grant the Canva CLI permission to manage your Canva apps.
-
Copy the confirmation code shown, and paste it into the Canva CLI input.
-
Run the
canva apps createcommand to start the app creation process, or run the command with the following optional command flags. If they aren't set, the Canva CLI prompts you for a decision during the app creation process:- App name: Add your app's name after the
canva apps createcommand as an argument. For example:canva apps create "A New App". - App template: Select a template using the
--templateflag. Templates are pre-built starter projects that demonstrate common use cases and best practices. Available templates includehello_world(a minimal example),data_connector(for importing external data),content_publisher(for publishing to external platforms), and more. For a complete list, see App templates. - Audience: Set the target audience using the
--distributionflag. This flag is important because it restricts the target audience for your app:public: You can make your app available to all of Canva's users, but the app will need to be reviewed by Canva and meet the requirements outlined in the submission checklist.private: The app can only be made available to members of the current team(opens in a new tab or window) on an Enterprise plan(opens in a new tab or window), and the team's administrators are responsible for reviewing it.
- Git: Include a Git repository using the
--gitflag. - Dependencies: Install dependencies during the app creation process using the
--installDependenciesflag.
- App name: Add your app's name after the
This example creates an app named "My New App" that uses the hello_world template with public distribution, includes a Git repository, and installs the dependencies during the app creation process:
canva apps create "My New App" --template="hello_world" --distribution="public" --git --installDependencies
When the build process is complete, the Canva CLI automatically opens the Developer Portal(opens in a new tab or window) to your new app's configuration page.
-
Open Your apps(opens in a new tab or window) in the Developer Portal and click Create an app.
-
In the modal:
- Enter an App name, using 18 characters or fewer.
- Under Who can use your app?, choose Public or Private. Private is only available on a Canva Enterprise plan. This can't be changed later.
- Accept the Developer Terms.
- Click Create app.
You land on the app's Overview page, which summarizes the app and links to the setup for each surface.
For help choosing between Public and Private, see Public and private apps above.
Step 2: Set up and run the app
-
Change into the app's folder:
cd my-new-appSHELL -
If you didn't use the
--installDependenciesflag when running thecanva apps createcommand, or install the dependencies when prompted, manually install the dependencies:npm installSHELL -
Run the following command to start your app:
canva apps startSHELLThe local development server starts running at http://localhost:8080(opens in a new tab or window), but you can't use this URL to view the local preview, see the next step instead.
-
Clone the following repo:
git clone https://github.com/canva-sdks/canva-apps-sdk-starter-kit.gitSHELLThis repo contains the starter kit for building apps inside Canva. The starter kit is a boilerplate for an app and all of the tooling we recommend. To learn more about the starter kit, see Starter kit.
-
Navigate into the cloned directory for the starter kit:
cd canva-apps-sdk-starter-kitSHELL -
Install the dependencies:
npm installSHELL -
Start the local development server:
canva apps startSHELLThe local development server starts running at http://localhost:8080(opens in a new tab or window), but you can't use this URL to view the local preview, see the next step instead.
Step 3: Preview the app
This step explains how to use Canva to view the app running locally at http://localhost:8080(opens in a new tab or window). In the Developer Portal(opens in a new tab or window), open your app, then:
-
On the app's Inside Canva page, set Code upload > App source > Development URL to the address of your local development server.
The URL must point directly to a standalone JavaScript file. This field exists only for development: you can't submit an app for review while it holds a value.
-
Click Preview.
The app opens in a new tab. Apps use the Design Editor intent by default; if your app implements another intent, or more than one, choose which to preview under Preview options > Choose an intent, beside Preview.
-
The first time you open an app you have to connect it. Click Open, and the app loads in the iframe.
You only need to connect the app once.
If you're using Google Chrome, click Allow when prompted by your browser to allow local network access. For more information on this, see Previewing apps.
The example app includes a button that responds with "Hello world!" when clicked:
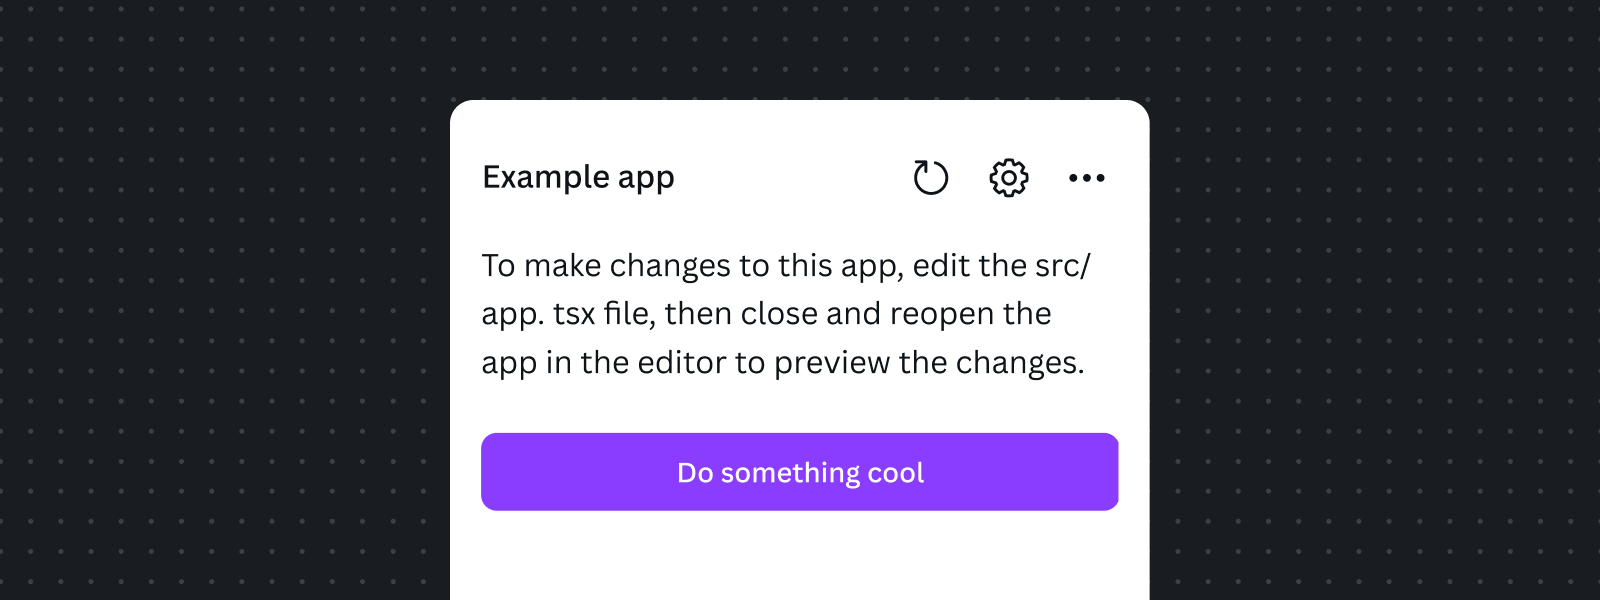
To learn more about how to preview apps, including how to set up live reloading, see Previewing apps.
Step 4: Start editing code
Use a code editor to open src/intents/design_editor/app.tsx. This file contains placeholder code that you can edit to start building your app.
In the following example, a button click triggers a wrapper method for addElementAtPoint, adding a new text layer to the Canva design with the words "Hello world!".
import { Button, Rows, Text } from "@canva/app-ui-kit";import { FormattedMessage, useIntl } from "react-intl";import * as styles from "styles/components.css";import { useFeatureSupport } from "@canva/app-hooks";export const App = () => {const isSupported = useFeatureSupport();const addElement = [addElementAtPoint, addElementAtCursor].find((fn) =>isSupported(fn),);const onClick = () => {if (!addElement) {return;}addElement({type: "text",children: ["Hello world!"],});};const intl = useIntl();return (<div className={styles.scrollContainer}><Rows spacing="2u"><Text><FormattedMessagedefaultMessage="To make changes to this app, edit the <code>src/app.tsx</code> file,then close and reopen the app in the editor to preview the changes."description="Instructions for how to make changes to the app. Do not translate<code>src/app.tsx</code>."values={{code: (chunks) => <code>{chunks}</code>,}}/></Text><Buttonvariant="primary"onClick={onClick}disabled={!addElement}tooltipLabel={!addElement ? intl.formatMessage({defaultMessage: "This feature is not supported in the current design",description: "Tooltip label for when a feature is not supported in the current design",}) : undefined}stretch>{intl.formatMessage({defaultMessage: "Do something cool",description:"Button text to do something cool. Creates a new text element when pressed.",})}</Button></Rows></div>);};
Optional: Log out of the Canva CLI
When you log in to the Canva CLI using the canva login command, the Canva CLI generates an authentication token. The token prevents you from having to repeat an authentication step for every CLI request. The token is encrypted and stored in ~/.canva-cli/credentials or %USERPROFILE%\.canva-cli\credentials, depending on your operating system.
You can use the canva logout command to revoke the token's access to your account as well as deleting the token file. Manually deleting the token file removes Canva CLI access, but doesn't revoke the token, so a copy of the token could reconnect the Canva CLI to your account.
Use the canva logout command to revoke access and delete the stored token.
canva logout
To help you get started with the Canva REST APIs, Canva has created an example app in a GitHub repository(opens in a new tab or window) that demonstrates some of the main features.
This part of the guide shows you how to create and configure an app, clone the repository, and run the example locally on your machine. You can then review the source code to understand how its features work.
Step 1: Create an app
-
Open Your apps(opens in a new tab or window) in the Developer Portal and click Create an app.
-
In the modal:
- Enter an App name, using 18 characters or fewer.
- Under Who can use your app?, choose Public or Private. Private is only available on a Canva Enterprise plan. This can't be changed later.
- Accept the Developer Terms.
- Click Create app.
You land on the app's Overview page, which summarizes the app and links to the setup for each surface.
For help choosing between Public and Private, see Public and private apps above.
Step 2: Enable and configure the REST APIs
-
Go to Outside Canva and click Start integrating.
Until you do this, Outside Canva has no Configuration or Redirect URLs beneath it. Canva creates an auth client for your app and takes you to Configuration.
-
On Outside Canva > Configuration, under Integration methods, check that Canva REST APIs is turned on.
The Scopes, REST API version, and Return navigation settings are all inside this section, so they're only available while it's turned on.
-
On the same page, under Credentials:
- Note the Client ID. You'll need it to request an access token.
- Click Generate secret, then store the secret somewhere secure. It isn't shown again.
Treat the client secret like a password. Don't commit it to source control, and don't include it in a client-side bundle.
Then set the scopes, redirect URL, and return navigation the example app needs:
-
On Outside Canva > Configuration, under Scopes, select the following scopes:
- design:content: Read and Write.
- design:meta: Read.
- asset: Read and Write.
- brandtemplate:meta: Read.
- brandtemplate:content: Read.
- profile: Read.
-
On Outside Canva > Redirect URLs, locate URL 1 and enter the following value:
http://127.0.0.1:3001/oauth/redirect -
On Outside Canva > Configuration, turn on Return navigation and enter the following value for Return URL:
http://127.0.0.1:3001/return-nav
Step 3: Clone the repository
Clone the example repository to your local machine:
git clone https://github.com/canva-sdks/canva-connect-api-starter-kit.git
Step 4: Install dependencies
Install the dependencies in the repository root:
cd canva-connect-api-starter-kitnpm install
Step 5: Configure the env file
Add your app's settings to the demos/ecommerce_shop/.env file. For example, you can use code from the command line to open the file in Visual Studio Code:
cd demos/ecommerce_shopcode .env
Update the following values:
CANVA_CLIENT_ID: This is the client ID from Step 2.CANVA_CLIENT_SECRET: This is the client secret you generated in Step 2. You can generate a new one if you no longer have it.
Step 6: Run the app
In the demos/ecommerce_shop directory, run the following command to start the app locally on your machine:
npm start
Step 7: View the app
With the app running locally on your machine, you can now authorize the app to access your Canva account using OAuth:
- Use your browser to access the app at http://127.0.0.1:3000(opens in a new tab or window). Don't use
localhost:3000, as you might get CORS errors. - Click the Connect to Canva button and follow the prompts in the popup window.
- Navigate through the app to view your Canva resources.
Optional: Generate a client SDK
The REST APIs' OpenAPI description is publicly available at https://www.canva.dev/sources/connect/api/latest/api.yml(opens in a new tab or window).
You can use this description to generate a client SDK in your preferred language, using a code generation library like openapi-generator(opens in a new tab or window).
TypeScript SDK
This example uses openapi-ts(opens in a new tab or window) to generate the TypeScript SDK in client/ts(opens in a new tab or window).
To regenerate the types, run the following command from the repository root:
npm run generate
Canva for AI assistants uses the Canva MCP server, the remote server that an AI assistant connects to so it can use Canva. For more information about the surface, see About Canva MCP.
Step 1: Get access to the Canva MCP server
Before users can authorize your AI application, Canva needs to recognize its OAuth client. There are two ways to set this up, and you only need to follow one of them. Which one you choose depends on how your AI application authenticates:
- Developer Portal (recommended): Create an app in the Developer Portal and turn on Canva MCP. You get a client ID and client secret straight away, and you manage your own redirect URLs.
- Waitlist: If your AI application authenticates with a Client ID Metadata Document (CIMD) and doesn't use a client secret, apply through the waitlist form to have your redirect URI added to the Canva MCP allowlist.
Create an app
-
Open Your apps(opens in a new tab or window) in the Developer Portal and click Create an app.
-
In the modal:
- Enter an App name, using 18 characters or fewer.
- Under Who can use your app?, choose Public or Private. Private is only available on a Canva Enterprise plan. This can't be changed later.
- Accept the Developer Terms.
- Click Create app.
You land on the app's Overview page, which summarizes the app and links to the setup for each surface.
For help choosing between Public and Private, see Public and private apps above.
Turn on Canva MCP
-
Go to Outside Canva and click Start integrating.
Until you do this, Outside Canva has no Configuration or Redirect URLs beneath it. Starting the integration creates an OAuth client for your app and takes you to Configuration.
-
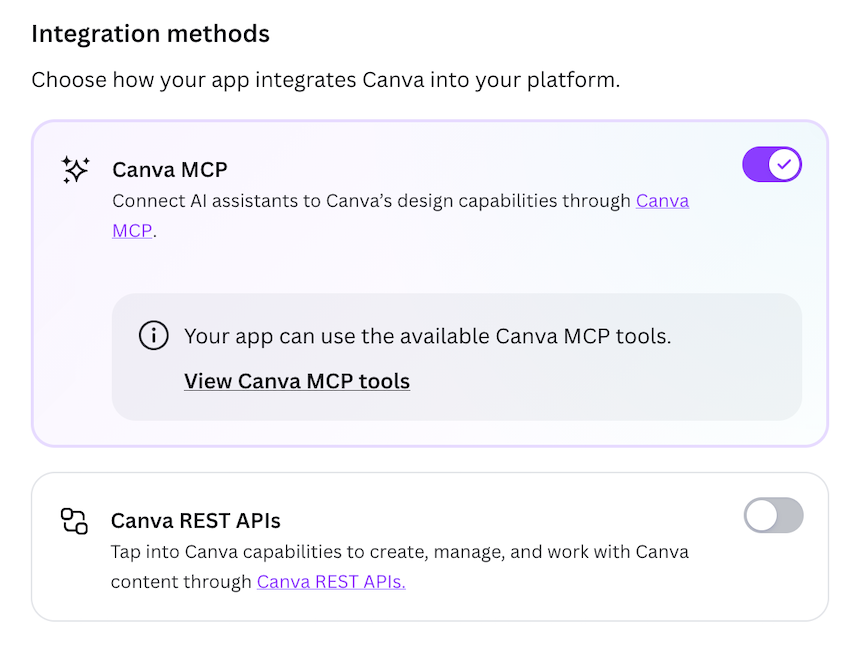
On Outside Canva > Configuration, under Integration methods, turn on the Canva MCP toggle. You can leave Canva REST APIs turned off unless your app also calls the REST APIs.
-
On Outside Canva > Configuration, under Credentials:
- Note the Client ID. Your AI application sends it as the OAuth
client_id. - Click Generate secret, then store the secret somewhere secure. It isn't shown again.
- Note the Client ID. Your AI application sends it as the OAuth
Treat the client secret like a password. Don't commit it to source control, and don't include it in a client-side bundle.
Add your redirect URL
On Outside Canva > Redirect URLs, enter the URL that Canva redirects users back to after they authorize your AI application. This is the same redirect URL that your AI application uses in its OAuth configuration.
To add your redirect URI to the Canva MCP allowlist, apply for access with our Waitlist form(opens in a new tab or window).
-
Tell us about your company, integration goals, technical requirements, and timeline so we can understand how you plan to use the Canva MCP server.
-
Our team reviews applications for brand alignment, trust and safety considerations, compliance readiness, technical fit, and strategic alignment.
-
We'll reach out if we need additional information and share next steps, including eligibility status and integration guidance. You receive notifications at the email address used during application.
We periodically review all applications to the waitlist, and will reach out if we see a fit.
If you're looking to use Canva's MCP server with popular AI tools like Claude, ChatGPT, Codex, Gemini, and others, many of these tools already have access to it. To connect your personal AI assistant to Canva's AI Connector, see our Help Center(opens in a new tab or window).
Step 2: Configure your AI assistant
Canva uses a remote MCP server at https://mcp.canva.com/mcp.
If your agent doesn't support a remote MCP server, use stdio with mcp-remote npm package.
Here is an example setup in VS Code:
{"servers": {"Canva": {"type": "stdio","command": "npx","args": ["-y","mcp-remote@latest","https://mcp.canva.com/mcp"]}}}
If you're looking for guides to connect to popular AI tools like Claude, ChatGPT, Gemini, Cursor, and VS Code, you can find setup instructions in our Help Center(opens in a new tab or window).
If you created your client in the Developer Portal, your AI application would also require some of the following OAuth settings:
- Client ID and client secret: The values from Outside Canva > Configuration > Credentials in the Developer Portal.
- Authorization URL:
https://mcp.canva.com/authorize - Token URL:
https://mcp.canva.com/token
Step 3: Set up the connection
Once MCP access is enabled, when you use the Canva tools, you should be prompted to log in and allow your AI assistant to access Canva. Each user needs to authenticate.
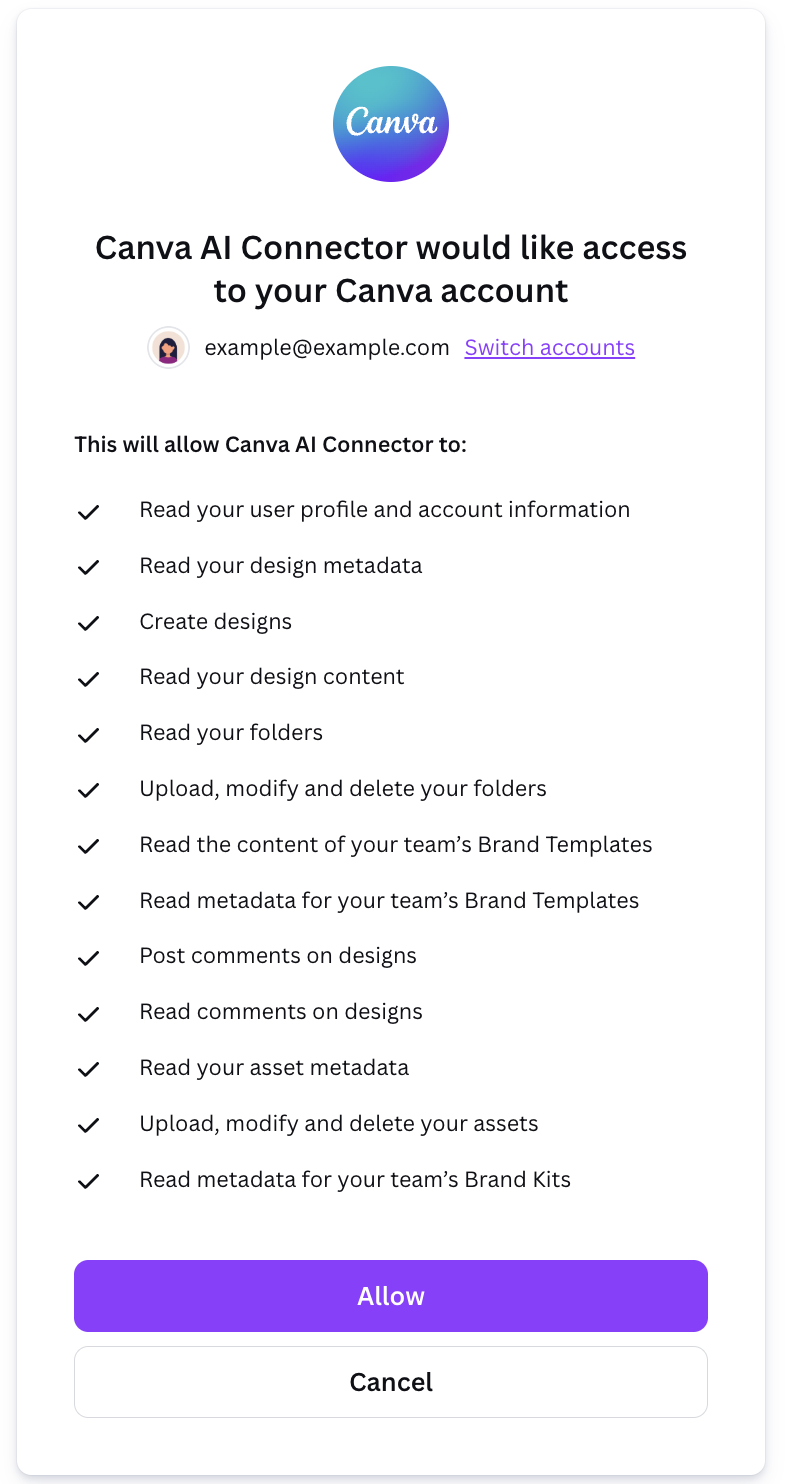
After you receive an 'authorization successful' message, you will be redirected back to your AI assistant's connection setup page.
Step 4: Test the connection
Once successfully connected, ask a simple question to test the connection. For example:
Show me my most recently edited Canva design
If your connection is successful, your client should display a tool usage prompt for you to approve. Approve the tool, and wait for the response.
Set up the Canva Dev MCP server (optional)
If you're writing code against the Developers SDK with AI coding tools, such as Cursor or Claude Code, you can connect to the Canva Dev MCP server to supercharge your development workflow. See this setup guide to get started.
Next steps
Where to go next depends on the surface you built for:
- Apps inside Canva:
- You can use various Canva APIs to add functionality to your app. For more information, see How apps work in Canva.
- Canva for your platform:
- Learn how to generate dynamic designs, using Brand template and the Autofill APIs.
- Learn about security practices for the REST APIs.
- Canva for AI assistants: