Backend
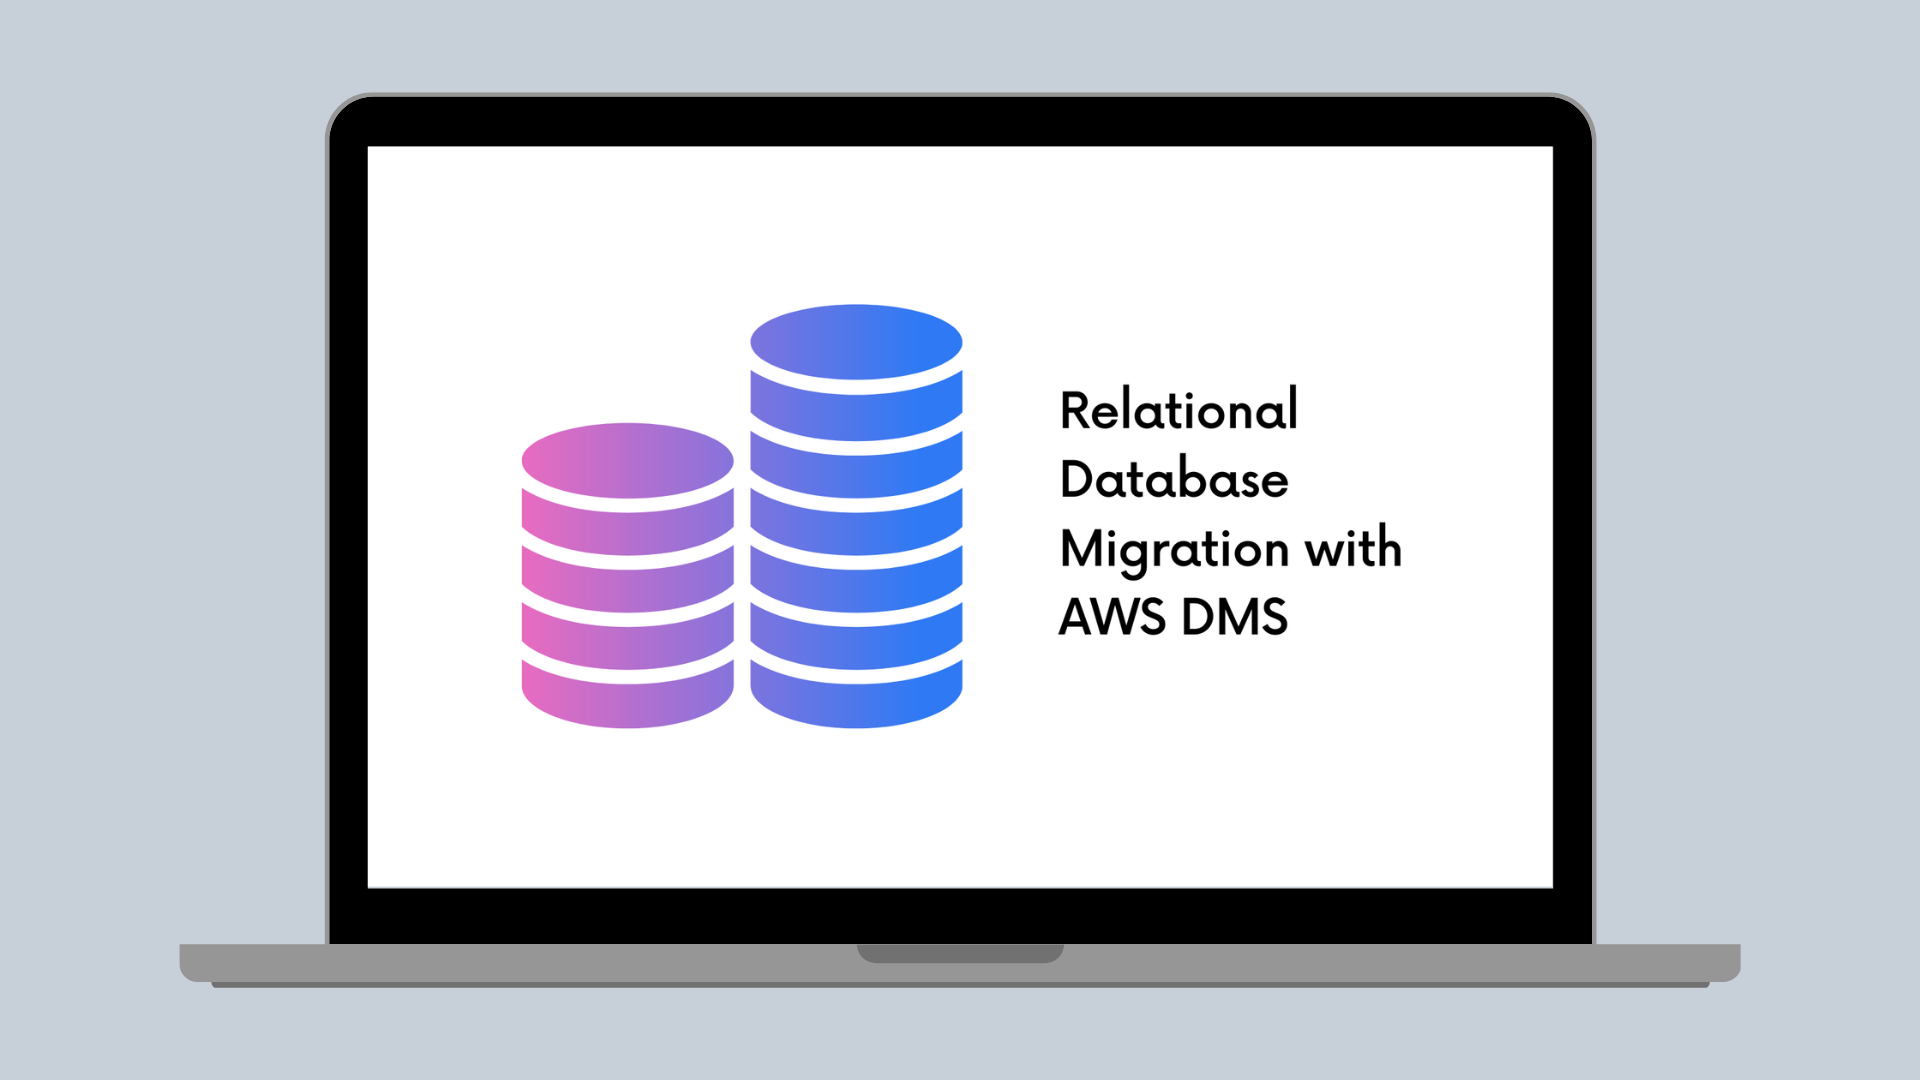
Relational Database Migration with AWS Database Migration Service (DMS)
How we reliably migrated hundreds of GBs of relational DB data for our service split project
The Canva Creators(opens in a new tab or window) program empowers Creators to publish design templates for use by Canva users and provides them the opportunity to earn royalties based on template usage.
Canva Creators has grown tremendously, with over 400k high-quality templates in the library and a 100% year-over-year increase in monthly active users (MAU). Alongside this, we’re adding more and more product features for the Creators community. This growth, however, comes with significant engineering challenges. Our business logic complexity is increased, and the template and MAU growth caused a substantial increase in data volume.
The Creators Monetization team at Canva is on a mission to provide a transparent, insightful, and reliable experience for our Creators, empowering them to earn money doing what they love. Our system, which handles template usage data, was becoming hard to scale, so we decided to split it into smaller, independent services. We were able to extract our code and infrastructure from the existing service to the new services, but we still had to split the giant store of data.
Our AWS RDS (Relational Database Service) instance stores hundreds of GBs of data, tracking over 100 million MAUs who use Creator templates. This data is crucial for calculating the royalties we pay to the template creators. Any disruption to our data processing system would hurt our Creators program, leading to:
- Delayed payments to our creators, impacting their financial stability.
- Inaccuracy in the amounts paid, leading to frustration and dissatisfaction among our Creators.
This blog, describes how we solved this problem by reliably migrating our data to a separate database instance. We discuss the alternatives we looked at and how we ultimately chose AWS DMS (Database Migration Service). Hopefully, anyone going through a similar microservices-related process can benefit from our experiences.
Zero-downtime migration
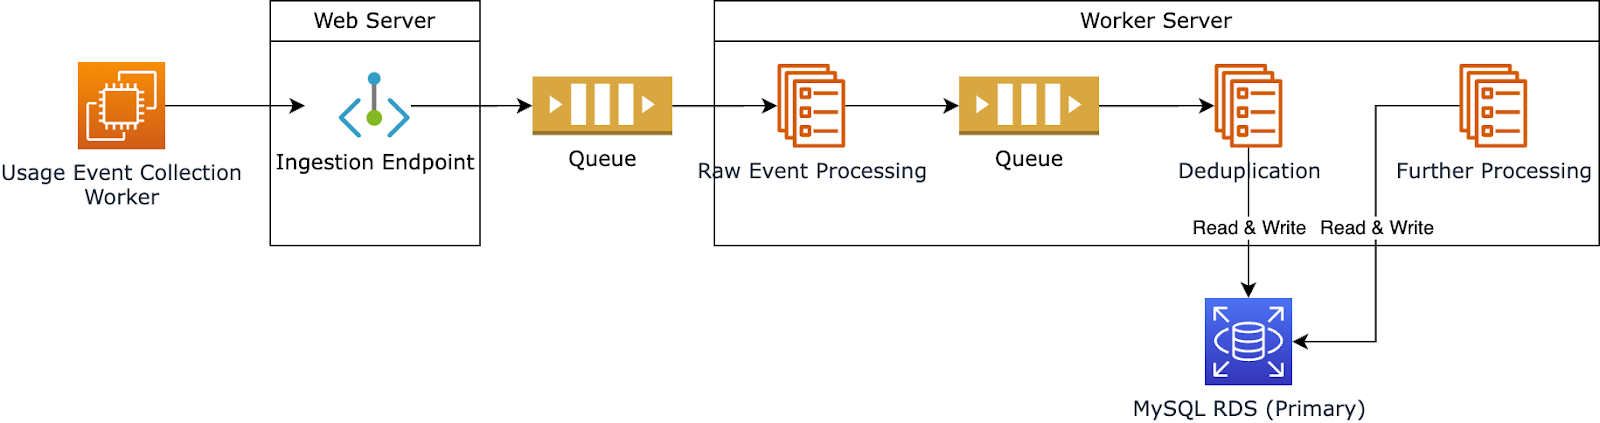
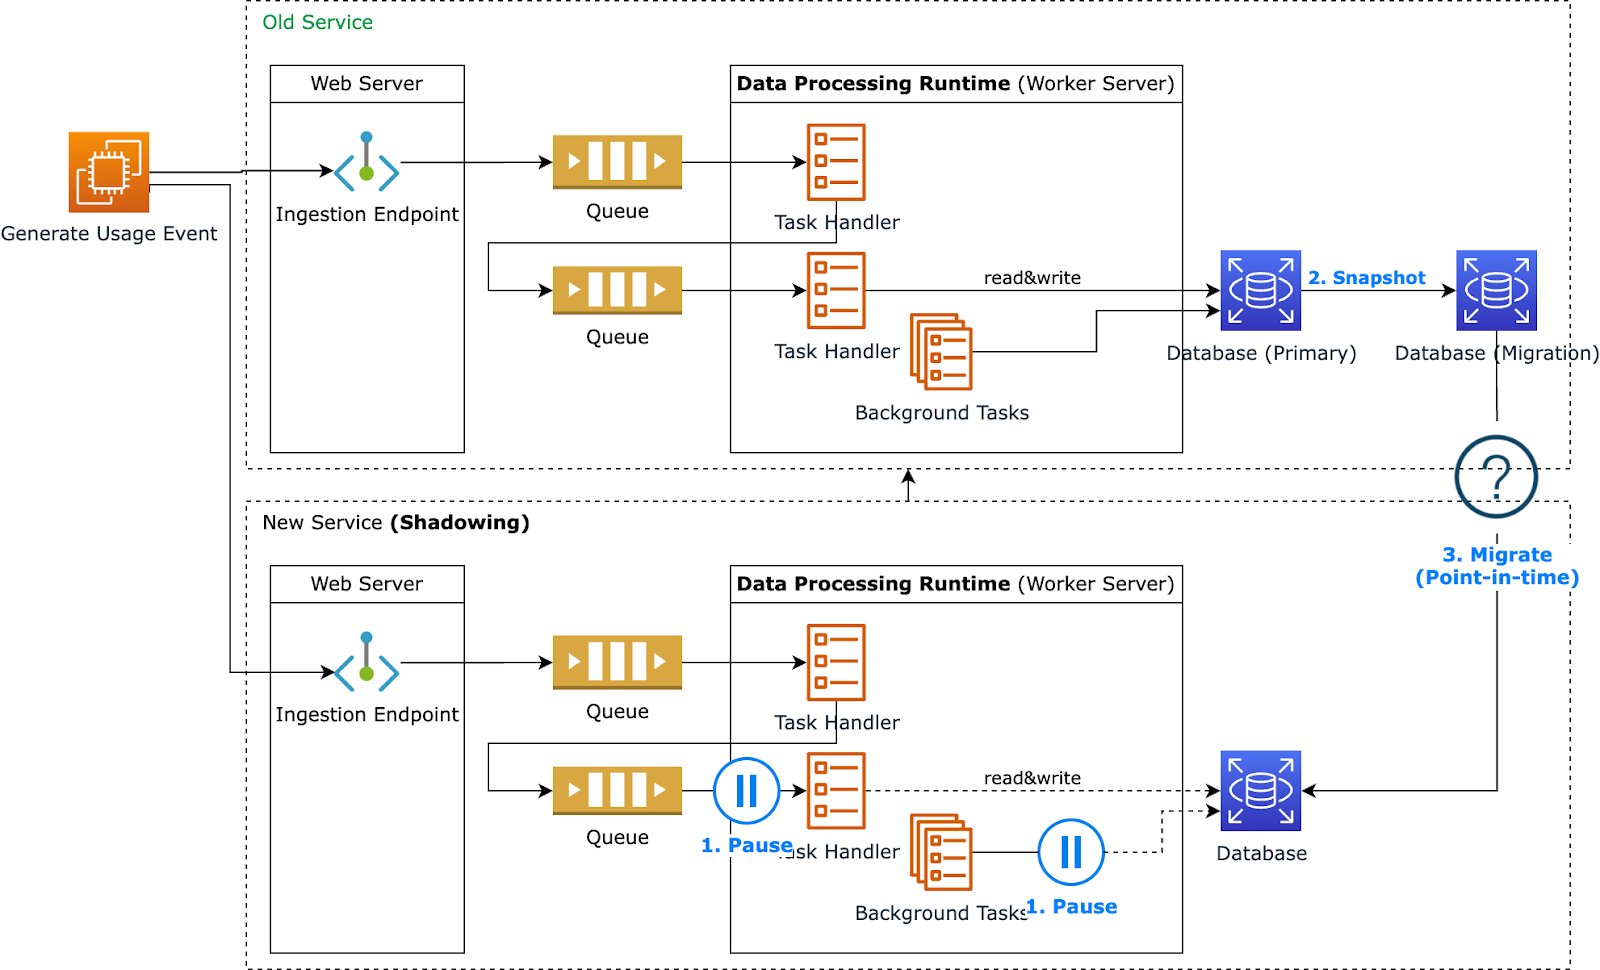
How did we approach zero-downtime migration? Let’s first look at how data flows into our database.
When a user uses a template:
- They generate a usage event, which is sent to our system through the Ingestion Endpoint.
- We store this event in a queue and apply a series of data transformations, such as filtering and aggregation.
- We store the output of each processing step in a separate database table.
As part of our migration strategy, we built a new service to shadow the existing system. This allowed us to verify that the new system worked correctly, similar to a blue-green deployment, where we validate a new system without impacting the live production environment.

With the new service shadowing the old one, our migration process was as follows:
- Pause data processing in the new service while users continued to read data from the old service database.
- Take a snapshot of the old service database for the new service.
- Perform a point-in-time data migration from the old service to the new one.
- Replay any queued messages and merge them with the migrated point-in-time data.
- Cut over user traffic to the new service. Users shouldn’t notice any disruption!
While this migration process sounded good, we based it on some assumptions. For example, how do we know we could pause the usage data processing without losing data?
First, let's consider our queuing system. We use AWS SQS (Simple Queue Service) for our queues. When we say we're pausing the queue, we mean that our processing handlers (that is, the clients consuming SQS messages) stop consuming. SQS can hold messages for up to 14 days, which gives us enough time to do the point-in-time migration. SQS guarantees at-least-once delivery, so we can trust that no data is lost during this time. At-least-once delivery means that for each message handed to the SQS, potentially multiple attempts are made to deliver it, such that at least one succeeds. Although messages might be duplicated, they’re not lost.
We also have background tasks (that is, the data processing runtimes) running periodically. These tasks do the heavy-lifting data transformations. We can pause these background tasks using feature flags.
But what happens after we complete the point-in-time migration? How do we merge the queued messages with our point-in-time data?
We realized we can use an existing deduplication stage in our data transformation process. We consider usages as duplicated when the same user applies the template on the same design. The deduplication process guarantees that the same usage counts only once, so we can count precisely the usage numbers for our Creator templates. For our migration, this helps us remove any duplicate messages received during the time between when we pause processing (step 1) and take a snapshot of the old service (step 2).
Point-in-time migration tool
Now that we have a zero-downtime migration process, how do we perform point-in-time migration? What tool should we use?
We had 8 tables to migrate, holding over 1TB of data in total, excluding indexes.
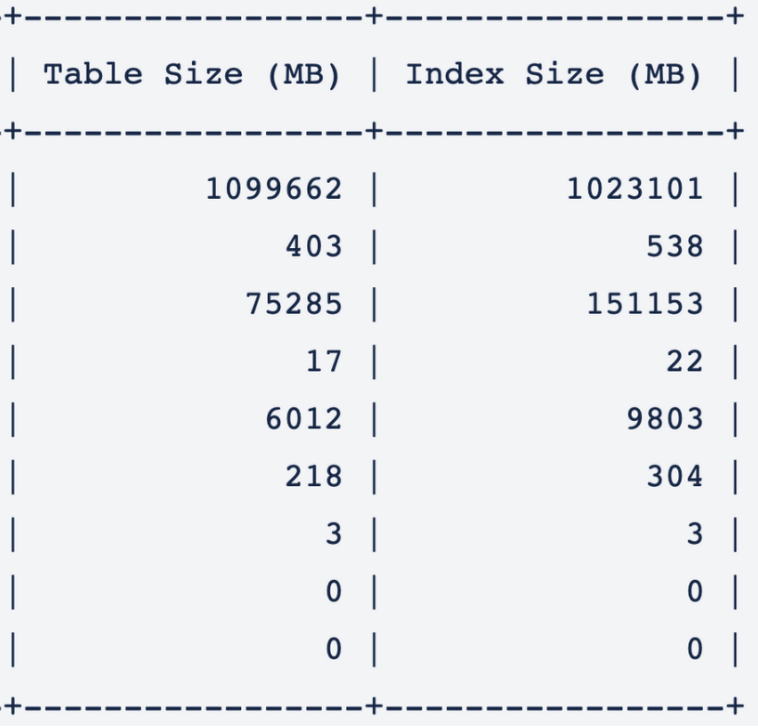
For the largest table, we needed to migrate only the last 100 GB of rows. We archived the older data that we didn’t need for further processing.
The following table summarizes the different options we explored and compared.
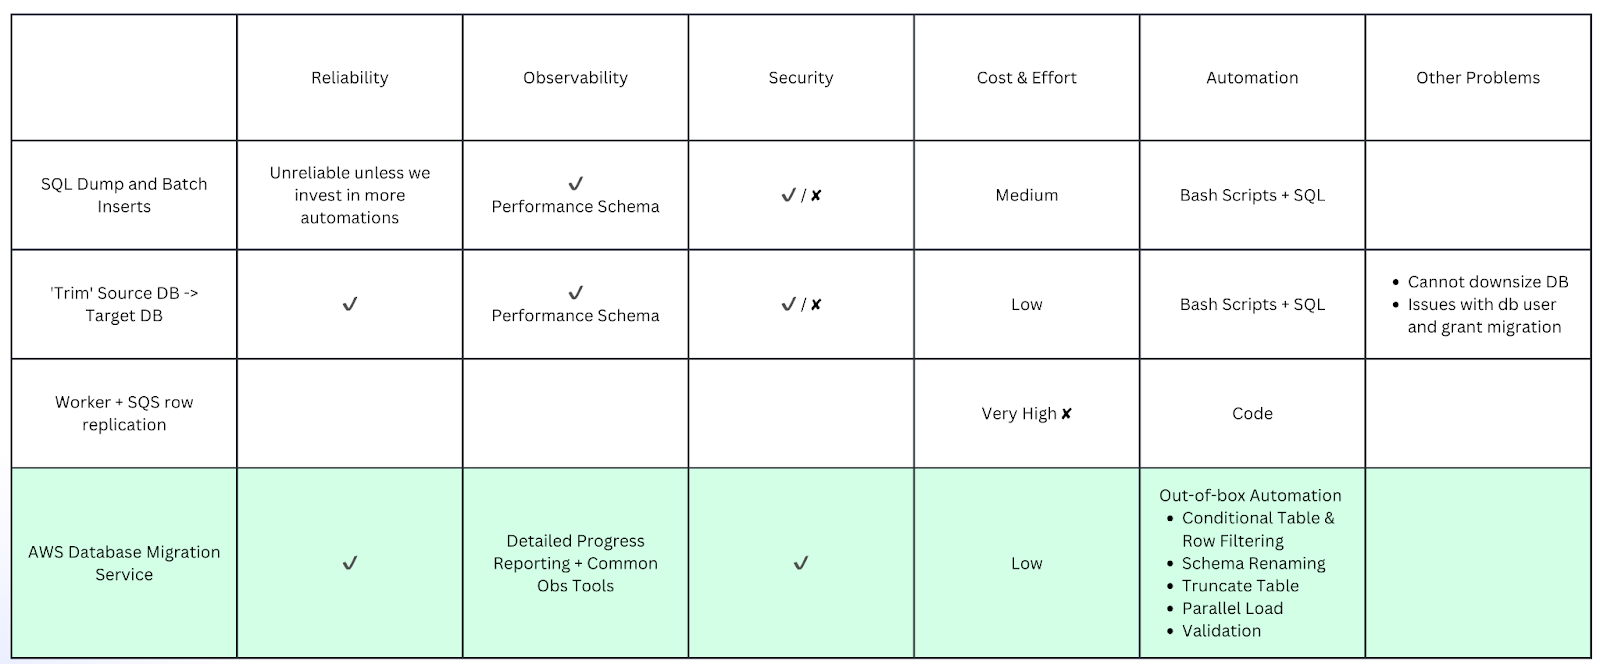
SQL dump and batch inserts
The first option we considered was to perform SQL dumps and batch inserts. For MySQL databases, we could use mysqldump(opens in a new tab or window) to dump the data into chunks using different primary key and ID ranges depending on our data volume. We could then insert the data into the target database in batches.
However, this option required a lot of effort to build an automated and secure script. This was our last resort option if nothing else worked.
Trim Source DB
Our second approach was to copy and “trim” the source database to become the target database. We tried the following steps:
- Copy the original database, either by snapshot or directly to the new one.
- Remove unnecessary tables and rows.
- Make changes to the database schema and users to ensure compatibility with the new service.
- Take a snapshot of the trimmed database and restore it as the new database, followed by a switchover.
Although this approach might be appropriate for simple scenarios where database access management isn’t enforced, or downsizing the database storage is required, it wasn’t an acceptable option for us because we required both.
Worker and SQS row replication
We also considered some background tasks and SQS to replicate row by row, which seemed to be a programmatic approach to achieve automation, but again, required a lot of effort. It made sense only if our new service started with a different schema and we required non-trivial data transformation.
AWS Database Migration Service
After a bit of research, we discovered the AWS Database Migration Service(opens in a new tab or window) (DMS), which could potentially meet the requirements of our production environment. It’s a cloud-based service enabling data migration between different types of databases, including RDS instances on AWS. We considered the following features:
- Source filters(opens in a new tab or window): Given we only want to move recent data to our new service, this sounded useful.
- Truncate tables: The new system’s RDS had some test data and we found that DMS's full load settings(opens in a new tab or window) could automate the safe truncation of tables.
- Transformation rules(opens in a new tab or window): These could help rename schemas when using different database names in the old and new services.
- Validation(opens in a new tab or window): With much data to migrate, how do we know if all database tables and rows are moved successfully? The validation feature could be helpful to ensure there is no data loss or mutation during migration.
- Parallel loads(opens in a new tab or window): Although DMS provides parallel loading options, this might not be necessary. Migrating our data might take up to a few days maximum, but we’re not in a rush to cut over to the new service.
So we decided to give AWS DMS a go.
Running point-in-time migration with AWS DMS
We first tried AWS DMS in our pre-production environment. We tested the infrastructure, integration, configuration, and end-to-end process using DMS. Because of the limited amount of data in our dev and staging environments, we couldn’t replicate the exact production workload. However, we still identified and addressed some infrastructure configuration issues.
Database performance
When we started the replication task, it started smoothly and quickly. However, alarms soon went off, indicating that the primary RDS instance of our new service had performance issues because of a lack of burst capacity(opens in a new tab or window). Meanwhile, the DMS replication became exceptionally slow.
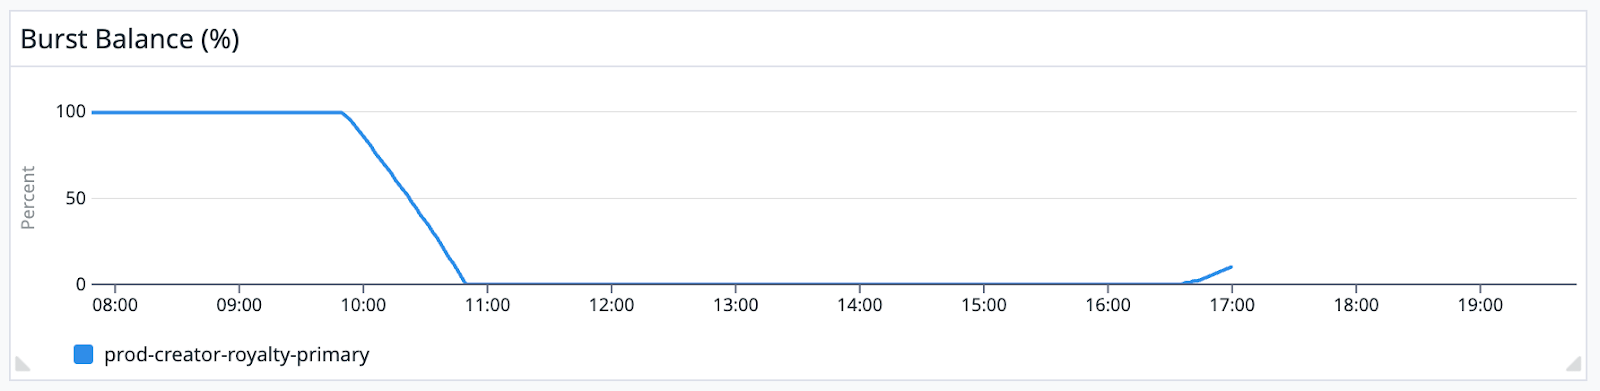
We first thought the DMS replication was causing our performance issues. That wasn't the case, however. Replicating data in parallel and synchronously shouldn't have been a problem for the RDS instance's burst capacity.
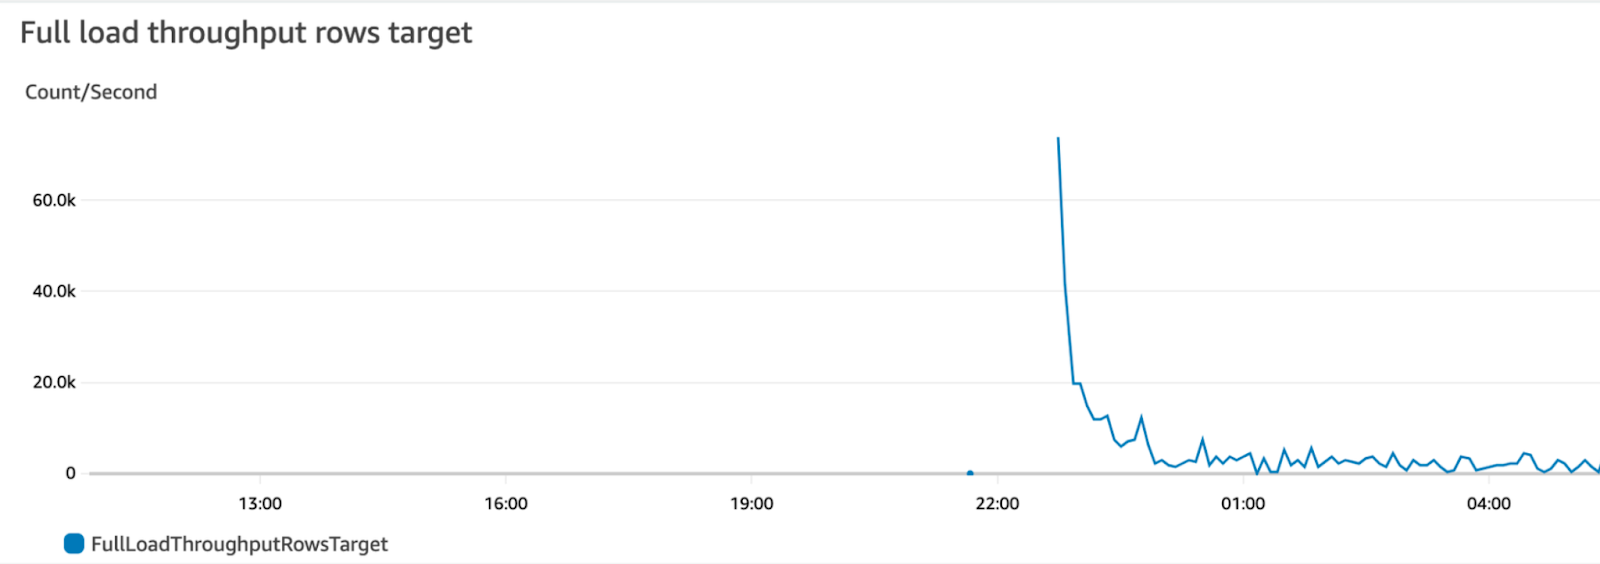
So, we checked some important metrics, like IOPS (input/output operations per second) and CPU usage (see the following chart). We discovered that:
- The RDS instance we were migrating to was handling a lot of write operations compared to the one we were moving from. This meant the RDS instance was already quite busy with ‘other things’, which is why it struggled.
- The CPU usage was high, which suggested that one of the ‘other things’ the RDS instance was busy with was the indexing process, which was using up a lot of resources.
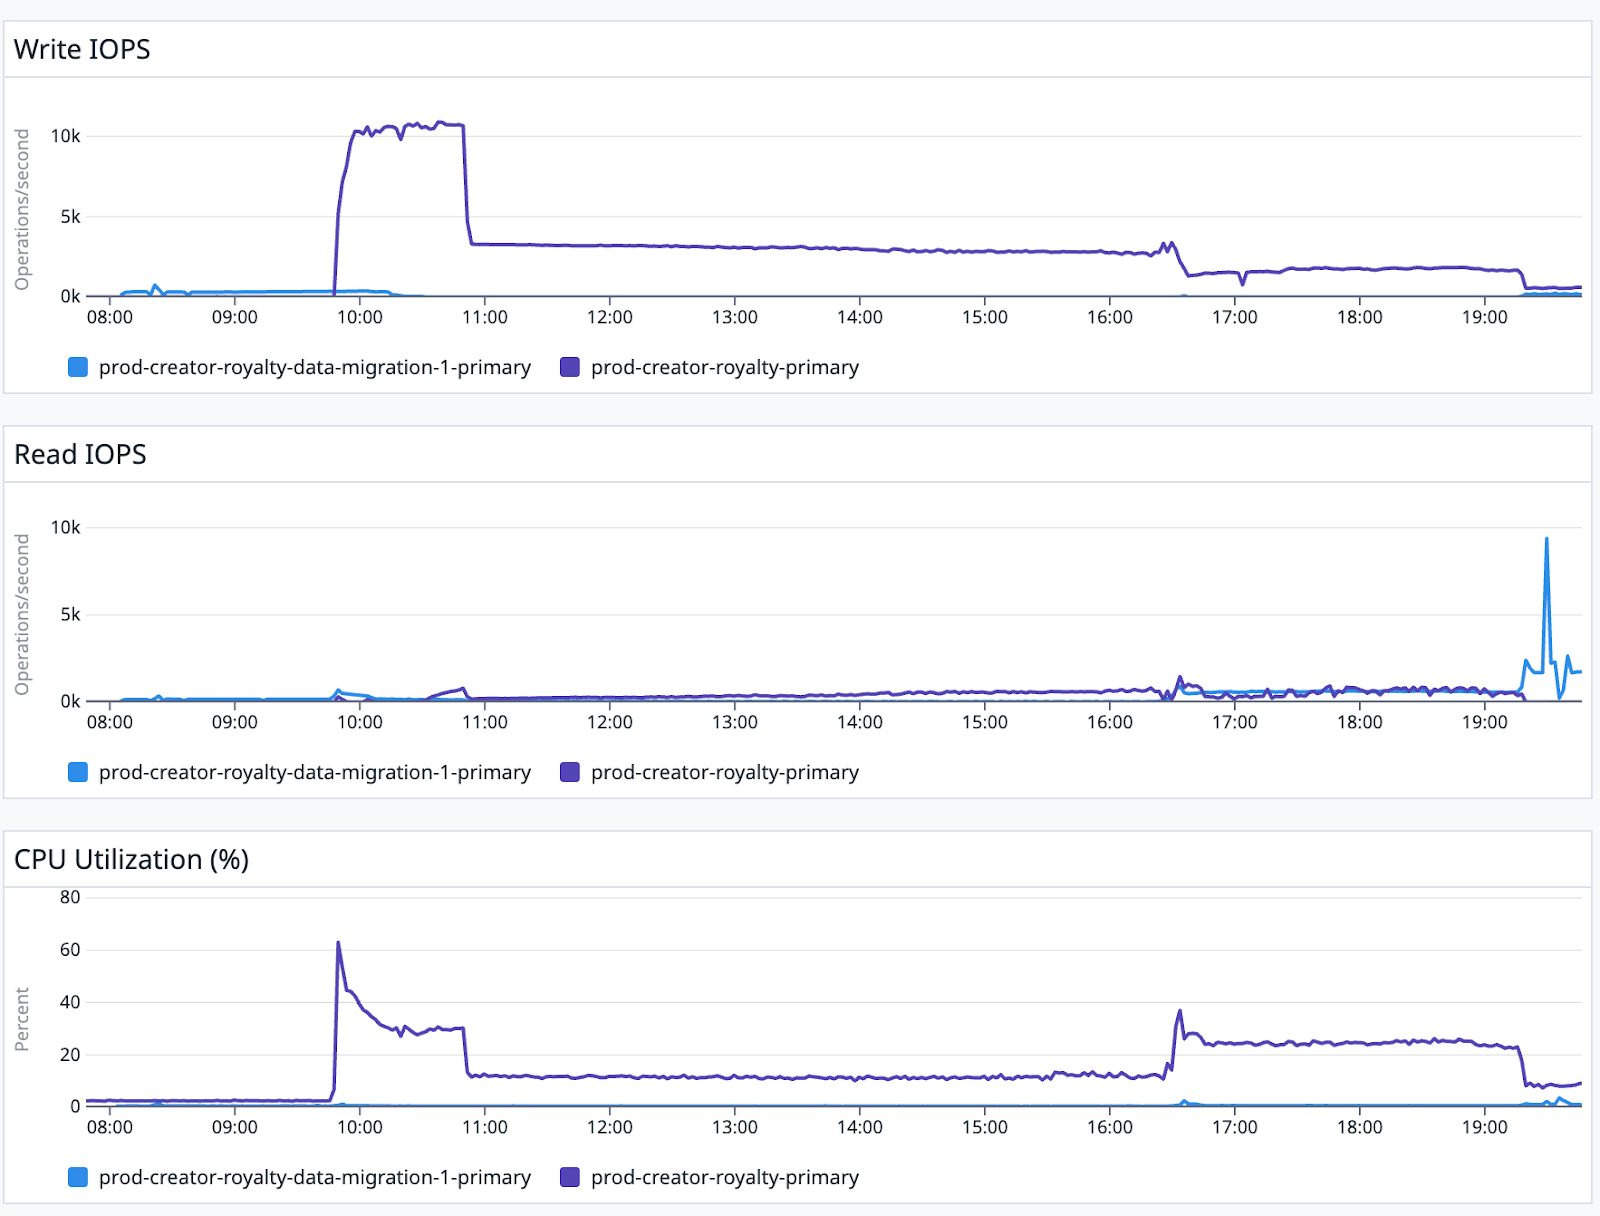
Because the indexes we had on our tables for our queries were causing problems during the migration (you can see their sizes in the first part of the blog), we decided to do the following to boost migration speed.
Drop the indexes and recreate them after the migration
After dropping the indexes, the burst balance improved, and the replication tasks ran faster through to completion.

Increase the burst balance to accommodate potential IOPS usage during the remaining migration
We upgraded the storage volume of our target RDS to gp3, which allowed us to scale up the IOPS capacity independently of storage size. This upgrade didn't require any downtime, but it took up to 24 hours to take effect. In the end, we didn't use all of the IOPS capacity during the migration because the I/O consumption wasn't as high as expected. However, when we rebuilt the indexes on the target RDS instance post-migration, the additional IOPS provided by the upgrade proved helpful and made the process faster. The index rebuilding process took a couple of hours.
After these two changes, we completed the migration process without major issues. AWS DMS's verification feature helped us confirm that everything migrated correctly. Overall, the entire process took about a day to complete, including preparation, migration, fixing indexing problems, and post-migration verification.
Takeaways and Reflections
The following is a summary of what we learned:
-
Migration process design and capturing ongoing data changes: A good system design gave us the advantage of having an SQS queue to hold usage event messages temporarily. This let us merge messages with the point-in-time migration data after migration. Without this option, we would have had to explore DMS's CDC(opens in a new tab or window) feature to ensure data consistency between the old and new services. This part also reminded us of the importance of thoughtful system architecture to help us maintain data integrity during migration.
-
Testing: Doing load testing would have made it easier to identify issues early on.
-
Observability and diagnosis: Use monitoring tools and setting up alerts to keep track of the migration progress, infrastructure resource usage, and performance issues. We were able to quickly identify and address any problems that came up.
-
DMS: DMS offers a parallel load option to speed up data migration. We didn’t think it was necessary because our timeframe was manageable. However, with more data to migrate, or a tight deadline, it might be worth setting up. Also, be aware of your table index sizes and think about dropping them before starting a migration, as AWS DMS suggests(opens in a new tab or window). Alternatively, you could increase IOPS capacity to make sure the migration finishes on time.
Acknowledgments
Special thanks to Jason Leong(opens in a new tab or window), Wenchuan An(opens in a new tab or window), Sergey Tselovalnikov(opens in a new tab or window), Grant Noble(opens in a new tab or window) and Monika Bhatt(opens in a new tab or window) for reviewing and suggesting improvements to this post.