Authentication
To start using the Canva Connect APIs, you need to authorize your users using OAuth 2.0(opens in a new tab or window).
OAuth lets your integration authenticate the user, get their authorization to access the Connect API endpoints, and then perform actions on their behalf. Specifically, the Connect APIs use OAuth 2.0 with the Authorization Code flow with Proof Key for Code Exchange (PKCE)(opens in a new tab or window) using SHA-256.
The authorization and authentication process involves the following steps:
- Obtain authorization from the Canva user for the scopes that your integration requires. After the user authorizes your integration, you'll receive an authorization code at your specified redirect URL.
- Use the authorization code to generate access tokens, which lets your integration access Connect API resources. This lets your integration act on the user's behalf.
There are libraries in various languages that provide support for handling the OAuth process. For more information, see the OAuth Community Site(opens in a new tab or window).
You can also use the Canva Connect API Starter Kit(opens in a new tab or window) as a starting point for an authorization and authentication implementation.
Prerequisites
Before authenticating to the Canva Connect APIs, you must first create and configure your integration in the Developer Portal, including:
- Setting an integration name
- Generating and saving a client secret
- Selecting scopes
- Setting at least one authentication redirect URL
For more information, see Creating integrations.
Obtain user authorization
To obtain user authorization, you must direct your users to Canva's authorization URL. This lets a user review and approve access for your integration.
Create the authorization URL
The authorization URL that you direct users to is in the following format:
https://www.canva.com/api/oauth/authorize?code_challenge=<code challenge string>&code_challenge_method=s256&scope=<list of scopes>&response_type=code&client_id=<client ID>&state=<optional state>&redirect_uri=<redirect uri for your integration>
In your integration's settings in the Developer Portal(opens in a new tab or window), there is an Authorization URL generator tool on the Authentication page that pre-fills most of the parameters for an authorization URL. If you use this tool, you must still provide your own code_challenge and state values, as well as verify the values for the other query parameters.
Create the URL, starting with https://www.canva.com/api/oauth/authorize? and add the following query parameters:
-
code_challengeThe
code_challengestring you provide is derived from another string, acode_verifier. You must first create acode_verifiervalue, and then transform thecode_verifierinto thecode_challengestring. For more information, see the PKCE specification(opens in a new tab or window).-
Create the
code_verifierstring. It must be a high-entropy cryptographically random string that is between 43 and 128 characters long. Only ASCII letters, numbers, and-,.,_, or~characters are allowed.You must securely store the
code_verifierstring in your client, because you'll use it later to generate an access token.The
code_verifiervalue must not be accessible by the user or their browser. -
Generate the
code_challengestring by SHA-256 hashing thecode_verifiervalue and then encoding that result into a URL-safe base64 string.
You can use the sample code shown below to generate the
code_verifierandcode_challengestrings.The
code_verifierandcode_challengevalues should be unique for each request. -
-
code_challenge_methodThis must be set to
S256(SHA-256). -
scopeThis is a space-separated list of scopes requested by your integration.
The scopes you request must already be set in your integration settings in the Developer Portal. You can't request any scopes you haven't set in your integration's settings. For information on setting scopes, see Creating integrations.
You must be explicit when listing scopes.
For example, specifying
asset:writedoesn't grantasset:readpermissions. You must specify both in the scope string, for example:asset:read asset:write. -
response_typeThis must be set to
code. -
client_idThis value is the unique ID that identifies your client. You can get this value from your integration settings in the Developer Portal(opens in a new tab or window).
-
state(Optional)The
stateparameter serves two primary purposes:- It acts as a countermeasure against Cross-Site Request Forgery (CSRF)(opens in a new tab or window) attacks by maintaining a unique session state between your integration and the Canva API. For more information, see the OWASP Cross-Site Request Forgery Prevention Cheat Sheet(opens in a new tab or window).
- It helps preserve the application state through the OAuth flow.
Although this parameter is optional to include in the authorization URL, it's highly recommended. It makes sure that the response your integration receives corresponds to the request initiated by the user, thereby preventing bad actors from forging requests.
When creating the
statevalue, it must be a high-entropy random string and it should be unique for each request. You can use the sample code shown below to generate thestatestring.You must securely store the
statestring in your client, so you can use it later to verify the response.The
stateparameter must not be used to store thecode_verifiervalue. -
redirect_uri(Optional)This is the URL to redirect the user to after they authorize your integration.
Although this parameter is optional to include in the authorization URL, you must have at least one redirect URL set in your integration settings in the Developer Portal. The URL set in this query parameter must be one that you have already set in your integration settings.
If you have only one redirect URL set in your integration settings, you don't need to provide this parameter.
If you have multiple redirect URLs set in your integration settings and this query parameter isn't supplied in the authorization URL, then the first redirect URL that's set in your integration's settings is used by default.
After adding the preceding query parameters, an example authorization URL might look similar to the following:
https://www.canva.com/api/oauth/authorize?code_challenge=eeeAbcdefgh123456789Vz96F9UIv8EHwnmibz3Djx3EE&code_challenge_method=s256&scope=asset:read%20asset:write%20design:meta:read%20folder:read%20comment:write&response_type=code&client_id=OCABC12-DeF
Example code for code_verifier & code_challenge strings
You can use the following sample code to generate the code_verifier and code_challenge strings.
import crypto from "crypto";const codeVerifier = crypto.randomBytes(96).toString("base64url");const codeChallenge = crypto.createHash("sha256").update(codeVerifier).digest("base64url");
Example code for state string
import crypto from "crypto";const state = crypto.randomBytes(96).toString("base64url");
Send the user to the authorization URL
You must direct your users to the authorization URL that you created to get their approval for your integration and the requested scopes.
They will see a prompt similar to the following:
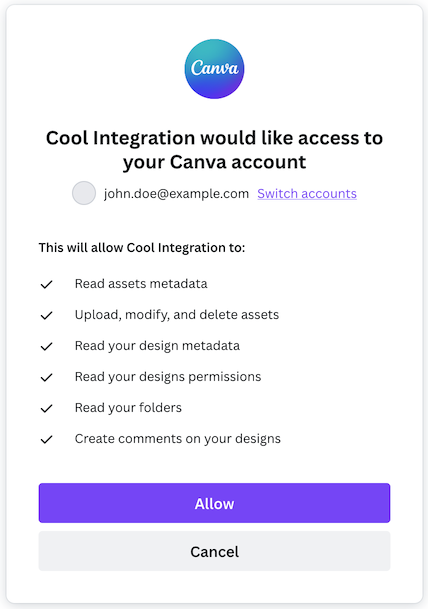
After they authorize your integration, they are redirected to your redirect URL with the following query parameters:
codeThe authorization code you can use to generate an access token.
stateThe value of the state parameter, if it was provided with the initial request.
To prevent forgery of cross-site requests, you must verify that the received state value matches the one in the authorization URL you sent to the user. If they don't match, you must stop the authorization flow and return an error to the user.
Generate access tokens
After you've obtained user authorization and received an authorization code, you can exchange the code for an access token (that lets you act on the user's behalf) and a refresh token (that you can use to get new access tokens).
Because access tokens are only valid for a short period time, you can handle requesting new access tokens using a refresh token instead of having to re-authorize the user to get a new authorization code.
An overview of the token request process is shown in the diagram below:
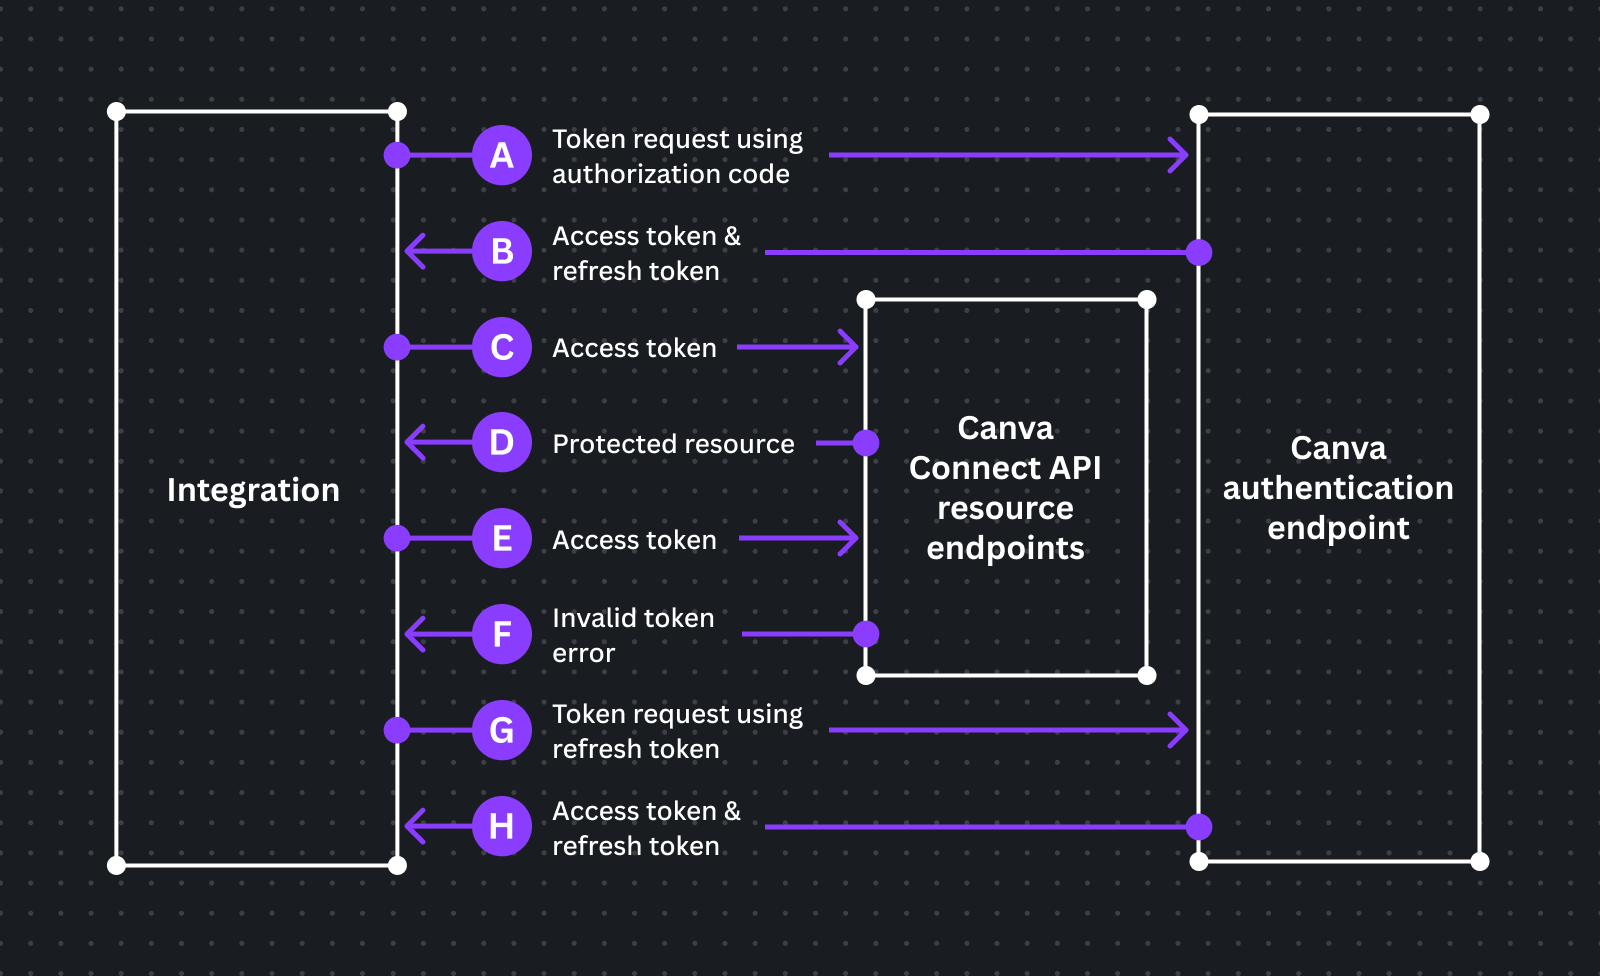
Requests that require authenticating with your client ID and client secret can't be made from a web-browser client. They must come from your backend, otherwise they'll be blocked by Canva's Cross-Origin Resource Sharing (CORS)(opens in a new tab or window) policy.
Use an authorization code
To exchange an authorization code for an access token, use the Generate an access token endpoint.
Some points to note when using the endpoint with an authorization code:
- Requests to the endpoint must be authenticated, and we recommend using the basic access authentication(opens in a new tab or window) method. For basic access authentication, the
{credentials}string must be a Base64 encoded value of{client id}:{client secret}. - When exchanging an authorization code for an access token, you must set
grant_typetoauthorization_code. - You must provide the
code_verifiervalue that you generated when creating the user authorization URL. - You must provide the authorization code you received after the user authorized your integration.
The endpoint reference includes example request code in various languages.
A successful response from the endpoint includes the access token, the expiry time for the token, and a refresh token.
Use a refresh token
When an access token expires or becomes invalid, you can use a refresh token from a previous access token request to get a new access token.
Refresh tokens can't be used to access resources on protected APIs. They are only used for generating new access tokens.
To exchange a refresh token for an access token, you again use the Generate an access token endpoint.
Some points to note when using the endpoint with a refresh token:
- Requests to the endpoint must be authenticated, and we recommend using the basic access authentication(opens in a new tab or window) method. For basic access authentication, the
{credentials}string must be a Base64 encoded value of{client id}:{client secret}. - When exchanging a refresh token for a new access token, you must set
grant_typetorefresh_token. - You must provide a refresh token from a previous token request.
- Each refresh token can only be used once.
A successful response from the endpoint includes a new access token, the expiry time for the new token, and another refresh token.
Introspect an access token
You can use the Introspect an access token endpoint to see whether an access token or refresh token is valid and active. You can also verify some token properties, such as its claims, scopes, and validity times.
Revoke a token
If necessary, you can use the Revoke a token endpoint to revoke an access token or refresh token.