Set up the Canva AI Connector
The Canva AI Connector allows your AI assistant to seamlessly interact with Canva's design capabilities. The connector uses the Model Context Protocol (MCP) to enable your AI assistant to create new empty designs, autofill templates with your content, find your existing designs, and export them as PDFs or images.
Before you start
To use the Canva AI Connector, you’ll need:
- An AI assistant that can use AI connectors or MCP servers, such as:
- ChatGPT
- Claude
- Claude Code
- Gemini CLI
- Cursor
- VS Code (with a compatible plugin or extension, such as GitHub Copilot)
- A Canva account
- Any Canva plan
Some features require a paid Canva plan, such as Canva Pro or Canva Enterprise. For example, autofill tools may only be available on Enterprise, while exporting designs is included in all plans.
Connect your AI assistant
Configure your AI assistant
Each AI assistant requires specific configuration to communicate with the Canva AI Connector. Follow the instructions below for your assistant.
ChatGPT connectors are currently in beta, and are only available to users on ChatGPT paid plans. For more information on the availability of the Canva connector, see the ChatGPT documentation(opens in a new tab or window).
-
Open ChatGPT (web or desktop).
-
In a new chat, click Tools, then select Use connectors.
-
Use the Add sources button to find the Canva connector and go through the process of enabling it.
-
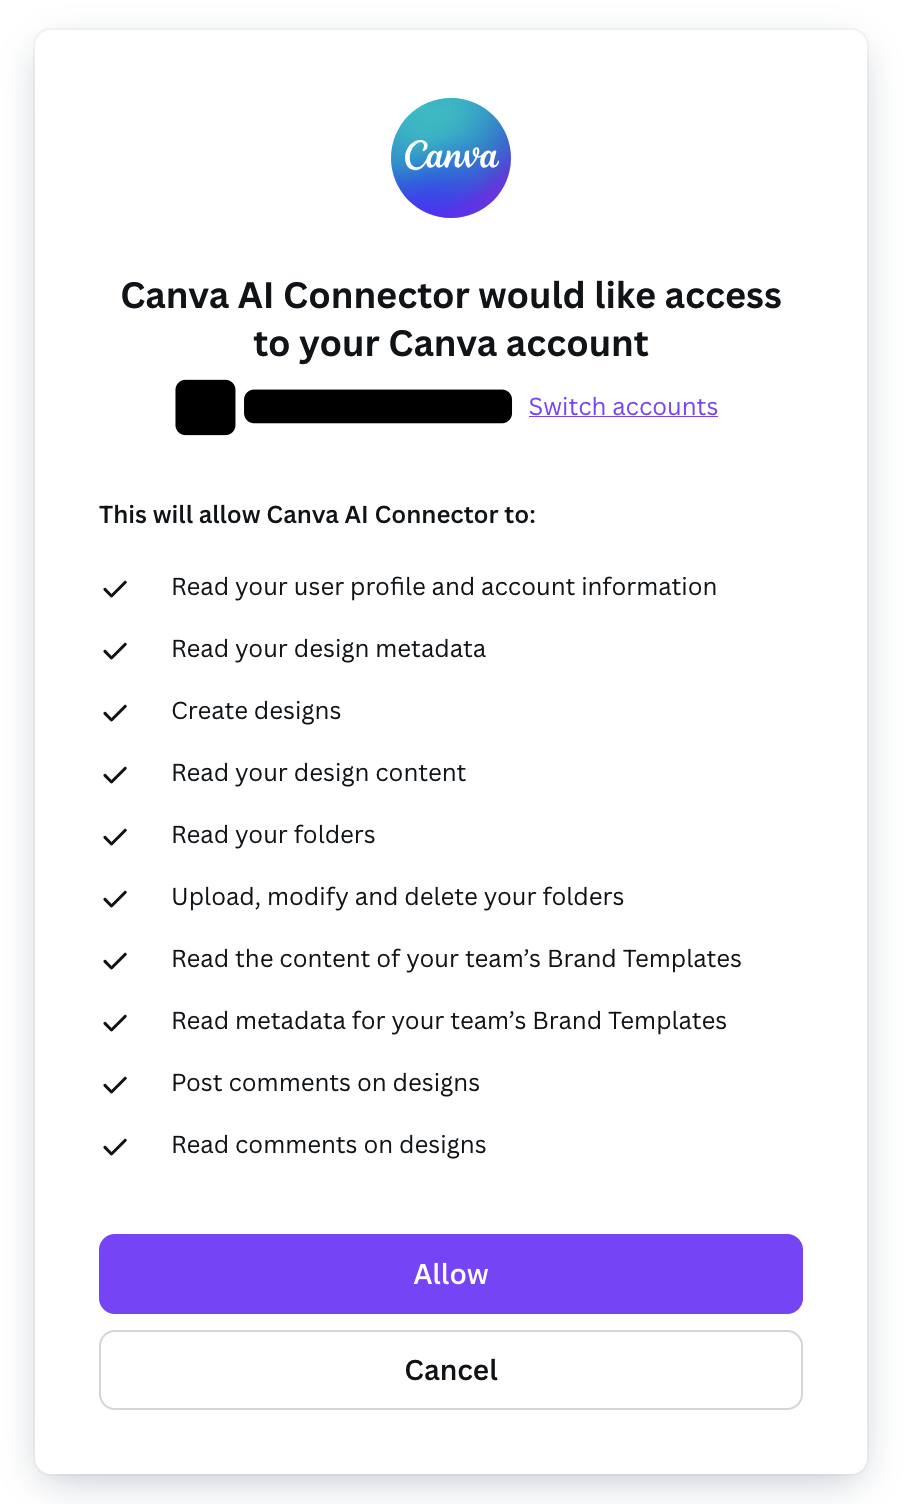
You'll be asked to allow the Canva AI Connector to access your Canva account. Click Allow.
There are two ways you can use Claude to connect to the Canva AI Connector: using Claude connectors or configuring an MCP server.
- Claude connectors: This is the easiest and recommended way to connect to the Canva AI Connector, and is available for the web and desktop versions of Claude. Claude connectors are only available to users on Claude paid plans.
- MCP server: This is only available on Claude Desktop, and is a manual method for setting up a custom MCP server for the Canva AI Connector. A paid Claude plan isn't required.
Claude connectors are only available to users on Claude paid plans.
-
Open Claude (web or desktop).
-
In a new chat, click the button (Search and tools), and select Manage connectors.
-
Find the Canva connector and click Connect.
If you don’t see the Canva connector, click Browse connectors and find it under the Web tab.
-
You will then be asked to allow the Canva AI Connector to access your Canva account. Click Allow.
- Configuring the Canva AI Connector as an MCP server requires Node.js 22.16 or later, with npm. If you don't already have Node.js installed, you can install it from https://nodejs.org/en/download(opens in a new tab or window).
-
Open Claude Desktop.
-
Open Claude Desktop Settings:
- On Windows, use the keyboard shortcut
Ctrl + ,. - On macOS, use the keyboard shortcut
Command + ,.
- On Windows, use the keyboard shortcut
-
Navigate to the Developer tab.
-
Click Edit Config and add the following configuration:
{"mcpServers": {"Canva": {"command": "npx","args": ["-y","mcp-remote@latest","https://mcp.canva.com/mcp"]}}}JSON
For more information, see the MCP quickstart guide(opens in a new tab or window).
Restart your AI assistant app and approve access
-
Save all configuration changes. If you’re running Claude Desktop, make sure you have your web browser open and are logged into your claude.ai(opens in a new tab or window) account.
-
Restart your AI assistant app (for example, Cursor, Claude Desktop, or VS Code) to apply the new settings.
-
Your app should open a browser tab to ask you allow the Canva AI Connector to access your Canva account. Click Allow.
Run the following command in your terminal:
claude mcp add --transport http Canva https://mcp.canva.com/mcp
For more information, see the Claude Code documentation(opens in a new tab or window)
Restart your AI assistant app and approve access
-
Save all configuration changes. If you’re running Claude Desktop, make sure you have your web browser open and are logged into your claude.ai(opens in a new tab or window) account.
-
Restart your AI assistant app (for example, Cursor, Claude Desktop, or VS Code) to apply the new settings.
-
Your app should open a browser tab to ask you allow the Canva AI Connector to access your Canva account. Click Allow.
Run the following command in your Gemini CLI project:
gemini extensions install https://github.com/canva-sdks/canva-gemini-extension
For more information, see the Gemini CLI documentation(opens in a new tab or window)
Restart your AI assistant app and approve access
-
Save all configuration changes. If you’re running Claude Desktop, make sure you have your web browser open and are logged into your claude.ai(opens in a new tab or window) account.
-
Restart your AI assistant app (for example, Cursor, Claude Desktop, or VS Code) to apply the new settings.
-
Your app should open a browser tab to ask you allow the Canva AI Connector to access your Canva account. Click Allow.
MCP tools are currently only available in Agent mode.
- Configuring the Canva AI Connector as an MCP server requires Node.js 22.16 or later, with npm. If you don't already have Node.js installed, you can install it from https://nodejs.org/en/download(opens in a new tab or window).
You can automatically set up the MCP server using this Cursor configuration link(opens in a new tab or window). Alternatively, you can manually create the configuration with the following steps:
-
If you haven’t already configured an MCP server in your project directory, create the configuration directory and file:
mkdir -p .cursortouch .cursor/mcp.jsonSHELL -
Add the following configuration for the Canva MCP server to
.cursor/mcp.json:{"mcpServers": {"Canva": {"command": "npx","args": ["-y","mcp-remote@latest","https://mcp.canva.com/mcp"]}}}JSON
For more information, see the Cursor MCP documentation(opens in a new tab or window).
Restart your AI assistant app and approve access
-
Save all configuration changes. If you’re running Claude Desktop, make sure you have your web browser open and are logged into your claude.ai(opens in a new tab or window) account.
-
Restart your AI assistant app (for example, Cursor, Claude Desktop, or VS Code) to apply the new settings.
-
Your app should open a browser tab to ask you allow the Canva AI Connector to access your Canva account. Click Allow.
MCP tools are only available in Agent mode.
- Configuring the Canva AI Connector as an MCP server requires Node.js 22.16 or later, with npm. If you don't already have Node.js installed, you can install it from https://nodejs.org/en/download(opens in a new tab or window).
-
If you haven’t already configured an MCP server in your project directory, create the configuration directory and file:
mkdir -p .vscodetouch .vscode/mcp.jsonSHELL -
Add the following configuration for the Canva MCP server to
.vscode/mcp.json:{"servers": {"Canva": {"type": "stdio","command": "npx","args": ["-y","mcp-remote@latest","https://mcp.canva.com/mcp"]}}}JSON
For more information, see the VS Code MCP documentation(opens in a new tab or window).
Restart your AI assistant app and approve access
-
Save all configuration changes. If you’re running Claude Desktop, make sure you have your web browser open and are logged into your claude.ai(opens in a new tab or window) account.
-
Restart your AI assistant app (for example, Cursor, Claude Desktop, or VS Code) to apply the new settings.
-
Your app should open a browser tab to ask you allow the Canva AI Connector to access your Canva account. Click Allow.
Check the connection
To confirm the Canva AI Connector is working:
-
Look for visual indicators in your AI assistant app.
For example, in Claude you should see the Canva connector listed in the button (Search and tools) near the prompt.
-
Ask a simple question to test the connection. For example:
Show me my most recently edited Canva design
If your connection is successful, your client should display a tool usage prompt for you to approve. Approve the tool, and wait for the response.
Return to the Canva Help Center(opens in a new tab or window).