Content Publisher intent implementation guide
This guide helps you implement the Content Publisher intent to publish Canva designs to external platforms.
Quickstart
To get a Content Publisher up and running as quickly as possible, we recommend scaffolding a project with the Canva CLI and using the Content Publisher template:
canva apps create my-publisher --template content_publisher
This template includes all of the essential boilerplate code to get started.
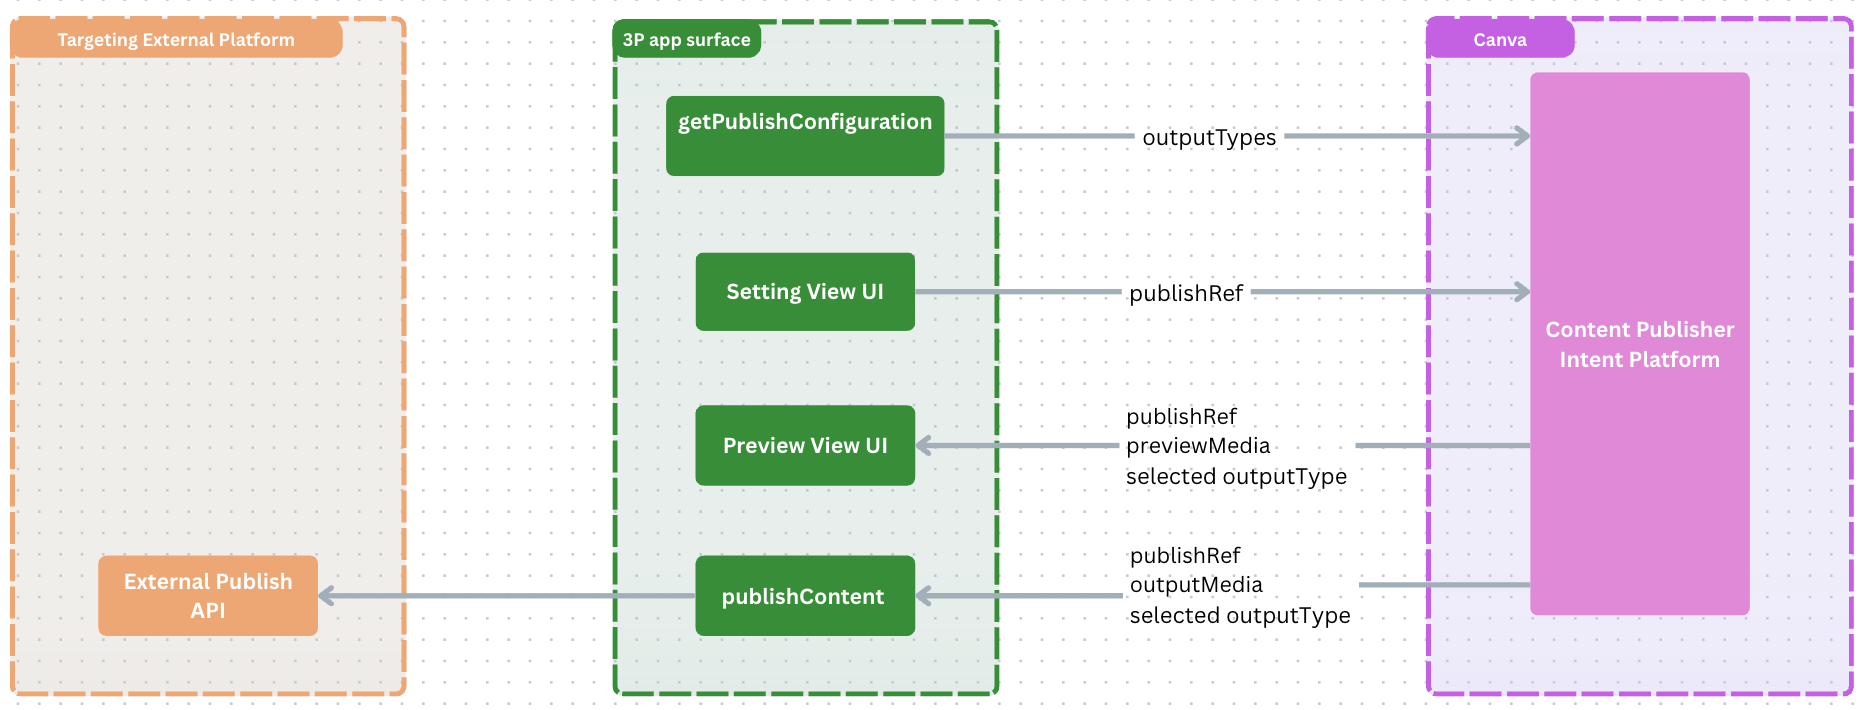
Architectural overview
The following diagram demonstrates the Content Publisher workflow. There are two app iframe views: one for the publish settings UI and one for the preview UI. The publish intent platform handles the communication between the app views and Canva.
OutputType
The OutputType identifies a distinct type of output that a third-party platform expects. These could be formats like an Instagram Story or a YouTube Video, or outputs like a Mailchimp Email or an ad type on Meta Ads.
Key concepts:
- OutputType: Defines a specific type of output that an app supports for an external platform (e.g., Instagram Reel, Mailchimp Email).
- MediaSlot: Describes a grouping of one or more files required to produce that output.
- FileRequirement: Defines constraints on those files (e.g., format, size, aspect ratio).
PublishRef
PublishRef is an opaque string to store all the settings you require to publish on your platform. Your app is responsible for serializing and deserializing this string. It is passed between settings, preview, and publishing steps, and has a maximum size of 5 KB.
PreviewMedia
PreviewMedia provides real-time file previews to render in your app's preview UI iframe during the publish flow. These previews update dynamically as users modify their publish settings.
Key concepts:
- Preview Files: Media representations that can be in various states (loading, ready, error, and so on).
- Video Optimization: Videos start as lightweight thumbnails and can be upgraded to full videos on demand.
- Live Updates: Previews refresh automatically when users change settings.
OutputMedia
OutputMedia represents the final exported files that will be sent to an external platform during the publish operation. These are the production-ready files that match the requirements you specified in your app's OutputType configuration.
Key concepts:
- OutputFiles: The actual media files exported from Canva designs.
Creating a content publisher
Step 1: Enable the intent
Before an intent can be implemented, it must be enabled. Enabling an intent informs Canva of when and where the app should be invoked throughout the user experience.
You can configure intents for your app with either the Developer Portal or the Canva CLI:
- Navigate to an app via the Your apps(opens in a new tab or window) page.
- On the Intents page, find the "Available intents" section.
- For the "Content Publisher" intent, click Set up.
- In the "Implement in your code" dialog that appears, click Done. The following sections in this guide will walk you through implementing the intent in your code.
-
Set up your app to use the Canva CLI to manage settings via the canva-app.json file.
-
Set the
intent.content_publisherproperty to be enrolled. For more information, see canva-app.json.For example, the following enables the Content Publisher intent.
{"intent": {"content_publisher": {"enrolled": true}}}JSON
Step 2: Enable the required scopes
In the Apps SDK, certain methods require certain scopes to be enabled. If an app attempts to call methods without the required scopes being enabled, the SDK will throw an error.
The Content Publisher intent requires the following scopes:
- Design read (
canva:design:content:read)
To learn more, see Configuring scopes.
Step 3: Register the intent
Before an intent can be implemented, it must be registered. Registering the Content Publisher intent establishes how the content will be published and what UI to display for configuring the publish settings.
To register the intent, call the prepareContentPublisher method as soon as the app loads:
import { prepareContentPublisher } from "@canva/intents/content";// Register the content publisher when your app loadsprepareContentPublisher({getPublishConfiguration: async () => {// Implement the logic to get the publish configuration},renderSettingsUi: (params) => {// Implement the UI for settings view},renderPreviewUi: (params) => {// Implement the UI for preview view},publishContent: async (params) => {// Implement the logic to publish the content},});
Intents must only be registered once. To learn more, see Technical requirements.
Step 4: Provide output types
Provide the content formats that your platform supports (for example, social media feed posts, video, documents, email). The following are some examples.
If you only provide one output type, the OutputType drop-down will be hidden. This means the OutputType's displayName isn't shown.
Feed post output type
import { initIntl } from "@canva/app-i18n-kit";const intl = initIntl();const outputTypes: OutputType[] = [{id: "post",displayName: intl.formatMessage({defaultMessage: "Feed Post",description: "Label shown in the output type dropdown for publishing to social media feeds",}),mediaSlots: [{id: "media",displayName: intl.formatMessage({defaultMessage: "Media",description: "Label for the media slot where users upload images or videos",}),fileCount: { exact: 1 },accepts: { image: { format: "png", aspectRatio: { min: 4 / 5, max: 1.91 / 1 } } },}]}];async function getPublishConfiguration(): Promise<GetPublishConfigurationResponse> {return {status: "completed",outputTypes,};}
Video output type
import { initIntl } from "@canva/app-i18n-kit";const intl = initIntl();const outputTypes: OutputType[] = [{id: "youtube",displayName: intl.formatMessage({defaultMessage: "YouTube",description: "Label shown in the output type dropdown for publishing to YouTube",}),mediaSlots: [{id: "video",displayName: intl.formatMessage({defaultMessage: "Choose pages",description: "Label for the page selection where users upload a video",}),accepts: {video: {format: "mp4",aspectRatio: { min: 4 / 5, max: 1.91 / 1 },durationMs: { exact: 40000 }}},fileCount: { exact: 1 }},{id: "thumbnail-selection",displayName: intl.formatMessage({defaultMessage: "Choose a thumbnail",description: "Label for the thumbnail selection where users upload a thumbnail",}),accepts: {image: { format: "png" }},fileCount: { exact: 1 }}]}];
Documents (PDF) output type
import { initIntl } from "@canva/app-i18n-kit";const intl = initIntl();const outputTypes: OutputType[] = [{id: "pdf-export",displayName: intl.formatMessage({defaultMessage: "PDF Document",description: "Label shown in the output type dropdown for publishing to PDF Export",}),mediaSlots: [{id: "pdf",displayName: intl.formatMessage({defaultMessage: "Choose pages for your PDF",description: "Label for the page selection where users upload a PDF",}),fileCount: { min: 1, max: 10 },accepts: {document: {format: "pdf_standard",// Size of the responsive document (Canva Docs) in the pdfsize: "a4"}}}]}];
Email output type
import { initIntl } from "@canva/app-i18n-kit";const intl = initIntl();const outputTypes: OutputType[] = [{id: "email-platform-1",displayName: intl.formatMessage({defaultMessage: "Email Platform 1",description: "Label shown in the output type dropdown for publishing to Email Platform 1",}),mediaSlots: [{id: "html_bundle",displayName: intl.formatMessage({defaultMessage: "Choose a page",description: "Label for the page selection where users upload an HTML bundle",}),fileCount: { exact: 1 },accepts: { email: { format: "html_bundle" } },}]},{id: "email-platform-2",displayName: intl.formatMessage({defaultMessage: "Email Platform 2",description: "Label shown in the output type dropdown for publishing to Email Platform 2",}),mediaSlots: [{id: "html_bundle",displayName: intl.formatMessage({defaultMessage: "Choose a page",description: "Label for the page selection where users upload an HTML bundle",}),fileCount: { exact: 1 },accepts: { email: { format: "html_bundle" } },}]}];
Step 5: Render publish settings UI
Renders your app's custom config UI for users to configure platform-specific settings (for example, captions, hashtags, privacy settings).
import type {RenderSettingsUiRequest,SettingsUiContext,} from "@canva/intents/content";import { FormField, Rows, Text, TextInput } from "@canva/app-ui-kit";import { useCallback, useEffect, useState } from "react";import { useIntl } from "react-intl";import * as styles from "styles/components.css";// Define the structure of settings that your app serializes into the publishRef stringinterface PublishSettings {caption: string;}// Utility function to safely parse publish settingsexport function parsePublishSettings(publishRef?: string,): PublishSettings | undefined {if (!publishRef) return undefined;try {return JSON.parse(publishRef) as PublishSettings;} catch {return undefined;}}// Settings UI component for configuring publish settingsexport const SettingUi = ({invocationContext,updatePublishSettings,registerOnSettingsUiContextChange,}: RenderSettingsUiRequest) => {const intl = useIntl();const [settings, setSettings] = useState<PublishSettings>(parsePublishSettings(invocationContext?.publishRef) ??({ caption: "" } as PublishSettings),);const [settingsUiContext, setSettingsUiContext] =useState<SettingsUiContext | null>(null);// Listen for settings UI context changes (e.g., when output type changes)useEffect(() => {const dispose = registerOnSettingsUiContextChange((context) => {setSettingsUiContext(context);});return dispose;}, [registerOnSettingsUiContextChange]);// Helper function to both set the settings locally and propagate them to Canvaconst setAndPropagateSettings = useCallback((updatedSettings: PublishSettings) => {setSettings(updatedSettings);updatePublishSettings({publishRef: JSON.stringify(updatedSettings),validityState: validatePublishRef(updatedSettings),});},[updatePublishSettings],);return (<div className={styles.scrollContainer}><Rows spacing="2u"><Text>{settingsUiContext?.outputType.displayName}</Text><FormFieldlabel={intl.formatMessage({defaultMessage: "Caption",description: "Label for the caption input field in publish settings",})}control={(props) => (<TextInput{...props}value={settings.caption}onChange={(caption) =>setAndPropagateSettings({ ...settings, caption })}/>)}/></Rows></div>);};// Validates the publish settings to enable/disable the publish button// Returns "valid" when all required fields are filledconst validatePublishRef = (publishRef: PublishSettings) => {// caption is requiredif (publishRef.caption.length === 0) {return "invalid_missing_required_fields";}return "valid";};const root = createRoot(document.getElementById("root") as Element);prepareContentPublisher({getPublishConfiguration,// Render the settings UI where users configure publishing optionsrenderSettingsUi: ({updatePublishSettings,registerOnSettingsUiContextChange,}) => {root.render(<AppI18nProvider><AppUiProvider><SettingUiupdatePublishSettings={updatePublishSettings}registerOnSettingsUiContextChange={registerOnSettingsUiContextChange}/></AppUiProvider></AppI18nProvider>,);},renderPreviewUi: (params) => {// Implement the UI for preview view},publishContent: async (params) => {// Implement the logic to publish the content},});
Step 6: Render preview UI
Displays a live app preview UI showing how the content will appear on your target platform.
The following are two examples for rendering previews:
- The first example is suitable for most preview types.
- The second example is specific to email previews, which have unique rendering requirements.
Rendering a preview for most preview types (for feed posts, video, documents, and so on)
import type { OutputType, PreviewMedia } from "@canva/intents/content";import { useEffect, useState } from "react";import * as styles from "./preview_ui.css";// Main preview UI component that receives preview updates when settings or pages change.// preview UI is more flexible to align with your platform's design system, so it is not constrained to the Canva design system.export const PreviewUi = ({invocationContext,registerOnPreviewChange,}: PreviewUiProps) => {const [previewData, setPreviewData] = useState<{previewMedia?: PreviewMedia[];outputType?: OutputType;publishRef?: string;} | null>(invocationContext? {previewMedia:(invocationContext?.previewMedia as PreviewMedia[]) || [],outputType:(invocationContext?.outputType as OutputType) || undefined,publishRef: invocationContext?.publishRef,}: null,);// Register to receive preview updates whenever settings or pages changeuseEffect(() => {const dispose = registerOnPreviewChange((data) => {setPreviewData(data);});return dispose;}, [registerOnPreviewChange]);const { previewMedia, publishRef, outputType } = previewData ?? {};const publishSettings = parsePublishSettings(publishRef);return (<div className={styles.container}>{outputType?.id === "post" && (<PostPreview previewMedia={previewMedia} settings={publishSettings} />)}</div>);};// Deserializes the publishRef string back into the PublishSettings objectconst parsePublishSettings = (publishRef?: string,): PublishSettings | undefined => {if (!publishRef) return undefined;try {return JSON.parse(publishRef) as PublishSettings;} catch {return undefined;}};// Renders a post preview that is specific to your platformexport const PostPreview = ({ previewMedia, settings }: {previewMedia: PreviewMedia[] | undefined;settings: PublishSettings | undefined;}) => {// Implement the logic to render the post preview};const root = createRoot(document.getElementById("root") as Element);prepareContentPublisher({getPublishConfiguration,// Render the settings UI where users configure publishing optionsrenderSettingsUi: ({updatePublishSettings,registerOnSettingsUiContextChange,}) => {root.render(<AppI18nProvider><AppUiProvider><SettingUiupdatePublishSettings={updatePublishSettings}registerOnSettingsUiContextChange={registerOnSettingsUiContextChange}/></AppUiProvider></AppI18nProvider>,);},// Render the preview UI showing how the content will appear after publishingrenderPreviewUi: ({ registerOnPreviewChange }) => {root.render(<AppI18nProvider><AppUiProvider><PreviewUi registerOnPreviewChange={registerOnPreviewChange} /></AppUiProvider></AppI18nProvider>,);},publishContent: async (params) => {// Implement the logic to publish the content},});
Rendering an email preview
Email previews are a bit different from the other preview types, because they are rendered as a single HTML file. For email previews, you must fetch the HTML file and render it in a HtmlPreview component.
import {Box,Text,Rows,Placeholder,HtmlPreview,} from "@canva/app-ui-kit";function getPreviewUrl(previewMedia: PreviewMedia[] | undefined): string | undefined {if (!previewMedia) {return undefined;}if (previewMedia.length === 0) {return undefined;}return previewMedia[0].url;}// Custom component to render the preview of a URLconst UrlPreview = ({ url }: { url: string }) => {const [html, setHtml] = useState<string | null>(null);useEffect(() => {const fetchHtml = async () => {const response = await fetch(url);const html = await response.text();setHtml(html);};fetchHtml();}, [url]);if (!html) return (<Box><Text>Loading...</Text></Box>);return (// HtmlPreview is a component specifically for rendering HTML content<HtmlPreview html={html} />);};export const PreviewUi = ({ registerOnPreviewChange }: RenderPreviewUiRequest) => {const [previewData, setPreviewData] = useState<{previewMedia: PreviewMedia[];outputType: OutputType;publishRef?: string;} | null>(null);useEffect(() => {const dispose = registerOnPreviewChange((data) => {setPreviewData(data);});return dispose;}, [registerOnPreviewChange]);const { previewMedia } = previewData ?? {};const previewUrl = getPreviewUrl(previewMedia);return (<Boxdisplay="flex"flexDirection="column"width="full"height="content"><Box><Text>Preview</Text></Box><Box><Placeholder shape="rectangle" /></Box>{previewUrl && <UrlPreview url={previewUrl} />}</Box>);}
Step 7: Publish content
Use the publishContent method to publish the content to your platform, invoking your platform's APIs.
The publishContent method is called when the user clicks the publish button.
async function publishContent(params: PublishContentRequest): Promise<PublishContentResponse> {// Replace this with your actual API integration// Example: Upload media to your platform and create a post// const uploadedMedia = await uploadToYourPlatform(params.outputMedia);// const post = await createPostOnYourPlatform({// media: uploadedMedia,// caption: JSON.parse(params.publishRef).caption// });return {status: "completed",externalId: "1234567890", // Your platform's unique identifier for this postexternalUrl: "https://example.com/posts/1234567890", // Link to view the published content};}const root = createRoot(document.getElementById("root") as Element);prepareContentPublisher({getPublishConfiguration,// Render the settings UI where users configure publishing optionsrenderSettingsUi: ({updatePublishSettings,registerOnSettingsUiContextChange,}) => {root.render(<AppI18nProvider><AppUiProvider><SettingUiupdatePublishSettings={updatePublishSettings}registerOnSettingsUiContextChange={registerOnSettingsUiContextChange}/></AppUiProvider></AppI18nProvider>,);},// Render the preview UI showing how the content will appear after publishingrenderPreviewUi: ({ registerOnPreviewChange }) => {root.render(<AppI18nProvider><AppUiProvider><PreviewUi registerOnPreviewChange={registerOnPreviewChange} /></AppUiProvider></AppI18nProvider>,);},publishContent,});
Initiating OAuth inside intents
If your app requires OAuth with a third-party identity provider, initiate the OAuth flow from inside the intent action that requires authentication.
For implementation guidance, see Initiating OAuth inside intents.
Deferred authentication
Apps using the Content Publisher intent should implement deferred authentication. This allows users to enter publish settings and preview their content before authenticating, letting them evaluate the publishing experience before committing to connect their account.
When users haven't authenticated with your platform, display a login prompt in the settings UI and set the validityState to invalid_authentication_required. This hides the publish button until the user connects their account.
To handle the deferred authentication flow:
- Check for a valid access token when the settings UI loads.
- If no token exists, display a login button and set
validityStatetoinvalid_authentication_required. - After successful authentication, update the
validityStatetovalid(orinvalid_missing_required_fieldsif required fields are empty).
import { auth } from "@canva/user";const scope = new Set(["offline_access"]);export const SettingUi = ({updatePublishSettings}: RenderSettingsUiRequest) => {const [settings, setSettings] = useState<PublishSettings>({ caption: "" });const [isAuthenticated, setIsAuthenticated] = useState(false);const [isLoading, setIsLoading] = useState(true);const oauth = auth.initOauth();// Check for existing authentication on mountuseEffect(() => {const checkAuth = async () => {try {const tokenResponse = await oauth.getAccessToken({ scope });setIsAuthenticated(tokenResponse != null);} finally {setIsLoading(false);}};checkAuth();}, []);// Update publish settings whenever authentication or settings changeuseEffect(() => {updatePublishSettings({publishRef: JSON.stringify(settings),validityState: !isAuthenticated? "invalid_authentication_required": !isValid(settings)? "invalid_missing_required_fields": "valid",});}, [settings, isAuthenticated, updatePublishSettings]);const handleLogin = async () => {const response = await oauth.requestAuthorization({ scope });if (response.status === "completed") {const tokenResponse = await oauth.getAccessToken({ scope });setIsAuthenticated(tokenResponse != null);}};if (isLoading) {return <Text>Loading...</Text>;}return (<div className={styles.scrollContainer}>{/* Fields users can fill before authenticating */}<SettingsFields settings={settings} onChange={setSettings} />{!isAuthenticated ? (<ConnectButton onClick={handleLogin} />) : (/* Additional fields only available after authentication */<AuthenticatedFields settings={settings} onChange={setSettings} />)}</div>);};
Error handling
Errors can occur inside publishContent for many reasons. The publishContent method can return an AppError, which provides several options for handling errors and improving the user experience.
Returning an AppError displays a generic error message above the publish button. This approach suits unrecoverable or unexpected errors.
For recoverable errors, you can improve the user experience by returning custom error messages or providing custom UI treatment in your settings panel.
Return a custom error message
Custom error messages help users recover from known errors. For example, you might display "All images must have the same aspect ratio" when a user selects incompatible media.
To return a custom error message:
- Define localized messages using the
defineMessagesAPI. - Upload your messages bundle to the Developer Portal.
- Return the
localizedMessageIdin yourAppErrorresponse.
Define localized messages
Create a messages file with your error definitions. For example:
// error.messages.tsimport { defineMessages } from "react-intl";export const ErrorMessages = defineMessages({aspect_ratio_mismatch: {id: "aspect_ratio_mismatch",defaultMessage: "All media should have the same aspect ratio",description: "An error message displayed when images have mismatched aspect ratios",},missing_scopes: {id: "missing_scopes",defaultMessage: "Additional permissions required",description: "An error message displayed when the user needs to re-authenticate",},});
Return the localized error
After uploading your messages bundle, return the error with these properties:
localizedMessageId: The message ID fromdefineMessages, which must exist in your uploaded bundle.errorCause(optional): Indicates if the error relates to a specific Canva field, allowing the UI to emphasize that field. Valid values areinvalid_selectionandinvalid_format.
import { ErrorMessages } from "./error.messages";async function publishContent() {// ...if (!allImagesHaveSameAspectRatio) {return {status: "app_error",message: "Image found with different aspect ratio",localizedMessageId: ErrorMessages.aspect_ratio_mismatch.id,errorCause: "invalid_selection",};}}
Provide custom settings UI treatment
For recoverable errors where users need additional context or instructions, you can send a custom payload to your settings UI and render specialized error handling components.
When you return an AppError, a signal is sent to the settings UI through a SettingsUiContext payload. Use the appDefinedPayload property to include custom data.
Send a custom payload from publishContent
async function publishContent() {// ...if (isMissingScopes) {return {status: "app_error",message: error.message,appDefinedPayload: JSON.stringify({code: "missing_scopes",scopes: ["scope1", "scope2"],}),};}}
Handle the error in your settings UI
Use the registerOnContextChange callback to respond to error signals. Check
the ctx.reason property to determine whether an error has been raised or
cleared.
publish_error: An error has been raised frompublishContent.publish_error_cleared: A previous error has been cleared.
Errors are cleared when the user clicks the publish button again.
export const SettingUi = ({updatePublishSettings,registerOnContextChange,}: RenderSettingsUiRequest) => {const [errorPayload, setErrorPayload] = useState(undefined);useEffect(() => {return registerOnContextChange((ctx) => {if (ctx.reason === "publish_error") {setErrorPayload(JSON.parse(ctx.error.appDefinedPayload));}if (ctx.reason === "publish_error_cleared") {setErrorPayload(undefined);}});}, [registerOnContextChange]);if (errorPayload?.code === "missing_scopes") {return (<div><Text>You are missing the following scopes: {errorPayload.scopes.join(", ")}</Text><Button onClick={doReauth}>Authenticate</Button></div>);}return (<SettingsFieldssettings={settings}updatePublishSettings={updatePublishSettings}/>);};