Real Estate
Streamlining Real Estate content creation
Learn how to architect your Canva App to supercharge your real estate marketing content creation.

In today’s fast-moving real estate market, marketing is constant, high-volume, and essential. Every property—past, present, and future—needs its own set of branded assets: flyers, brochures, social posts, signage, and more. Canva has become a go-to tool for agents, brokers, and marketing teams to create these assets quickly and beautifully.
If you’re in the real estate tech space, building a Canva App can offer a serious competitive advantage, with teams at eXp, Cloze, and Ray White already seeing huge benefits for their teams. Whether you're managing a brokerage platform, CRM, or listing syndication service, integrating directly with Canva lets your users seamlessly access listing assets inside the Canva editor—boosting productivity and brand consistency.
Here’s why and how to do it.
Why Real Estate Professionals Use Canva (And Why You Should Integrate With It)
Real estate teams rely on Canva for:
- High-frequency marketing: Each listing needs multiple creative assets.
- Design flexibility: Templates, branding kits, and team collaboration tools.
- Device flexibility: Mobile-first agents and desktop-based marketers both benefit.
Many companies—large and small—have already built public or private Canva apps to streamline real estate marketing workflows. These apps connect property databases, image libraries, and listing metadata directly into Canva. The result? Less time copy/pasting, more time selling.
Common Use Case: You Need an App That...
Most teams end up needing an integration that:
- Pulls listing data (photos, text, metadata) from their system
- Supports listings across all statuses (live, pending, sold, etc.)
- Organizes content in a structured, browsable format
- Works well on both mobile and desktop
- Allows users to drag images and text into designs
- Optionally, exports finished designs back to their source system
We know many teams end up printing their designs. At the time of publication of this guide, exporting as Print Quality PDF isn't currently supported using the API. If your team needs to print these created resources, it would be best to manually download instead of programatic API export.
Let’s walk through the architecture and some practical implementation tips.
Step 1: Connect to Your Source System
While many Canva apps avoid a login-first flow, real estate integrations are an exception. Users need access to their own listings, which usually requires authentication. Many real estate companies also choose to make their Apps team restricted. Since these apps are specific to the team, the advertising in the Apps Marketplace may not be necessary. For the team restricted real estate app to work best, make sure the organization is all in one Canva Team or Enterprise account.
We recommend using OAuth 2.0 for secure, token-based auth. We’ve created functions to help manage access and token refresh. Remember to register your app on your 3rd party service.
When building out the Auth flow, we know most development teams build it once and then never touch it again. To make it easier to build our auth, we have created auth patterns and samples to simply the UX and token exchange. Check out our sample auth flow(opens in a new tab or window) on GitHub.
To get started with Auth, simply import the auth resource from the Canva User API:
import { auth } from "@canva/user”
Step 2: Your backend code for your Canva app
When building Canva apps, Canva hosts the frontend/UI of the app in the editor, so any backend services you need will have to be self hosted. You can use any cloud provider or hosting service. Canva frontends use browser fetch to communicate with their backends, so just make sure your backend architecture supports fetch calls.
Many teams handle OAuth in the backend. This adds an additional layer of security, as the browser can always be inspected to find keys or tokens. We have found most teams backends typically consists of an authorization layer, that connects the frontend to the MLS datasource.
After gaining authorization to the MLS datasource, your app will need to pull in the actually listing data. Some data manipulation may also be needed, as listing information can come in different formatting. Also consider any potential sorting, filtering, or paging you may want to do.
Step 3: Organize Listing Resources
Once your user have access to your listing data, it’s time to access those resources in an organized way. Keep in mind real estate assets work best when visually and contextually grouped. One common pattern we see among our real estate apps is organizing listings this way:
- Tabs = Listing status
- Active, Pending, In Escrow, Sold, For Rent, Rented, etc
- Top-level folders = Properties
- Inside folders = Photos and Text Content
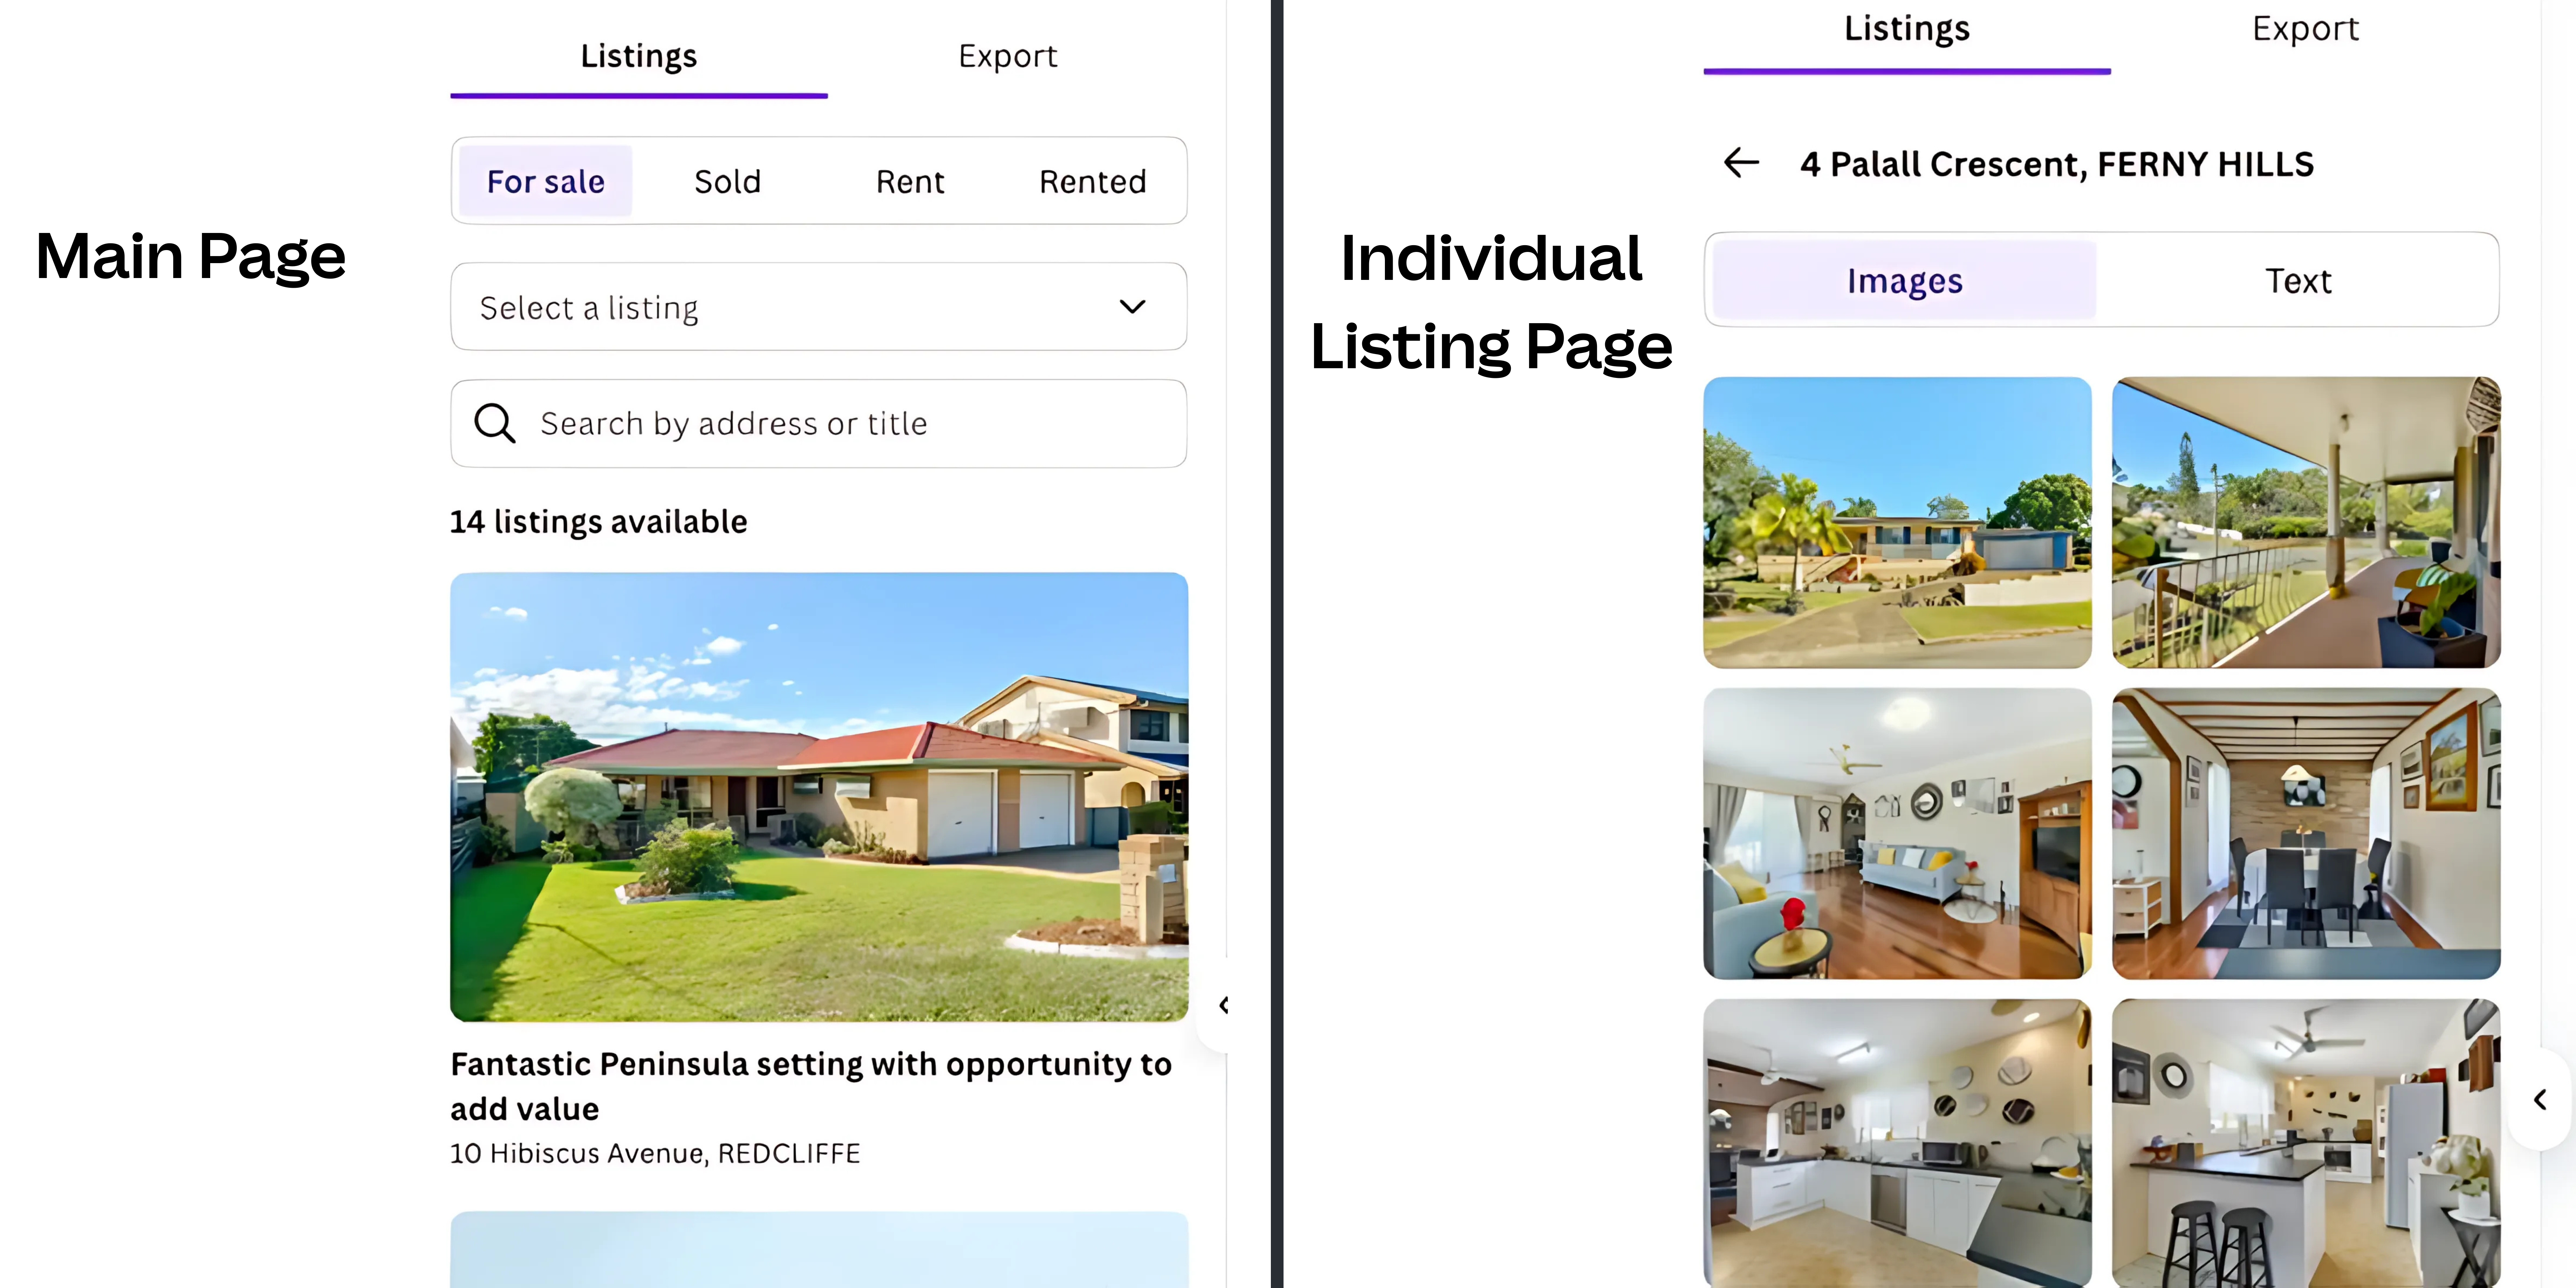
We’ve created a pattern called SearchableListView that supports this general structure. SearchableListView lets you to define a layout, which it would be best to use List or Full Width for the real estate listing use case. This makes sure that properties are quickly browsable by agents. It’s supports a tabbed structure to quickly layout the top filter your team may use. To enable tabs, use the containerTypes config, and specify an array similar to below. See all the configs in the documentation(opens in a new tab or window).
[{"value": "collection","label": "Collections","listingSurfaces": ...},{"value": "section","label": "Sections","listingSurfaces": ...},{"value": "folder","label": "Folders","listingSurfaces": ...,"icon": "folder"}]
You can also provide filtering and sorting options, which are fully customizable to match your teams need.
When laying out properties, we would recommend keeping a folder like experience with an optional hero image and clear text for the property, most likely it’s address. You can use components like our image cards(opens in a new tab or window) or horizontal cards(opens in a new tab or window). Make sure to use the rows(opens in a new tab or window) layout component to keep the look and feel clean.
Step 4: Keep the metadata clean
Each property will have both text and image assets. Your user’s properties may also have videos. When an agent clicks into a singular listing, they will need to be able to locate assets quickly and efficiently. Organizing them by type, text or image, the agents will be able to quickly get to the metadata they need.
When building out the individual listing pages, you can also use tabs(opens in a new tab or window) to make it easy to switch between the types of assets. Tabs are also flexible, so if you need an optional 3rd tab for videos on some listings, it’s easy to include more in the list.
For the assets within the tabs, your users may be on desktop or mobile, so make sure to support both drag and click actions. To support both onDragStart and onClick functions, we’ve created some helpful components:
For the image layout, image cards can be used in a masonry layout. Masonry(opens in a new tab or window) is the best way to optimize screen layout utilization and is responsive to screen and editor size. There’s a great example(opens in a new tab or window) of the masonry component in our GitHub sample code library.
<ImageCardonClick={() => {}}onDragStart={() => {}}thumbnailUrl=”ADD YOUR URL HERE”/>
<TypographyCardonClick={() => {}}onDragStart={() => {}}><Text> ADD YOUR TEXT HERE </Text></TypographyCard>
Step 5: Exporting Designs Back to Your System (if needed)
Want to close the loop? You can include an export capability so that users can save their finished Canva designs (e.g., brochures or social posts) back to your platform or listing CMS. The Canva design API lets you to request design exports as common file types like PNG, PDF, video, and PPTX. Once an export is complete, you will receive an export blob. Make sure your source system can accept the exported blob. As a reminder, this API at time of publishing this guide doesn't support exporting as print quality PDF, so if these resources will be printed, it is best to manually export.
To get started with exporting, import the requestExport resource from the design API.
import { requestExport } from "@canva/design";
There’s sample code(opens in a new tab or window) available on GitHub.
Templates and Sample Code
Much of this logic is already encapsulated in our Digital Assets Management template and accessible in the Canva CLI. You’ll find:
- Auth flow examples
- Container and card layouts
- Tabbed views and filters
- Drag-and-drop image and text components
Try out using the DAM template to help you get started. You can quickly spin up the DAM example directly from your command line tool of choice. Make sure you have node and npm installed and run this command to install our CLI.
npm install -g @canva/cli@latest
Once the CLI is installed, you can run the create command to generate all the code needed for the DAM template.
canva apps create --template "dam"
And as always you can find more sample code in our GitHub repo(opens in a new tab or window). Each new API we release always comes accompanied by sample code, as well as some of our more complex UI patterns.
Closing out
For real estate tech platforms, Canva integration isn’t just a nice-to-have—it’s a productivity unlock for agents and teams under constant marketing pressure. By meeting your users where they already work (Canva), and feeding them the assets they already own (listings), you reduce friction and boost results.
Ready to build your Canva app? Talk with your team about their requirements first. And then explore all the tools we have like the CLI and templates, and use this guide to structure your integration with some of Canva’s best practices.